Getting started with iOS
This getting started with iOS guide is a tutorial that helps you understand how to set up Buildkite macOS hosted agents to run a Buildkite pipeline that creates a basic iOS app for deployment.
Before you start
To complete this tutorial, you'll need to have done the following:
Run through the Getting started with Pipelines tutorial, to familiarize yourself with the basics of Buildkite Pipelines.
Make your own copy or fork of the FlappyKite repository within your own GitHub account.
Set up your hosted agent
You can use macOS hosted agents to build iOS apps, which you can get up and running by following the procedure in this section.
If you already have a Buildkite hosted queue for macOS hosted agents, skip to the next step on creating a pipeline.
You can create the first Buildkite hosted agent for macOS within a Buildkite organization for a two-week free trial, after which a usage cost (based on the agent's capacity) is charged per minute.
To create your macOS hosted agent:
-
Follow the Create a Buildkite hosted queue > Using the Buildkite interface instructions to begin creating your hosted agent within its own queue.
As part of this process:
- Give this queue an intuitive key and description, for example, macos and Buildkite macOS hosted queue, respectively.
- In the Select your agent infrastructure section, select Hosted.
- Select macOS as the Machine type and Medium for the Capacity.
-
Make your pipelines use your new macOS hosted agent by default, by ensuring its queue is the default queue. This should be indicated by (default) after the queue's key on the cluster's Queues page. If this is not the case and another queue is marked (default):
- On the cluster's Queues page, select the queue with the hosted agent you just created.
- On the queue's Overview page, select the Settings tab to open this page.
- In the Queue Management section, select Set as Default Queue.
Your Buildkite macOS hosted agent, as the new default queue, is now ready to use.
Create a pipeline
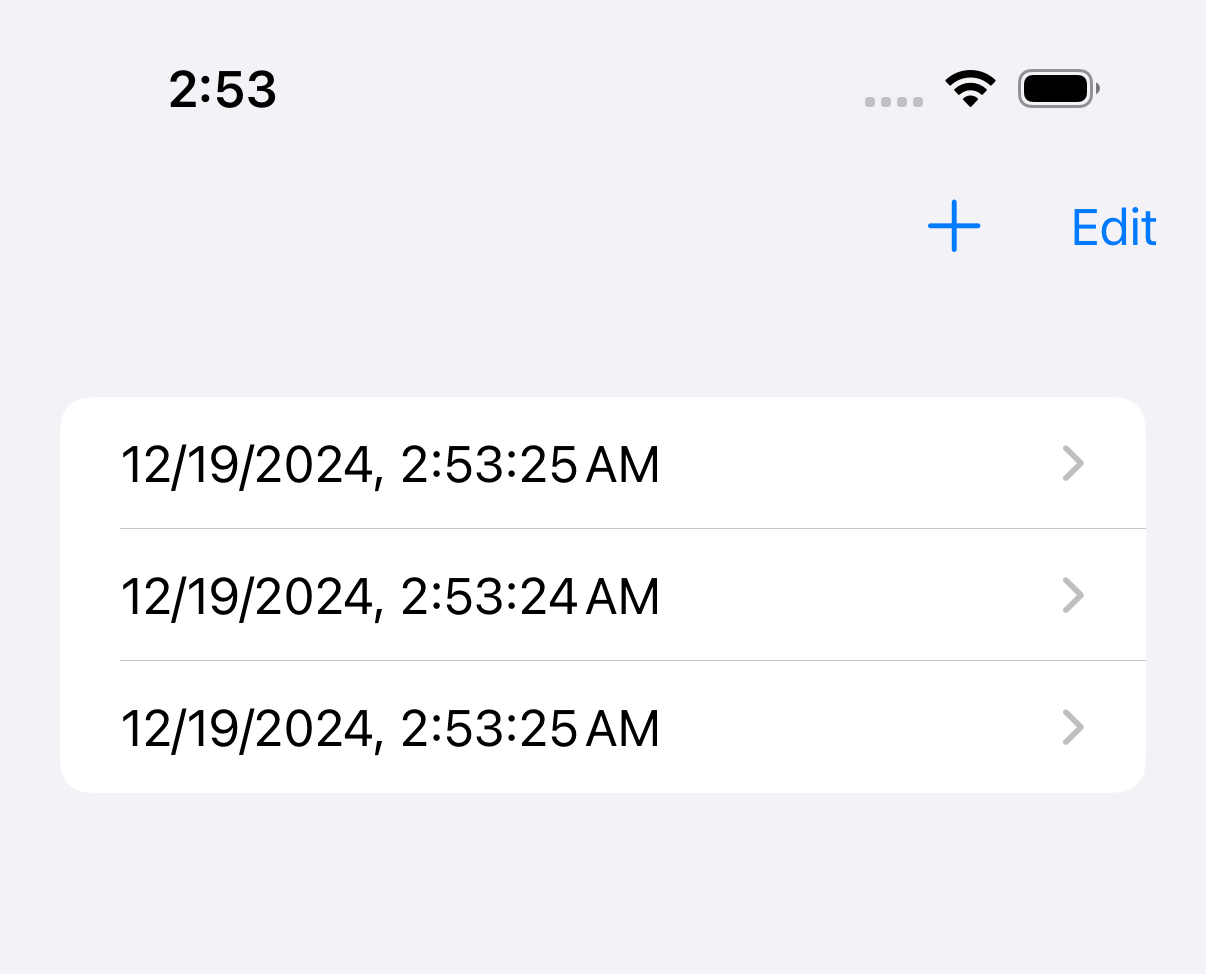
Next, you'll create a new pipeline to build the example FlappyKite Swift application (app). This simple example of a mobile app starts with an initial blank screen, and a plus (+) button at its top. Each time you tap this button, a new timestamp is generated successively down the screen.
The source code for this app contains the Buildkite pipeline in its .buildkite folder. This pipeline:
- Runs two iOS emulators (one each for the iPhone 16 and 16 Pro models) to test the app, which in turn, takes screenshots of the app after the + button is tapped a few times as part of a UI test.
- Leverages fastlane to automate deployments and releases. Learn more about fastlane from the fastlane documentation.
To create the new Buildkite pipeline for this app:
Add a new pipeline in your Buildkite organization, select your GitHub account from the Any account dropdown, and specify your copy or fork of the 'FlappyKite' repository for the Git Repository value.
On the New Pipeline page, select the cluster you created the hosted agent for macOS in.
If necessary, provide a Name for your new pipeline.
Select the Cluster of the agent you had previously set up.
If your Buildkite organization already has the teams feature enabled, choose the Team who will have access to this pipeline.
Leave all other fields with their pre-filled default values, and select Create Pipeline. This associates the example repository with your new pipeline, and adds a step to upload the full pipeline definition from the repository.
-
On the next page showing your pipeline name, select New Build. In the resulting dialog, create a build using the pre-filled details.
- In the Message field, enter a short description for the build. For example, My first build.
- Select Create Build.
After a few minutes, and when the pipeline has completed its build, expand the screenshots job.
Select the Artifacts tab to reveal the two screenshots taken (one from each iOS emulator) after the UI tests 'tap' the + button three times.
Select each screenshot to view the results, such as the following from the main screen of the app run by the pipeline in an iPhone 16 Pro emulator.
Next steps
That's it! You've successfully configured a Buildkite hosted macOS agent, built an iOS app, and checked its functionality using emulators run by the build. 🎉
Learn more about how to deploy apps like FlappyKite to the iOS App Store, which you can integrate into your pipeline builds, from the following resources:
- The fastlane documentation on iOS App Store deployment, as well as fastlane's Code Signing Guide Guide, and Buildkite's own fastlane troubleshooting guide.
- The Submit your iOS apps to the App Store page of the Apple Developer site.