
GitHub
Buildkite can connect to a GitHub repository in your GitHub account or GitHub organization and use GitHub's REST API endpoints for commit statuses to update the status of commits in pull requests.
To complete this integration, you need admin privileges for your GitHub repository.
Accessing private repositories
Connecting GitHub to Buildkite configures webhooks and commit statuses. If you use the full-access GitHub App with Buildkite hosted agents, code access is included automatically. However, if you use self-hosted agents or the Limited Access GitHub App, you need to configure code access separately. The recommended approach is to store an SSH key as a Buildkite secret and reference it with checkout.ssh_secret in your pipeline YAML. Alternatively, self-hosted agents can use GitHub App installation access tokens. For all options, see Configuring access to private repositories.
Connecting Buildkite and GitHub
You can use the Buildkite app for GitHub to connect a Buildkite organization to a GitHub organization.
Benefits of using the GitHub App
Using the GitHub App removes the reliance on individual user connections to report build statuses. See the changelog announcement.
If you want to connect using OAuth, you can still do so from your Personal Settings.
GitHub repository provider options
When you connect Buildkite to GitHub through a GitHub App, the Repository Providers page in your Buildkite organization settings presents two options:
- GitHub — a Buildkite GitHub App with full access permissions. This app has read access to your repository code and metadata, plus read and write access to checks, commit statuses, deployments, pull requests, and repository hooks. Use this option if you run builds on Buildkite-hosted agents, because Buildkite needs code access to clone your repository.
- GitHub (Limited Access) — a limited-permissions Buildkite GitHub App. This app does not have code access, but has read access to metadata, plus read and write access to checks, commit statuses, deployments, pull requests, and repository hooks. Use this option if you run builds exclusively on self-hosted agents.
Permissions comparison
| Permission | GitHub | GitHub (Limited Access) | |||
|---|---|---|---|---|---|
| Permission | Code | GitHub | Read | GitHub (Limited Access) | No access |
| Permission | Metadata | GitHub | Read | GitHub (Limited Access) | Read |
| Permission | Checks | GitHub | Read and write | GitHub (Limited Access) | Read and write |
| Permission | Commit statuses | GitHub | Read and write | GitHub (Limited Access) | Read and write |
| Permission | Deployments | GitHub | Read and write | GitHub (Limited Access) | Read and write |
| Permission | Pull requests | GitHub | Read and write | GitHub (Limited Access) | Read and write |
| Permission | Repository hooks | GitHub | Read and write | GitHub (Limited Access) | Read and write |
Choosing the right option
Select the full-access GitHub app if you use Buildkite-hosted agents to run builds.
Select the GitHub (Limited Access) app if you run builds exclusively on self-hosted agents.
If you use both Buildkite-hosted and self-hosted agents, you can install both apps and scope each to the relevant repositories. Alternatively, you can install only the full access GitHub app, which works with both agent types.
Connect your Buildkite account to GitHub using the GitHub App
Connecting Buildkite and GitHub using the GitHub App lets your GitHub organization admins see permissions and manage access on a per-repository basis.
Required permissions for adding a provider
The user adding the provider needs to be a Buildkite user connected to a GitHub user who has administrative privileges on both Buildkite and the GitHub organizations.
- Open your Buildkite organization's Settings.
- Select Repository Providers.
- Select GitHub or GitHub (Limited Access) depending on your requirements. See GitHub repository provider options to determine which option is right for you.
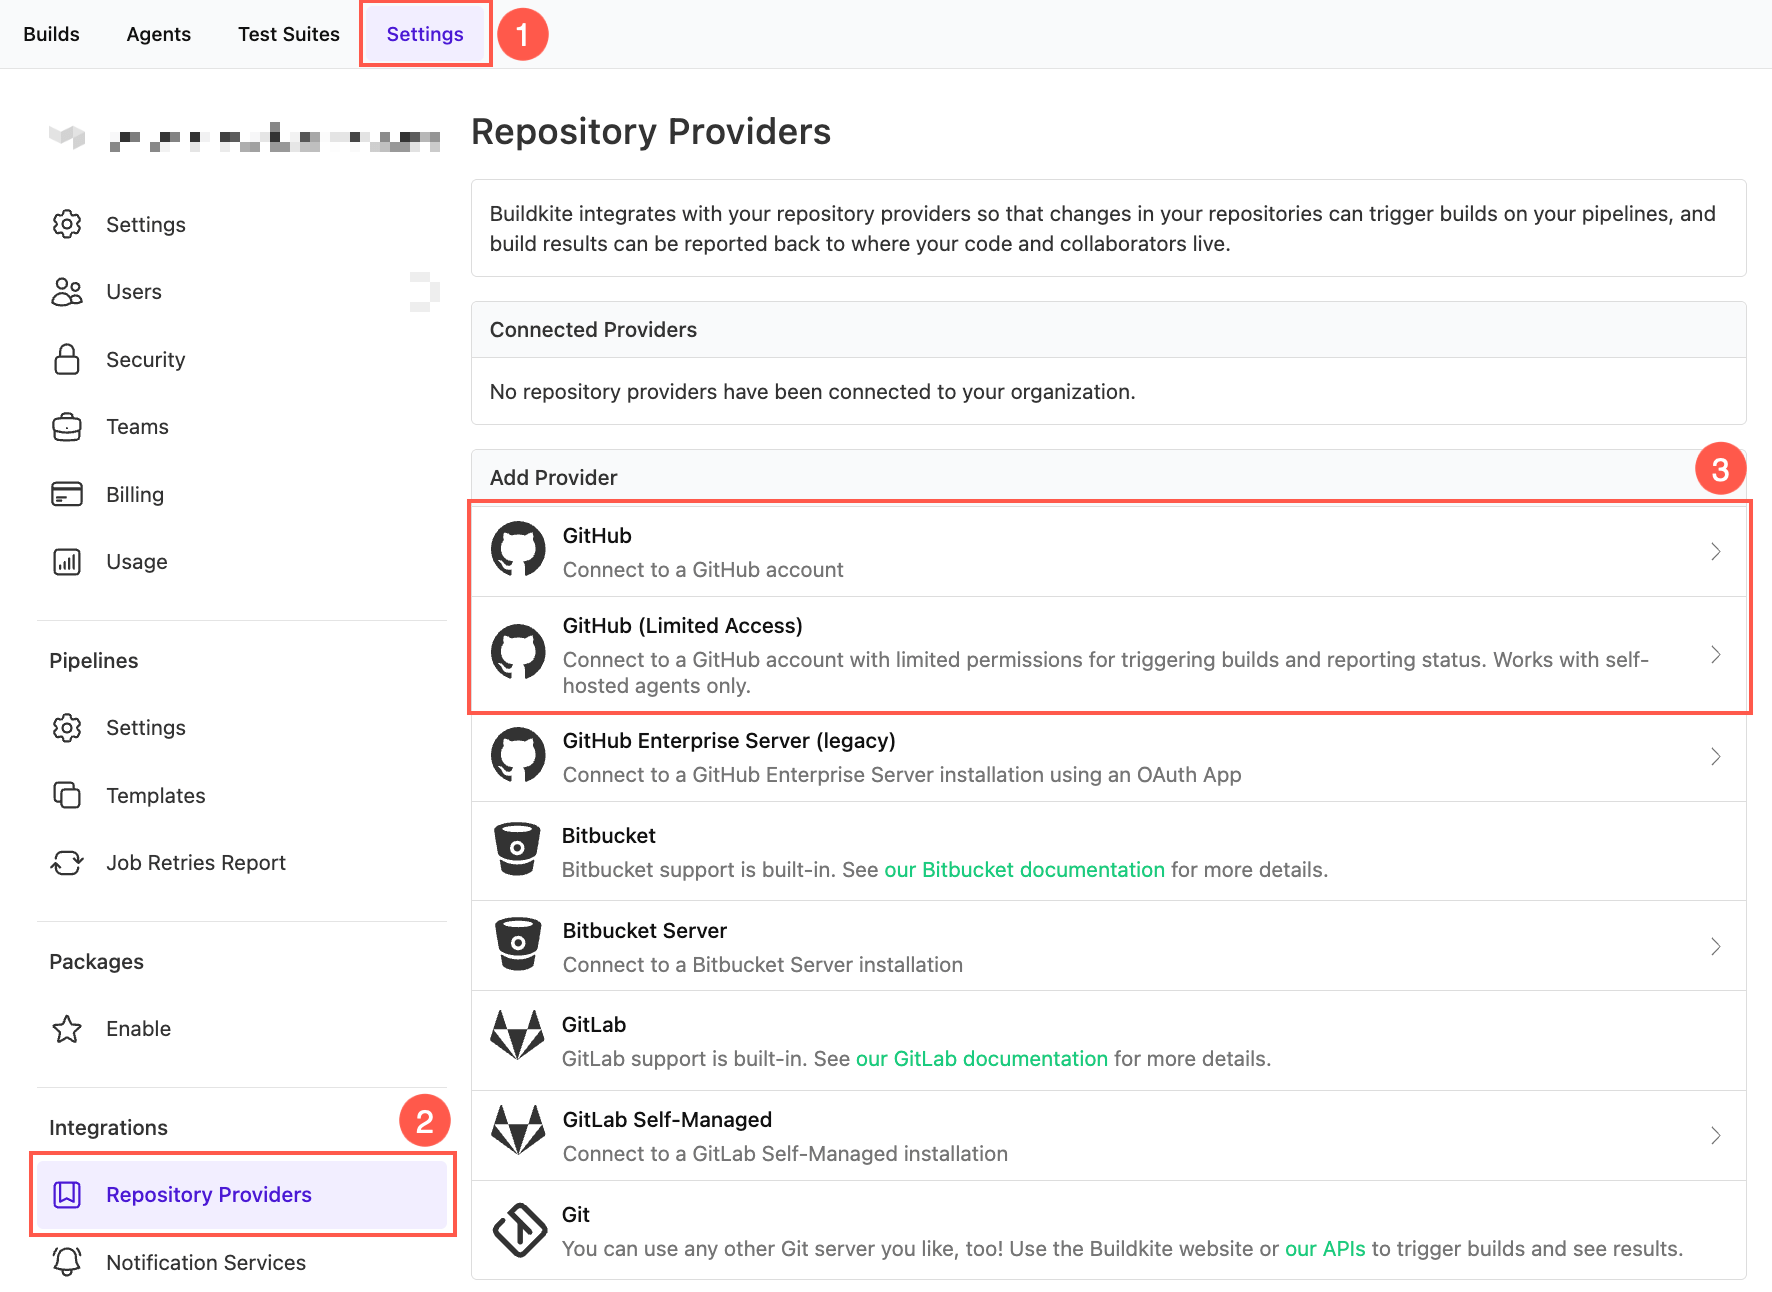
- Select Connect to a new GitHub Account. If you have never connected your Buildkite and GitHub accounts before, you will first need to select Connect and authorize Buildkite.
- Select the GitHub organization you want to connect to your Buildkite organization.
- Choose which repositories Buildkite should have access to, then select Install.
You can now set up a pipeline.
Buildkite GitHub permissions
The permissions Buildkite requests depend on which GitHub repository provider option you select. Both options require the following permissions:
Read access to metadata. Learn more about this from GitHub's documentation.
Read and write access to checks, commit statuses, deployments, pull requests, and repository hooks: this is needed for Buildkite to perform tasks such as running a build on pull requests and reporting that build status directly on the PR on GitHub.
The GitHub (full access) option additionally requests read access to code, which allows Buildkite-hosted agents to clone your repository. The GitHub (Limited Access) option does not request code access.
Set up a new pipeline for a GitHub repository
To run GitHub Actions workflows, use the recommended GitHub Actions pipeline setup. It creates a GitHub Actions pipeline trigger with its own signed repository webhook and skips the traditional webhook setup below.
For a native Buildkite pipeline:
- Select Pipelines > New pipeline.
-
Enter your pipeline details, including your GitHub repository URL in the form
git@github.com:your/repo.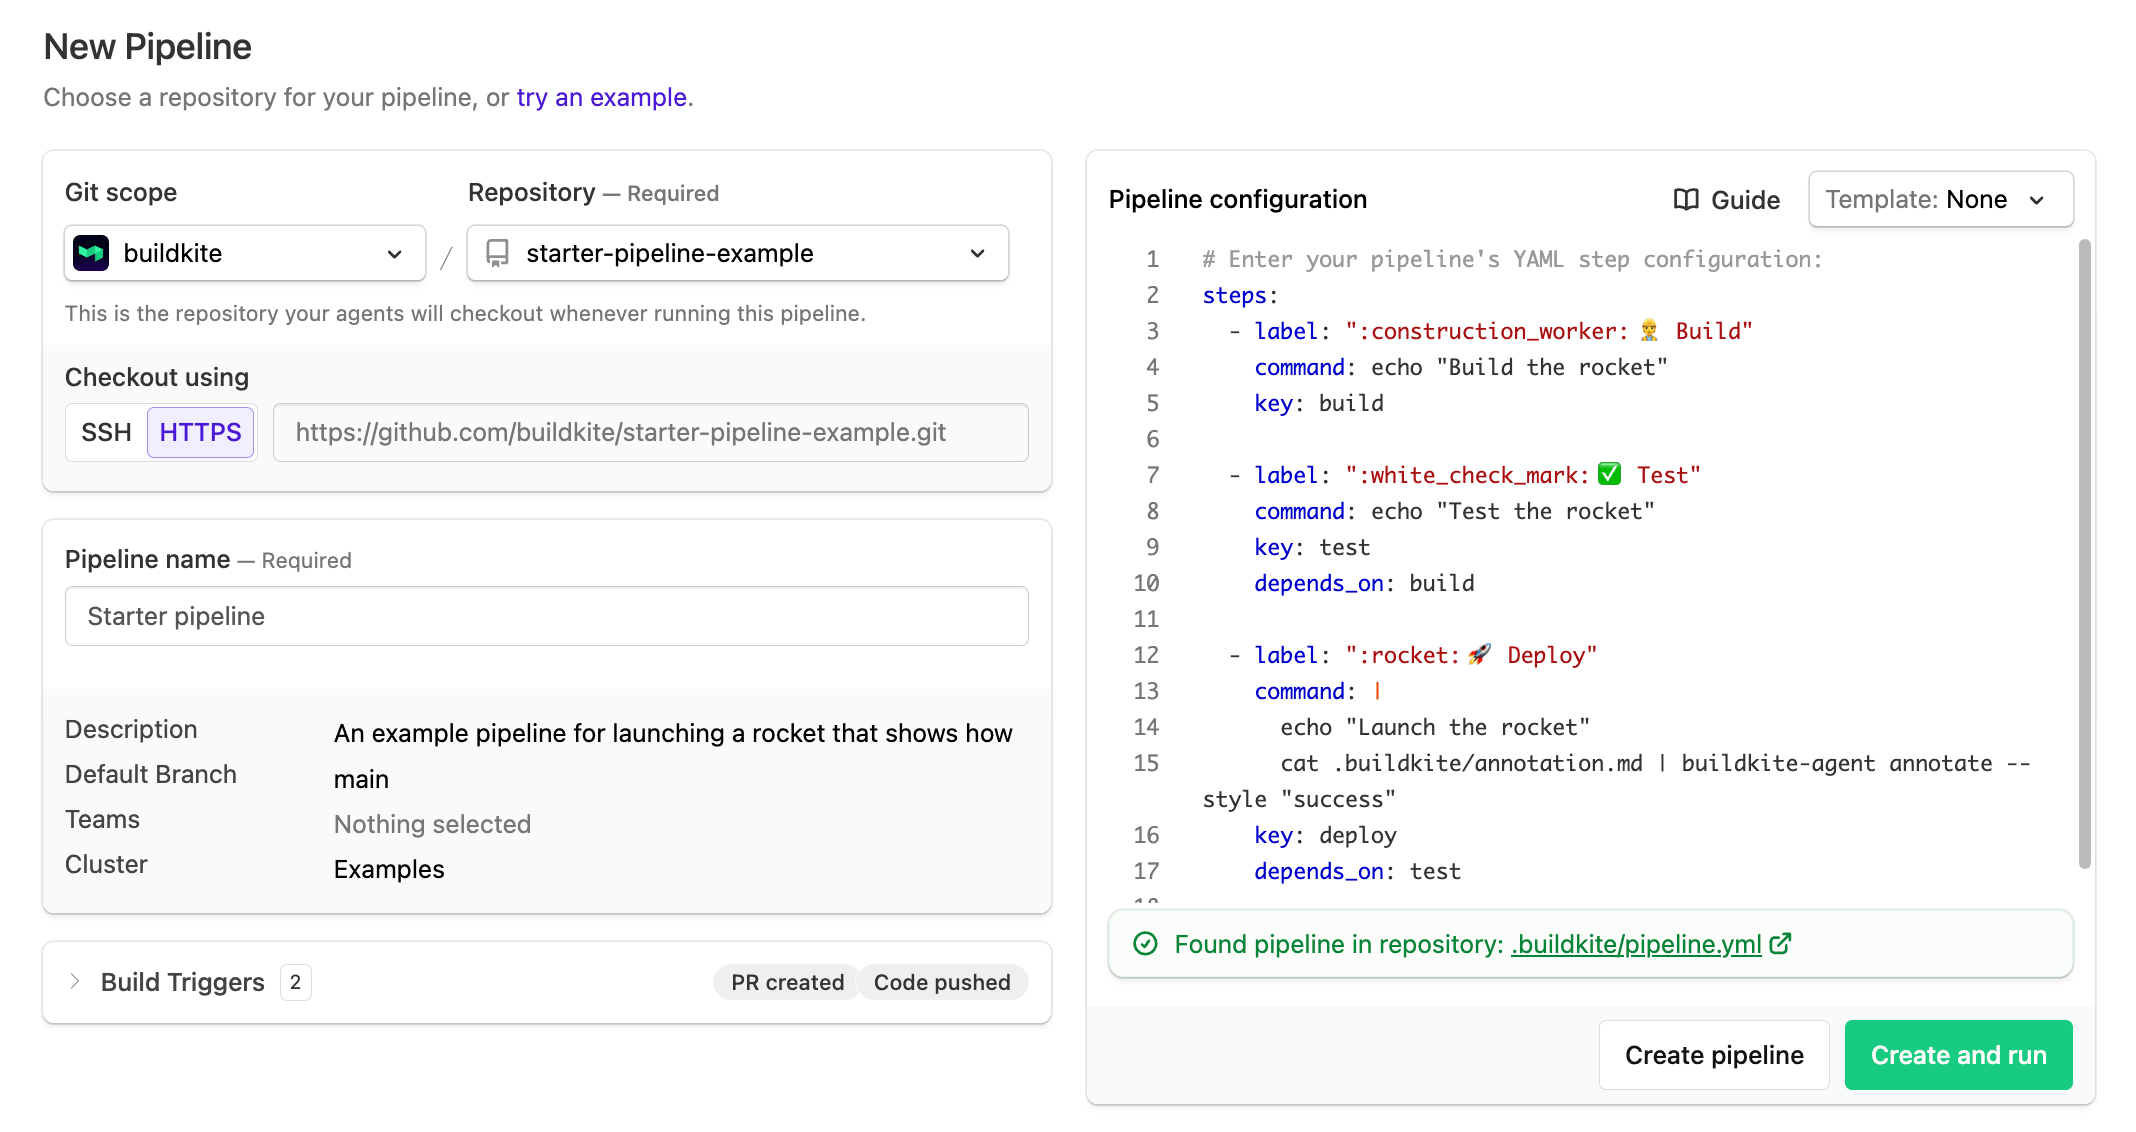
If you are still using the web steps visual editor, add at least one step to your pipeline. Refer to Defining Steps - Adding steps for more information.
Select Create Pipeline.
-
Follow the onscreen instructions to set up a webhook:
- Add a new webhook in GitHub.
- Paste in the provided webhook URL.
- Select
application/jsonas the content type of the webhook. - Select Deployments, Merge groups, Pull requests, and Pushes as events to trigger the webhook.
The repository webhook is required so that the Buildkite GitHub app does not need read access to your repository.
If using the YAML steps editor, add at least one step to your pipeline, then select Save and Build. Refer to Defining Steps - Adding steps for more information.
If you need to set up the webhook again, you can find the instructions linked at the bottom of the pipeline GitHub settings page.
You can edit your pipeline configuration at any time in your pipeline's Settings.
Branch configuration and settings
You can edit the version control provider settings for each pipeline from the pipeline's settings page. Go to Pipelines > your specific pipeline > Settings > your Git service provider.
If you need more control over your pipeline configuration, add a pipeline.yml to your repository. Then you can use conditionals and branch filtering to configure your pipeline.
Pull request and merge request builds ignore branch filters
Branch filters (branch limiting) apply to branch builds only. Builds created for pull requests or merge requests ignore pipeline-level branch filters. Some source control providers support additional branch filtering for pull request builds. For more information, see Additional branch filtering for pull request builds.
Build branches vs build pull requests
If Build branches is enabled, Buildkite Pipelines runs builds on branch pushes, and those builds don't include pull request details. That's why pull request variables like BUILDKITE_PULL_REQUEST_BASE_BRANCH can be empty, even when the branch has an open pull request. If your pipeline needs pull request information, make sure Build when pull request is opened or updated is enabled. Consider turning off Build branches or limiting it to just your default branch (like main) so you don't end up with branch builds when you expect pull request builds.
Running builds on pull requests
To run builds for GitHub pull requests, edit the GitHub settings for your Buildkite pipeline and select Build when pull request is opened or updated.
Buildkite Pipelines creates a build directly from the opened action. When you push more commits to a pull request branch in your own repository, those commits create builds from the push event instead. Buildkite Pipelines adds the pull request details to those builds. The matching synchronize webhook delivery therefore doesn't create a build of its own, but it does refresh the pull request details (such as the base branch, labels, and draft state) that Buildkite Pipelines attaches to the push build.
Pull requests opened from third-party forks work differently because GitHub doesn't send your repository a push event for commits on a fork. For these pull requests, the synchronize action creates the build. Fork builds also require the Allow builds from third-party forked repositories option described below.
You can enable additional pull request actions to trigger builds:
- Build when pull request becomes ready for review: build when a draft pull request is marked ready for review
- Build when pull request is edited: build when the title, description, or base branch of a pull request is changed. Choose between Any edit (triggers on all edits) and Base branch changed only (triggers only when the base branch is changed).
-
Build when pull request labels are changed: build when labels are added to or removed from a pull request. Use the
build.pull_request.labelsconditional variable to filter by individual label names. - Build when pull request is reopened: build when a closed pull request is reopened
- Build when pull request is converted to draft: build when a pull request is converted to a draft
- Build when a review is requested: build when a review is requested on a pull request
- Build when pull request is removed from merge queue: build when a pull request is dequeued from a GitHub merge queue
You can also configure these Pull request webhook options (these options may also affect builds triggered by pull request reviews and comments):
- Allow builds from third-party forked repositories: allow builds to be created for pull requests opened from third-party forks. Make sure to check the managing secrets guide if you choose to do this.
- Limit pull request branches: filter which branches trigger pull request builds
- Skip when pull request has existing build for commit and branch: skip creating a duplicate build if one already exists for the same commit and branch. This option is enabled by default.
- Skip when pull request is closed or merged: skip creating a new build for a pull request that's closed or merged, useful for ignoring late activity from automated housekeeping (such as label changes from bots) on closed pull requests. This option is enabled by default.
- Skip when pull request source is default branch: skip pull request builds when the source branch is the default branch. This option is disabled by default.
- Cancel deleted branch builds: cancel running builds for a branch when the branch is deleted from GitHub
Even when Skip when pull request source is default branch is disabled, Buildkite Pipelines skips pull request builds whose source branch is the default branch if Build when pull request is opened or updated is also disabled.
If you want to control which third-party forks can trigger builds in GitHub, you can prefix the branches from third-party forks with the contributor's username. For example, the main branch from some-user becomes some-user:main. You can then detect these using a pre-command hook or something similar before running a build. To enable prefixing the branch names, go to the GitHub settings for the pipeline and select Prefix third-party fork branch names.
If you want to run builds only on pull requests, set the Branch Filter Pattern in the pipeline to a branch name that will never occur (such as "this-branch-will-never-occur"). Pull request builds ignore the Branch Filter Pattern, and all pushes to other branches that don't match the pattern are ignored.
When you create a pull request, two builds are triggered: one for the pull request and one for the most recent commit. However, any commit made after the pull request is created only triggers one build.
Rebuilding pull request builds
Rebuilding a pull request build replays the pull request data captured when the original build was created, including labels, draft state, base branch, and repository. A rebuild doesn't fetch the current pull request state from GitHub. If a label has been added or removed, or the pull request has been moved out of draft since the original build, the rebuild won't reflect those changes.
To run a build against the current pull request state, enable the relevant trigger from the pull request actions listed above. For example, Build when pull request labels are changed or Build when pull request becomes ready for review. Each trigger creates a new build from the webhook payload, so labels, draft state, and base branch reflect the pull request at the time of the event.
Building the test merge commit
By default, Buildkite Pipelines runs pull request builds against the head commit of the pull request branch (refs/pull/<N>/head). You can instead have the Buildkite agent check out the GitHub-computed test merge commit (refs/pull/<N>/merge), which represents the speculative result of merging the change into its base branch.
This is useful when you want builds to reflect the post-merge state of the code, rather than the pull request branch in isolation.
This feature is in private preview. Contact Buildkite support to have it enabled for your organization.
To use this feature, three things need to be in place:
- Your organization has the feature enabled by Buildkite support.
- In the pipeline's GitHub repository settings, Build the test merge commit is selected. This checkbox only appears once Buildkite support has enabled the feature for your organization.
- The Buildkite agents running the pipeline's jobs are v3.137.1 or newer.
You do not need to configure an agent-side setting. Once Build the test merge commit is selected, Buildkite Pipelines automatically sets the BUILDKITE_PULL_REQUEST_USING_MERGE_REFSPEC=true environment variable on every job in each new pull request build for the pipeline. The environment variable tells the agent to check out the merge refspec. Do not set it globally when starting agents. A global setting changes checkout behavior for pipelines that do not have the feature enabled.
The setting applies to all of the pipeline's new pull request builds, regardless of which queues their jobs target. Agents older than v3.105.0 ignore the environment variable and check out the pull request head commit instead. Agents from v3.105.0 through v3.137.0 check out the merge commit without validating that it includes the expected pull request head. Upgrade all agents that the pipeline's jobs can run on before selecting the checkbox.
With all three in place, pull request builds for that pipeline fetch and check out the GitHub-computed merge commit automatically. The build's reported commit in the Buildkite interface stays the pull request head commit, so GitHub commit statuses continue to attach to the right commit. The actual merge commit that was checked out is tracked separately on the build.
Jobs for these builds also receive a BUILDKITE_PULL_REQUEST_HEAD_COMMIT environment variable, set to the pull request head commit from the GitHub webhook payload. When checkout resolves the GitHub-computed merge ref (refs/pull/<N>/merge), the agent validates that the merge commit includes this expected head commit. If the merge ref lags behind the pull request after a force-push, the agent retries the checkout instead of testing stale code.
Note the following limitations:
- Buildkite recommends disabling Build branches on pipelines using this feature, to avoid mixed commit statuses on the same commit SHA.
-
refs/pull/<N>/mergeonly exists once GitHub has computed the merge. It is created asynchronously and does not exist for pull requests with merge conflicts. Builds for pull requests with merge conflicts fail at checkout. The build log identifies two possible causes: a merge conflict or GitHub being unable to create the merge ref automatically. The agent skips the fetch-specific retry loop for a missing merge ref, but the outer checkout retry loop still retries the entire checkout. - Builds that fire very quickly after a pull request is opened or synchronized may occasionally hit the same checkout failure if GitHub hasn't finished computing the merge ref yet. Retrying the build after a short delay usually resolves this.
Running builds for stacked pull requests
Buildkite Pipelines uses stack metadata from GitHub pull request webhooks to create builds and make stack details available to pipeline interpolation and step-level if conditions.
The Build when a pull request is added to a stack option in the pipeline's GitHub settings is disabled by default. Enable this option to create a build when GitHub sends a pull_request stacked event. When it is disabled, Buildkite still caches the stack metadata for subsequent builds.
GitHub does not include stack metadata in the initial pull_request opened event. Buildkite Pipelines processes that event as a normal pull request build without the stack variables. GitHub sends a later pull_request stacked event with the metadata.
When Build when a pull request is added to a stack is enabled, Skip when pull request has existing build for commit and branch is enabled by default. Buildkite Pipelines skips the later stacked event when the initial build has the same commit and branch. Clear this option to create a separate stack-aware build for the same commit.
Buildkite Pipelines caches the metadata from the stacked event and includes it in builds created by subsequent pushes to the pull request branch.
Use stack metadata in step conditions
The following variables are available in pipeline interpolation and step-level if conditions when GitHub provides stack metadata, but not at runtime or in pipeline-level build conditionals:
| Variable | Description | ||
|---|---|---|---|
| Variable | BUILDKITE_GITHUB_PULL_REQUEST_STACK_POSITION |
Description | The one-based position of the pull request in the stack |
| Variable | BUILDKITE_GITHUB_PULL_REQUEST_STACK_SIZE |
Description | The total number of pull requests in the stack |
| Variable | BUILDKITE_GITHUB_PULL_REQUEST_STACK_BASE_BRANCH |
Description | The base branch targeted by the entire stack |
The following pipeline runs the full test suite when stack metadata is not available, including for the initial opened build. For stack-aware builds, it runs the full test suite for the lowest open pull request and the top pull request. It runs a lighter test suite for pull requests between them:
steps:
  - label: "Full test suite"
    command: "scripts/run-full-tests"
    if: |
      build.env("BUILDKITE_GITHUB_PULL_REQUEST_STACK_POSITION") == null ||
      build.env("BUILDKITE_GITHUB_PULL_REQUEST_STACK_BASE_BRANCH") == build.pull_request.base_branch ||
      build.env("BUILDKITE_GITHUB_PULL_REQUEST_STACK_POSITION") == build.env("BUILDKITE_GITHUB_PULL_REQUEST_STACK_SIZE")
  - label: "Light test suite"
    command: "scripts/run-light-tests"
    if: |
      build.env("BUILDKITE_GITHUB_PULL_REQUEST_STACK_POSITION") != null &&
      build.env("BUILDKITE_GITHUB_PULL_REQUEST_STACK_BASE_BRANCH") != build.pull_request.base_branch &&
      build.env("BUILDKITE_GITHUB_PULL_REQUEST_STACK_POSITION") != build.env("BUILDKITE_GITHUB_PULL_REQUEST_STACK_SIZE")
For builds created from a GitHub pull_request event, use buildkite-agent meta-data get buildkite:webhook to retrieve the full webhook payload at runtime. The stack object is at .pull_request.stack. A subsequent push webhook does not contain this object.
Running builds on merge queues
To enable merge queue builds, edit the GitHub settings for the pipeline and select Build merge queues.
Ensure GitHub webhook has Merge groups events enabled
Buildkite relies on receiving merge_group webhook events from GitHub to create builds for merge groups in the merge queue. Ensure your pipeline's webhook has the Merge groups event enabled before enabling merge queue builds.
Enabling this will prevent ordinary code pushes to gh-readonly-queue/* branches from creating builds, instead builds will be created in response to merge_group webhook events from GitHub. Merge queue builds ignore any pipeline-level branch filter settings and do not support skipping using a commit message.
To cancel running builds when the corresponding GitHub merge queue entry is destroyed, select the Cancel builds for destroyed merge groups option. The way the agent handles the if_changed attribute during pipeline uploads can also be influenced using the Use base commit when making if_changed comparisons setting.
For more information about the interaction between GitHub merge queues and Buildkite, see our merge queue tutorial.
Disabling incoming GitHub webhook processing
To stop native GitHub webhook-triggered builds for a pipeline, use the Disable Incoming GitHub Webhook Processing button in the Disable Incoming Webhook Processing section of your pipeline's GitHub settings. This blocks the repository provider's webhook processing for this pipeline. It doesn't disable GitHub Actions pipeline triggers, which process deliveries separately.
Your existing trigger settings are preserved, and commit status settings remain configurable in the GitHub Commit Statuses section. To resume webhook-triggered builds, select Enable Incoming GitHub Webhook Processing. Your previous configuration will be restored.
Running builds on additional GitHub events
Beyond pushes, pull requests, and tags, Buildkite Pipelines can trigger builds from a broader set of GitHub webhook events. These are configured in the Additional Webhooks section of your pipeline's GitHub settings and require the Code trigger mode (except where noted).
-
Pull request reviews: trigger builds when a review is submitted or dismissed.
BUILDKITE_BUILD_AUTHORidentifies the author of the pull request's head commit when cached or persisted commit context is available. Otherwise, it identifies the webhook sender. With strict creator semantics,BUILDKITE_BUILD_CREATORidentifies the webhook sender when their GitHub identity is linked to a Buildkite user with access to the organization. It is empty when no eligible linked Buildkite user exists. Without strict creator semantics, a linked commit author takes precedence over a linked webhook sender. If neither identity is linked,BUILDKITE_BUILD_CREATORcan fall back to commit-author or webhook-sender information. For dismissed reviews, the webhook sender can be the user who dismissed the review rather than the original reviewer. - Check runs: trigger builds when a check run from another GitHub App completes. Check runs from Buildkite Pipelines are automatically skipped to prevent feedback loops.
- Releases: trigger builds when a GitHub release is published, created, or released.
-
Issue comments: trigger builds from comments on pull requests. Comments must match a configurable command word (default:
/bk) and come from a trusted author. A commenter is trusted if GitHub reports their association as owner, member, or collaborator. They are also trusted if their GitHub account is linked to a Buildkite user who has build permission on the pipeline. Supportsexact(default) andcontainsmatch modes. -
Pull request review comments: trigger builds from inline diff comments on pull requests. Like issue comments, requires a command word match and a trusted author. A commenter is trusted if GitHub reports their association as owner, member, or collaborator. They are also trusted if their GitHub account is linked to a Buildkite user who has build permission on the pipeline. Supports
exactandcontainsmatch modes (useful for AI assistant triggers like@claude). - Deployment statuses: trigger builds when a deployment status changes. Requires the Deployment trigger mode.
- Branch and tag creation: trigger builds when a new branch or tag is created.
- Issue activity: trigger builds from GitHub issue activity, such as an issue being opened, edited, labeled, or closed. See Running builds on issue activity for requirements and limitations.
Configure the GitHub webhook for issue comments
To trigger builds from pull request comments, configure the repository webhook in GitHub to send both Issue comments and Pull requests events. Buildkite Pipelines uses the pull_request event to identify the pull request branch and commit when processing a later issue_comment event.You don't need to enable Build when pull request is opened or updated in Pipeline Settings. Buildkite Pipelines records the pull request information when it receives the webhook, even when pull request builds are disabled.GitHub does not send pull_request events retroactively when you update a webhook. After enabling Pull requests, open a new pull request or push a commit to an existing pull request before using the issue comment command word.
Running builds on issue activity
Running builds on issue activity is in private preview. Contact Buildkite support to have it enabled for your organization.
To enable issue activity builds, select Pipelines > your pipeline > Settings > GitHub. In Additional Webhooks, expand Issue activity, then select Build on GitHub issue activity. This option is only available for GitHub.com pipelines that use the full-access GitHub App. It isn't available for GitHub Enterprise Server pipelines.
Buildkite Pipelines supports every GitHub issues webhook activity type:
-
Assignment:
assignedandunassigned -
Classification:
typed,untyped,labeled,unlabeled,milestoned,demilestoned,field_added, andfield_removed -
Content:
opened,edited,deleted, andtransferred -
State:
closed,reopened,locked,unlocked,pinned, andunpinned
The setting enables all activity types and has no per-action selector. To limit which issue events create builds, use Filter builds using a conditional in the pipeline's GitHub settings with build.source_event and build.source_action. For example, build.source_event == "issues" && build.source_action == "opened" creates a build only when an issue is opened. The pipeline's branch configuration also applies to the repository's default branch, so a configuration that excludes the default branch prevents issue builds.
Unlike issue comments, issue builds don't require a trusted author. Any GitHub user, including public issue authors outside your organization, can trigger a build by interacting with an issue. Buildkite platform quota controls still apply. Configure steps that process issue content as untrusted input.
Every issue build runs the repository's default branch at the exact commit that Buildkite Pipelines resolves when it processes the webhook delivery. This differs from the commit checked out for a pull request or push build. Code triggered by a public author always comes from your trusted default branch rather than from the issue itself. Rebuilds and builds created from trigger steps preserve the original event and commit provenance instead of resolving the default branch again.
Issue builds can request normal workflow permissions
Builds triggered by issue activity aren't pull request builds, so they aren't limited to the read-only permission ceiling applied to pull request workflow access tokens. These builds can request the same workflow access token permissions, including write permissions, as other trusted branch builds. Only enable this event for pipelines whose default branch code is safe to run with those permissions.
GitHub still delivers issue events created with a Buildkite-minted GITHUB_TOKEN. Buildkite Pipelines recognizes the Code Access App bot and skips the corresponding builds to prevent feedback loops. Third-party automation, bots, and other integrations aren't suppressed. They can still repeatedly trigger an opted-in issue workflow, for example, by editing the same issue. Review your workflow's triggers and permissions before opting in.
Environment variables
GitHub webhook-triggered builds expose environment variables for pipeline interpolation and step-level if conditions. Some are also available at runtime in build scripts and hooks.
Also available at runtime:
-
BUILDKITE_GITHUB_COMMENT_ID: the comment that triggered the build (issue comments and review comments) -
BUILDKITE_GITHUB_REVIEW_ID: the review that triggered the build (pull request reviews) -
BUILDKITE_GITHUB_EVENT: the GitHub webhook event name (for example,pull_request,check_run,release) -
BUILDKITE_GITHUB_ACTION: the GitHub webhook action (for example,opened,completed,published) -
BUILDKITE_GITHUB_DEPLOYMENT_ID: the deployment ID (deployment status events) -
BUILDKITE_GITHUB_ISSUE_NUMBER: the number of the issue that triggered the build (issue events)
Not available at runtime or in pipeline-level build conditionals:
-
BUILDKITE_GITHUB_CHECK_RUN_NAME,BUILDKITE_GITHUB_CHECK_RUN_CONCLUSION: check run details -
BUILDKITE_GITHUB_RELEASE_TAG,BUILDKITE_GITHUB_RELEASE_DRAFT,BUILDKITE_GITHUB_RELEASE_PRERELEASE: release details -
BUILDKITE_GITHUB_REVIEW_STATE: the review state (approved,changes_requested, and so on) -
BUILDKITE_GITHUB_DEPLOYMENT_STATUS_STATE,BUILDKITE_GITHUB_DEPLOYMENT_STATUS_ENVIRONMENT: deployment status details -
BUILDKITE_GITHUB_PULL_REQUEST_STACK_POSITION,BUILDKITE_GITHUB_PULL_REQUEST_STACK_SIZE,BUILDKITE_GITHUB_PULL_REQUEST_STACK_BASE_BRANCH: pull request stack details
Noreply email handling
When you connect your GitHub account to Buildkite the email address associated with the GitHub account is added to your Buildkite account. If you've got GitHub set not to display your email, [username]@users.noreply.github.com or the more recent [username+id]@users.noreply.github.com is added instead. The email address of a commit is one of the ways Buildkite matches webhook builds to users.
Customizing commit statuses
The commit status is the label used to identify the Buildkite checks on your commits and pull requests on GitHub. Normally, Buildkite autogenerates these statuses.
For example, if you select Update commit statuses in the GitHub Commit Statuses section of your pipeline's GitHub settings:
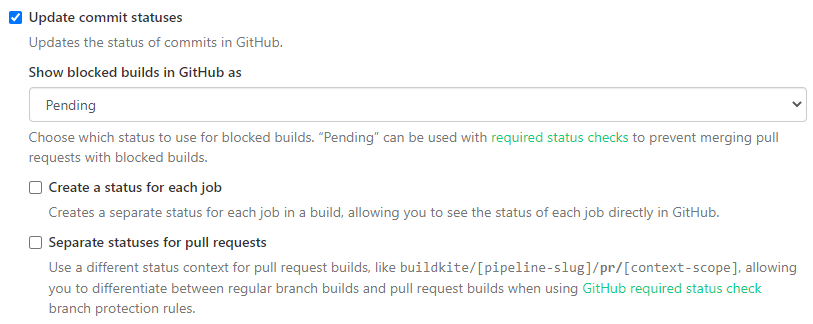
Your checks will appear on your pull request as buildkite/your-pipeline-name:

You can customize the commit statuses, for example, to reuse the same pipeline for multiple components in a monorepo, at both the build and step level, using the notify attribute in your pipeline.yml.
Build level
-
Add the following to your
pipeline.yml, at the top level:notify: - github_commit_status: context: "my-custom-status" In Pipeline > your specific pipeline > Settings > GitHub, make sure Update commit statuses is not selected. Note that this prevents Buildkite from automatically creating and sending statuses for this pipeline, meaning you will have to handle all commit statuses through the
pipeline.yml.When you make a new commit or pull request, you should see my-custom-status as the commit status:

In a setup for a repository containing one codebase and one pipeline.yml, this customizes the commit status for the pipeline. However, if you have multiple pipeline.yml files in one repo, feeding in to the same Buildkite pipeline, this allows you to have different statuses when building different sections of the repo.
For example, if you have a monorepo containing three applications, you could use the same pipeline, with different pipeline.yml files for each application. Each pipeline.yml can contain a different GitHub status.
When a build level GitHub commit status has been set (as part of an uploaded pipeline YAML file), as opposed to a pipeline level GitHub commit status, where the notify block is defined within the YAML step editor of the Buildkite Pipelines interface, then the GitHub status is only reported after the build has completed, because the notify block is evaluated after the build has started. By moving the GitHub status notification block to the pipeline level (in the YAML step editor of the Buildkite Pipelines interface), the notify block will be evaluated when the build starts and sends off the commit status to GitHub.
Step level
-
Add
notifyto a command in yourpipeline.yml:steps: - label: "Example Script" command: "script.sh" notify: - github_commit_status: context: "my-custom-status" -
In Pipeline > your specific pipeline > Settings > GitHub, you can choose to either:
- Make sure Update commit statuses is not selected. Note that this prevents Buildkite from automatically creating and sending statuses for this pipeline, meaning you will have to handle all commit statuses through the
pipeline.yml. - Enable both Update commit statuses and Create a status for each job. Buildkite sends its default statuses as well as your custom status.
- Make sure Update commit statuses is not selected. Note that this prevents Buildkite from automatically creating and sending statuses for this pipeline, meaning you will have to handle all commit statuses through the
When you make a new commit or pull request, you should see my-custom-status as the commit status:
You can also define the commit status in a group step:
steps:
  - group: ":lock_with_ink_pen: Security Audits"
    key: "audits"
    notify:
    - github_commit_status:
        context: "group status"

    steps:
      - label: ":brakeman: Brakeman"
        command: ".buildkite/steps/brakeman"
      - label: ":bundleaudit: Bundle Audit"
        command: ".buildkite/steps/bundleaudit"
      - label: ":yarn: Yarn Audit"
        command: ".buildkite/steps/yarn"
      - label: ":yarn: Outdated Check"
        command: ".buildkite/steps/outdated"
When you set a custom commit status on a group step, GitHub only displays one status for the group. A passing result only shows when all jobs in the group pass. If you want to show custom commit statuses for each job, set them on the individual step.
Commit statuses and GitHub API rate limits
Enabling Create a status for each job generates at least two GitHub API requests per job. Pipelines with high job counts can consume a significant portion of your hourly rate limit budget. See GitHub API rate limits for details on monitoring and managing your usage.
GitHub API rate limits
GitHub imposes hourly rate limits on REST API requests made through each GitHub App installation. Buildkite uses these API calls primarily for posting commit statuses to your repositories. When Buildkite encounters a rate limit from GitHub, it automatically retries the request.
Checking your rate limit usage
To view your current GitHub API rate limit usage, go to your organization's Settings > Repository Providers, and select your connected GitHub provider. The GitHub API Rate Limit panel displays the following values:
-
x-ratelimit-limit: The maximum number of requests that Buildkite can make per hour, as set by GitHub. -
x-ratelimit-remaining: The number of requests remaining in the current rate limit window. -
x-ratelimit-reset: The time at which the current rate limit window resets, in UTC epoch seconds. -
x-ratelimit-used: The number of API requests that Buildkite has made in the current rate limit window.
This panel is available for both the full-access GitHub and GitHub (Limited Access) App integrations.
You can also query rate limit data programmatically using the Buildkite GraphQL API.
What causes high API usage
The biggest contributor to GitHub API usage is commit statuses. Each status update requires at least one API request. When you enable Create a status for each job in the GitHub settings for a pipeline, every job in the build generates at least two status update requests (one when the job starts, one when it finishes). A build with 500 jobs could consume over 1,000 API requests.
Other factors that increase API usage:
- Running many pipelines that report commit statuses against the same GitHub App installation
- High build frequency across branches and pull requests
What happens when rate limits are exceeded
When Buildkite receives a rate-limited response from GitHub, it automatically retries the request after the rate limit window resets. During this period, commit status updates to GitHub may be delayed.
If rate-limited requests continue to fail, Buildkite may temporarily disable commit status updates for affected pipelines. When this happens, a notice appears on the pipeline's GitHub settings page with instructions for re-enabling status updates.
Reducing API usage
To reduce your GitHub API usage:
- Disable Create a status for each job on pipelines with high job counts, and rely on the single pipeline-level commit status instead.
- Review which pipelines have Update commit statuses enabled, and disable it for pipelines where GitHub status reporting is not needed.
Raising your rate limit
The rate limit is set by GitHub on the GitHub App installation, not by Buildkite. To request a higher rate limit, contact GitHub support.
Using one repository in multiple pipelines and organizations
If you want to use the same repository in multiple pipelines (including pipelines in different Buildkite organizations), you need to configure a separate webhook for each pipeline. Follow the webhook setup instructions in the Buildkite UI. Buildkite shows you these instructions when you create the pipeline, but you can also find them in Pipeline > your specific pipeline > Settings > your Git service provider > your Git service provider's Setup Instructions.
If you want to integrate the same repository into multiple Buildkite organizations, you need to link each organization to GitHub using different Buildkite user accounts. You must use different user accounts because there's a one-to-one relationship between a Buildkite user and a GitHub user. The user needs admin permissions on the GitHub organization to link it to Buildkite. You can only install the Buildkite app for GitHub once per GitHub organization.
Build skipping
You may not always want to rebuild on every commit, or branch. You can configure Buildkite to ignore individual commits or branches, or to skip builds under certain conditions.
Connect your Buildkite account to GitHub using OAuth
To connect your GitHub account:
- Open your Buildkite Personal Settings.
- Select Connected Apps.
- Select the GitHub Connect button:
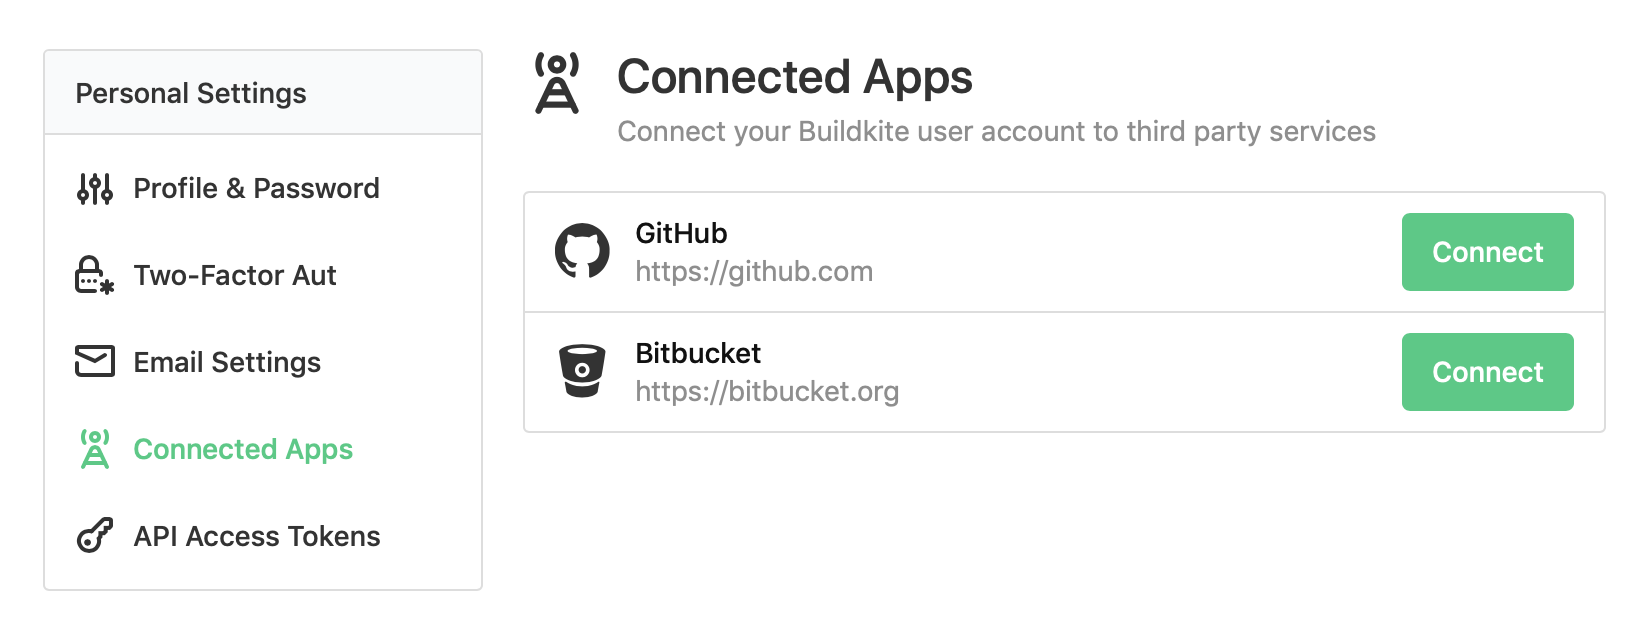
- Select Authorize Buildkite. GitHub redirects you back to your Connected Apps page.
You can now set up a pipeline.
Workflow-scoped GitHub access tokens
Jobs in a GitHub.com pipeline can request a short-lived, repository-scoped GitHub access token using the Buildkite GitHub App connection. Requested permissions are checked against a permissions map declared in a workflow file at the build's exact commit, so a job can only receive permissions the repository has explicitly allowed for that commit.
To use this feature, the following requirements must be met:
- The pipeline uses the full-access GitHub repository provider. The GitHub (Limited Access) provider isn't supported because it doesn't provide code access.
- The job runs on a Buildkite-hosted agent.
- In the GitHub Workflow Access Tokens section of the pipeline's GitHub settings, Allow workflow-authorized GitHub access tokens is selected. This checkbox only appears for pipelines connected to GitHub.com using the GitHub App (not GitHub Enterprise Server).
Protect workflow-scoped tokens
Enabling this setting acknowledges that eligible jobs execute trusted code and may request write access to the pipeline's repository.
For builds outside pull requests and merge queues, enable write permissions only when users who can create builds at arbitrary commits are trusted to select the code and workflow policy that will run.
Changing the pipeline's repository preserves this setting, so review it after a repository change.
Request a token
From a running job, send a request to the Agent API with the pipeline repository URL, a workflow filename, and the required permissions. The job token in BUILDKITE_AGENT_ACCESS_TOKEN can only request a token for the same job.
For example, add the following top-level policy to .github/workflows/release.yml and commit it before running the build:
permissions:
  contents: write
The following command requests contents: write and exports the returned token as GITHUB_TOKEN:
if ! response=$(curl --fail-with-body --silent --show-error \
  --request POST \
  --header "Authorization: Token $BUILDKITE_AGENT_ACCESS_TOKEN" \
  --header "Content-Type: application/json" \
  --data "{\"repo_url\":\"$BUILDKITE_REPO\",\"workflow\":\"release.yml\",\"permissions\":{\"contents\":\"write\"}}" \
  "$BUILDKITE_AGENT_ENDPOINT/jobs/$BUILDKITE_JOB_ID/github_workflow_access_token"); then
  printf '%s\n' "$response" >&2
  exit 1
fi

if ! printf '%s' "$response" | buildkite-agent redactor add --format json; then
  unset response
  exit 1
fi

if ! GITHUB_TOKEN=$(printf '%s' "$response" | jq --exit-status --raw-output '.token'); then
  unset response
  exit 1
fi

export GITHUB_TOKEN
unset response
The successful response has the following shape:
{
  "token": "ghs_xxx"
}
The request supports the read, write, and none access levels for actions, artifact_metadata, attestations, checks, code_quality, contents, deployments, discussions, issues, packages, pages, pull_requests, security_events, and statuses. The metadata and vulnerability_alerts permissions support read and none. Use underscores in the request body for permission names that GitHub writes with hyphens in the workflow file.
How the workflow policy is applied
When a job requests a token, the job selects a single .yml or .yaml file from .github/workflows/ in the pipeline's repository. Buildkite reads the file at the build's commit SHA and uses only its top-level permissions map as a static permissions policy. Buildkite doesn't evaluate the workflow's triggers, jobs, or expressions, and doesn't run the workflow.
The selected workflow file isn't bound to a GitHub Actions job or trigger. Any eligible job can select any supported workflow file at the build's commit. Treat the broadest compatible top-level permissions map in .github/workflows/ as the permission limit available to a job.
A requested permission is only granted when it's allowed by all of the following:
- The selected workflow file's top-level
permissionspolicy. If the file omits this map, the policy defaults tocontents: read. Theread-allshorthand expands to every supported read permission. An explicit map must be non-empty and contain static permission names and access levels (read,write, ornone). Thewrite-allshorthand and expressions (for example,${{ ... }}) cause the request to be denied. Job-level permissions and reusable workflowusesdeclarations don't affect the selected file's policy. - Buildkite's own allowlist of permissions that can be requested this way.
- The permissions granted to the Buildkite GitHub App installation for the repository.
Restrictions
- Only available for pipelines connected to GitHub.com using the GitHub App. GitHub Enterprise Server repositories aren't supported.
- Pull request builds, and any build triggered or rebuilt from a pull request build, can only request
contents: read, regardless of what permissions the pull request's own workflow file declares. - Builds in a GitHub merge queue, including builds created by pushes to
gh-readonly-queue/*branches, and any build triggered or rebuilt from one, can't request workflow-scoped tokens. - The build's commit must be a full, immutable commit SHA, and Buildkite must be able to resolve its complete trigger and rebuild history of up to 100 unique builds. Histories with more than 100 unique builds or incomplete histories are denied.
- Issued tokens expire after one hour. The response doesn't include an expiration timestamp.
- Each job can make up to ten token requests per hour. Further requests return
429 Too Many Requestswith aRetry-Afterresponse header. - The selected workflow file must not exceed 128 KiB.
Using GitHub App installation access tokens
The difference between repository authentication and account connection
Configuring a GitHub App for repository authentication is different from using the Buildkite GitHub App to connect your Buildkite account to GitHub.
An alternative to using SSH keys for accessing your private repositories is to use the GitHub App and GitHub's installation access tokens. This approach requires a private key for generating a JSON Web Token (JWT) that is exchanged for an installation access token. The repository permissions of the GitHub App can be scoped to read-only, and every generated installation access token can be set to expire after 1 hour.
Configuring a GitHub App for repository authentication
GitHub Organization access prerequisites
You need to be an Admin of the GitHub Organization to be able to create and install the GitHub App and follow the steps outlined in this instruction.
Create the GitHub App
To register a GitHub App, follow the GitHub documentation. Configure a new GitHub App:
- GitHub App name: choose a unique name (for example, buildkite-agent-ro-access)
- Homepage URL: your company's homepage
- Webhook:
- Deselect Active (webhooks are not required)
- Webhook URL (leave blank)
- Secret (leave blank)
- Permissions:
- Repository Permissions:
- Contents: choose either
Read-onlyorRead and write, depending on whether write access will be required to push files - Metadata: select
Read-only(required for basic repository info) - Pull requests: choose either
Read-onlyorRead and write, depending on whether read or write access will be required for pull requests
- Contents: choose either
- Repository Permissions:
- Where can this GitHub App be installed?
- Choose "Only on this account"
After the GitHub App has been configured with the settings outlined above, click the Create GitHub App button. You will see the General settings of the new GitHub App.
The value of the GitHub App's Client ID displayed on the General settings page will be required for generating installation access tokens. Make sure you have this value available.
Generate authentication keys
In order to create a JWT that can be exchanged for an installation access token, a private key must be generated for the GitHub App. This private key can then be stored in Buildkite secrets and securely accessed by a Buildkite agent. To generate a private key:
- In your GitHub App's General settings, scroll to Private keys
- Click the Generate a private key button
- This will download a
.pemfile of the newly generated private key - Create a new Buildkite Secret in the Cluster(s) containing the Buildkite agents that require access to your private repositories
- Add the contents of the
.pemfile as the secret's Value
- Add the contents of the
The value of the Buildkite Secret's name contains the private key and will be required when generating installation access tokens. Make sure you have this value available as it will be referenced by buildkite-agent secret get <bk-secret-name> command in the agent environment hook.
Install the newly created GitHub App
After creating the GitHub App, you can install this app into your account. To install the GitHub App, go to the app's settings and select Install App from the left-hand menu. Choose the account into which you want to install the GitHub App. Choose the repositories that the GitHub App will have access to, based on the repository permissions selected during the GitHub App's creation. After selecting the GitHub App's repository access, click the Install button.
The value of the GitHub App's Installation ID will be required for generating installation access tokens. This value can be found at the end of the URL after installation is complete: .../settings/installations/<installation_id>. Make sure you have this value available.
Generating tokens
The GitHub documentation describes the process of generating a JWT and then exchanging it for an installation access token. There are a few examples available that show how you can generate a JWT using some common programming languages. The example that follows will be using Bash to configure a pre-checkout agent hook.
Configure agent hook
The pre-checkout hook example below requires the openssl package to be installed and available to the Buildkite agent performing the checkout.
In order to have the agent generate a GitHub App installation token, add the following code to your agent hooks directory as a pre-checkout hook, configuring the variables at the beginning of the hook with the GitHub App's Client ID (client_id), Installation ID (installation_id), and Buildkite Secret name (private_key_secret_name):
#!/usr/bin/env bash

set -o pipefail

echo "~~~ :lock_with_ink_pen: Generating JWT for GitHub App access token exchange"
client_id= # Client ID of GitHub App
private_key_secret_name= # Buildkite Secret containing private key
installation_id= # Installation ID of GitHub App

pem=$( buildkite-agent secret get ${private_key_secret_name} )

now=$(date +%s)
iat=$((${now} - 60)) # Issues 60 seconds in the past
exp=$((${now} + 600)) # Expires 10 minutes in the future

b64enc() { openssl base64 | tr -d '=' | tr '/+' '_-' | tr -d '\n'; }

header_json='{
    "typ":"JWT",
    "alg":"RS256"
}'
# Header encode
header=$( echo -n "${header_json}" | b64enc )

payload_json="{
    \"iat\":${iat},
    \"exp\":${exp},
    \"iss\":\"${client_id}\"
}"
# Payload encode
payload=$( echo -n "${payload_json}" | b64enc )

# Signature
header_payload="${header}"."${payload}"
signature=$(
    openssl dgst -sha256 -sign <(echo -n "${pem}") \
    <(echo -n "${header_payload}") | b64enc
)

# Create JWT
JWT="${header_payload}"."${signature}"

echo "~~~ :github: Requesting GitHub App installation access token"
# Exchange your JWT for the installation access token
access_token=$(curl -sS --request POST \
    --url "https://api.github.com/app/installations/${installation_id}/access_tokens" \
    --header "Accept: application/vnd.github+json" \
    --header "Authorization: Bearer ${JWT}" \
    --header "X-GitHub-Api-Version: 2022-11-28" | awk -F'"' '/"token"/ {print $4}')

echo "~~~ :git: Configuring Git credential helper to use installation access token"
# Store the installation access token in ~/.git-credentials and configure the credential helper
echo "https://x-access-token:${access_token}@github.com" > ~/.git-credentials
git config --global url."https://github.com/".insteadOf git@github.com:
git config --global credential.helper store