OIDC with Azure
OpenID Connect (OIDC) allows your Buildkite pipelines to authenticate directly with Microsoft Azure without storing long-lived credentials. Instead of managing client secrets, your pipeline requests a short-lived token from the Buildkite agent at runtime, and Azure validates it using a trust relationship you configure in Microsoft Entra ID (formerly Azure AD).
This guide walks you through setting up OIDC between Buildkite Pipelines and Azure, including a working example that uses Terraform with an Azure Storage Account backend.
Learn more about:
- How OIDC tokens are constructed and how to extract and use claims in the OpenID Connect Core specification.
- Microsoft's implementation of workload identity federation in Workload identity federation on Microsoft Learn.
- Supported scenarios and limitations in Considerations for workload identity federation on Microsoft Learn.
Requirements
You will need:
- An Azure subscription with permissions to create App Registrations and assign RBAC roles. Note your Subscription ID from the Azure Portal (found on the Subscriptions page).
- A Buildkite pipeline you want to authenticate with Azure. Depending on which subject claim you use, you'll need its Pipeline UUID, Cluster UUID, or another identifier. You can find the Pipeline UUID in Buildkite under Pipeline Settings > General, listed as Pipeline ID. You can also retrieve it using the REST API (the
idfield) or the GraphQL API.
Step 1: Register an application in Microsoft Entra ID
The App Registration in Microsoft Entra ID acts as the identity that your Buildkite pipeline will assume when accessing Azure resources. To register an application in Microsoft Entra ID:
- In the Azure Portal, go to Microsoft Entra ID > App registrations.
- Click New registration.
- Enter a name for the application (for example,
buildkite-oidc-example). - Leave the default setting for Supported account types (single tenant).
- Click Register.
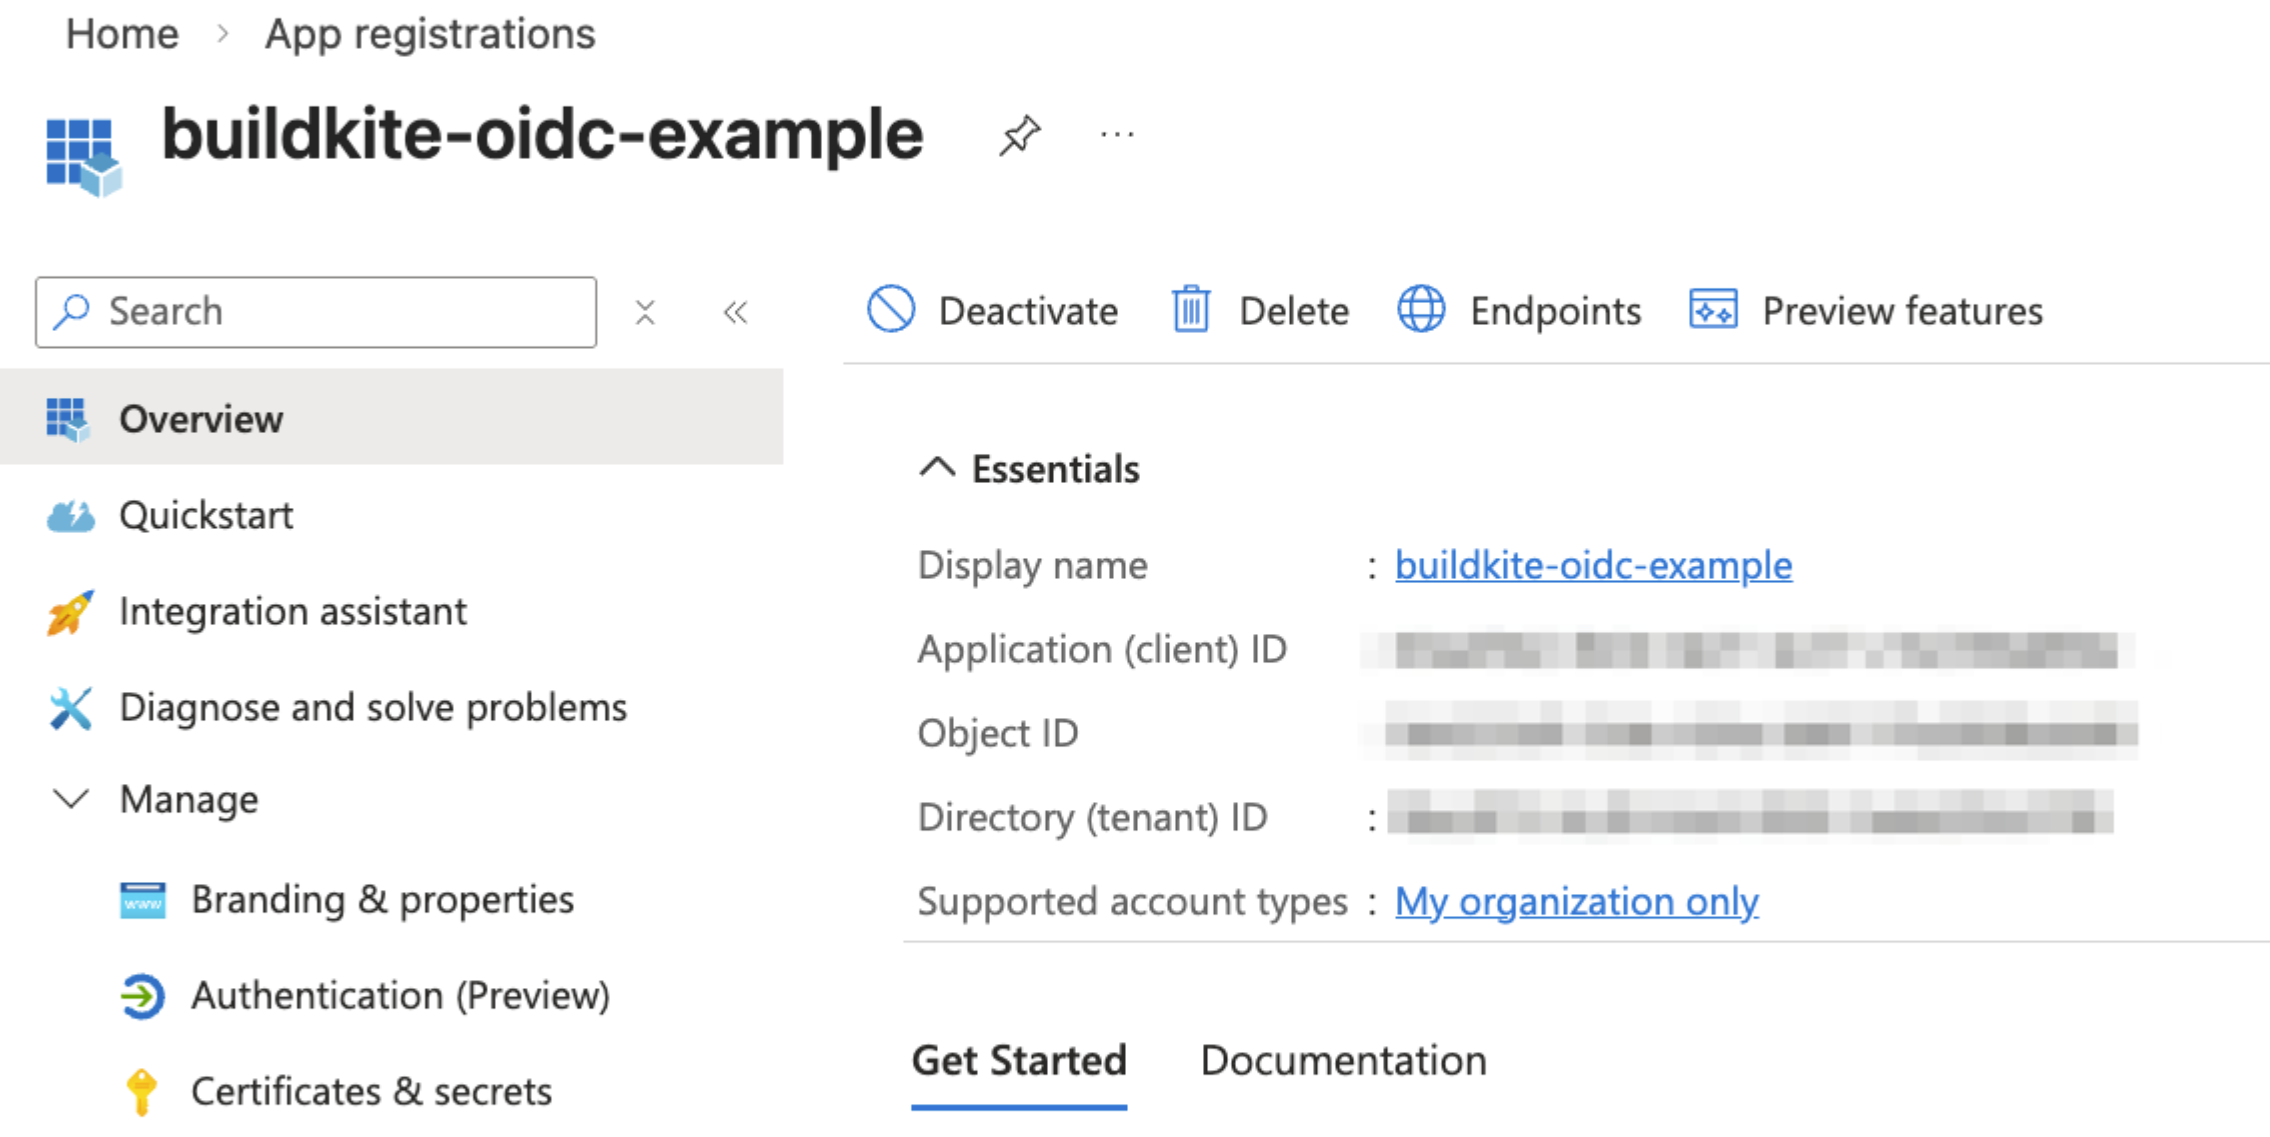
Once created, note the following values from the App Registration's Overview page. You'll need them later:
-
Application (client) ID, for example,
00xx0x0-0x00-0x00-xx00-x0x000xxx0x0 -
Directory (tenant) ID, for example,
00xx0x0-0x00-0x00-xx00-x0x000xxx0x0
When you register an application in the previous step, Azure automatically creates a service principal for it. You'll see this term later when assigning RBAC roles.
Think of the App Registration as the definition of your app, and the service principal as the identity it uses to access resources. Learn more in Application and service principal objects in Microsoft Entra ID.
Step 2: Add a federated identity credential
The Federated Identity Credential establishes the trust between your Buildkite pipeline and the Azure App Registration. Azure uses it to validate the OIDC token that the Buildkite agent presents.
- In your App Registration, go to Certificates & secrets.
- Select the Federated credentials tab.
- Click Add credential.
- For Federated credential scenario, select Other issuer.
- Configure the credential with the following values, then click Add.
| Field | Value |
|---|---|
| Issuer | https://agent.buildkite.com |
| Subject identifier | The value of the subject claim in the OIDC token. By default, this is the pipeline UUID (for example, 000xx00x-000x-0000-00xx-00x0x00x00x0). If you're using a custom subject claim, use the corresponding identifier instead (for example, a cluster UUID). |
| Name | A descriptive name (for example, buildkite-pipeline-deploy) |
| Audience | Leave as the default api://AzureADTokenExchange
|
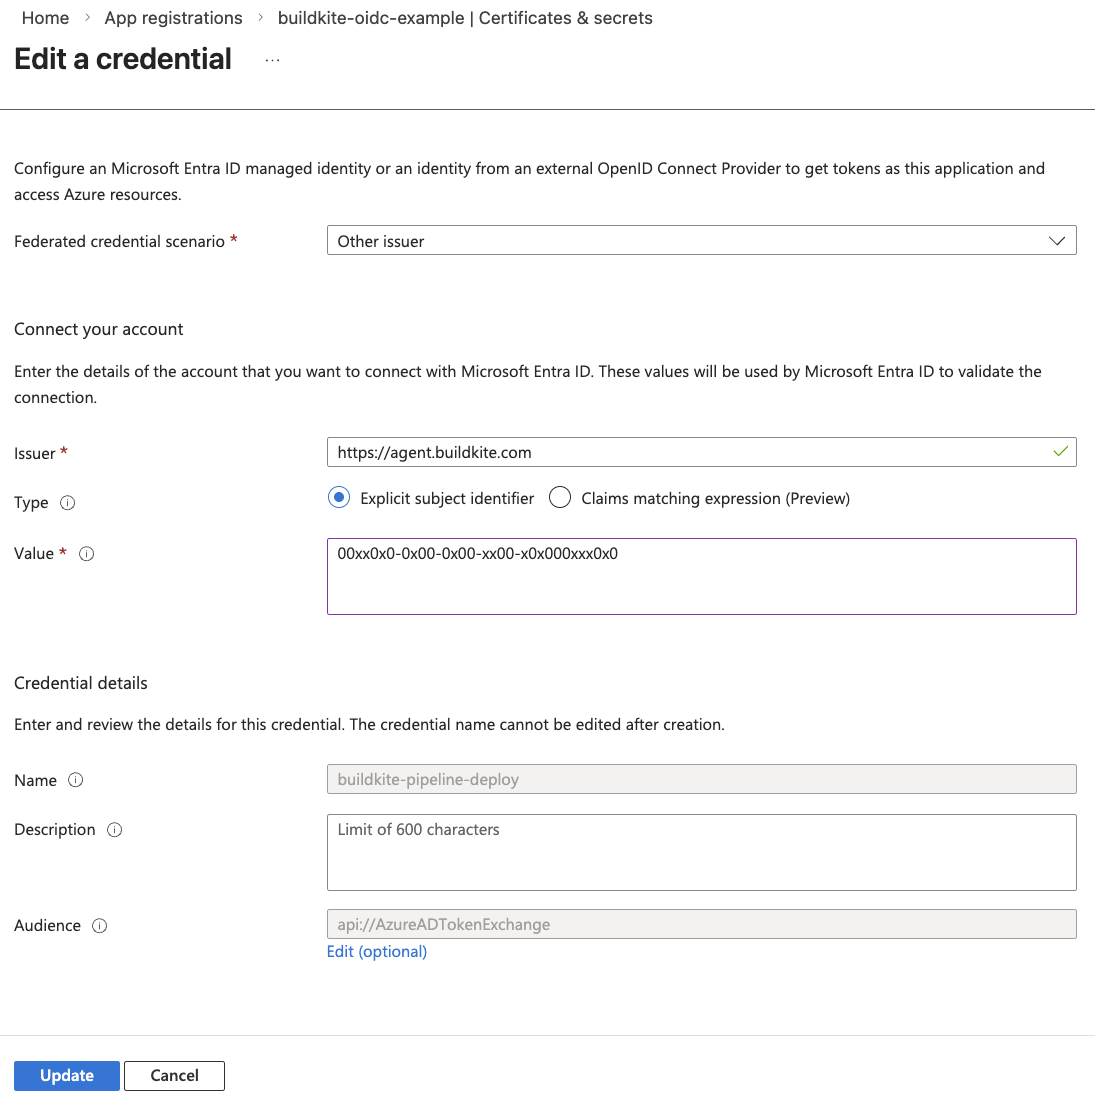
The Subject identifier must match the sub claim in the OIDC token exactly. By default, this is the pipeline UUID. If you use --subject-claim to override it (see Custom subject claims), set the Subject identifier to the corresponding value, such as a cluster UUID. Each unique subject value that needs Azure access requires its own Federated Identity Credential.
Step 3: Assign RBAC roles
Your App Registration needs Azure RBAC roles to access resources. The roles you assign depend on what your pipeline needs to do.
For this example, the pipeline uses Terraform with an Azure Storage Account backend, so it will need:
- Contributor on the resource group (to create and manage resources)
- Storage Blob Data Contributor on the storage account (to read and write Terraform state)
To assign a role:
- Navigate to the resource (resource group, storage account, subscription, and so on).
- Go to Access control (IAM) > Role assignments.
- Click Add > Add role assignment.
- Select the role, then assign it to your App Registration's service principal.
Step 4: Configure Azure credentials in your pipeline
To authenticate, your pipeline needs:
- Azure Client ID
- Tenant ID
- Subscription ID
These values are identifiers, not secrets. Define them as pipeline-level environment variables in your pipeline.yml:
env:
  ARM_CLIENT_ID: "your-application-client-id"
  ARM_TENANT_ID: "your-directory-tenant-id"
  ARM_SUBSCRIPTION_ID: "your-azure-subscription-id"
This keeps the values easy to find and change in one place.
You can also store these values as Buildkite Secrets if your organization prefers to keep all configuration out of version control. The approach is the same either way. The OIDC token itself is the only sensitive value, and it's generated fresh in each step.
Buildkite Secrets requires agent version 3.106.0 or later. The secret key names are up to you, just match them in your pipeline YAML.
Step 5: Request an OIDC token in your pipeline
In your pipeline steps, use the buildkite-agent oidc request-token command to get an OIDC token. The token is short-lived and scoped to the pipeline by default.
BUILDKITE_OIDC_TOKEN=$(buildkite-agent oidc request-token --audience "api://AzureADTokenExchange")
You can change what the token's sub claim contains by using the --subject-claim flag. For example, to scope the token to the cluster instead of the pipeline:
BUILDKITE_OIDC_TOKEN=$(buildkite-agent oidc request-token --audience "api://AzureADTokenExchange" --subject-claim cluster_id)
See Custom subject claims for the full list of allowed claims and guidance on when to use each one.
The --audience value must match one of the audiences Azure accepts for federated identity credentials:
| Azure environment | Audience value |
|---|---|
| Azure Commercial (public) | api://AzureADTokenExchange |
| Azure US Government | api://AzureADTokenExchangeUSGov |
| Azure China (21Vianet) | api://AzureADTokenExchangeChina |
Do not change the audience to a custom value. If the audience in the OIDC token doesn't match one of these values, Azure will reject the token exchange and authentication will fail.
Most users should leave this as the default api://AzureADTokenExchange.
Each step in a Buildkite pipeline runs independently. If multiple steps need Azure access, each step must request its own OIDC token. Tokens cannot be passed between steps.
Step 6: Authenticate with Azure using the token
Once you have the OIDC token, use it to authenticate with Azure. The exact method depends on your tooling.
Using the Azure CLI
az login --service-principal \
  --username "$ARM_CLIENT_ID" \
  --tenant "$ARM_TENANT_ID" \
  --federated-token "$BUILDKITE_OIDC_TOKEN"
Using Terraform with the AzureRM provider
Set the following environment variables in your pipeline:
env:
  ARM_USE_OIDC: "true"
  ARM_USE_AZUREAD: "true"
  ARM_CLIENT_ID: "your-application-client-id"
  ARM_TENANT_ID: "your-directory-tenant-id"
  ARM_SUBSCRIPTION_ID: "your-azure-subscription-id"
The ARM_CLIENT_ID, ARM_TENANT_ID, and ARM_SUBSCRIPTION_ID values are identifiers, not secrets, so they can be defined directly in your pipeline.yml. The OIDC token is the only sensitive value, and it's generated fresh in each step.
The AzureRM provider will read these environment variables automatically when ARM_USE_OIDC is set to true. The ARM_USE_AZUREAD variable is needed when using an Azure Storage Account backend for Terraform state. It tells the provider to authenticate to the storage data plane using Entra ID rather than storage account keys.
You can also store these values as Buildkite Secrets if your organization prefers to keep all configuration out of version control. Both approaches work the same way with the Docker Compose Buildkite plugin's propagate-environment option.
Example pipeline
This example pipeline runs Terraform to deploy Azure resources, authenticating entirely through OIDC with no stored Azure credentials. It uses the Docker Compose Buildkite plugin to run Terraform in a container.
The pipeline defines the Azure identifiers and OIDC flags as pipeline-level environment variables. Each step requests a fresh OIDC token before running Terraform commands.
env:
  ARM_USE_OIDC: "true"
  ARM_USE_AZUREAD: "true"
  ARM_CLIENT_ID: "your-application-client-id"
  ARM_TENANT_ID: "your-directory-tenant-id"
  ARM_SUBSCRIPTION_ID: "your-azure-subscription-id"

steps:
  - label: ":terraform: init & plan"
    key: terraform-plan
    command: |
      echo "--- Getting OIDC token"
      export ARM_OIDC_TOKEN=$$(buildkite-agent oidc request-token --audience api://AzureADTokenExchange)

      echo "--- Terraform init"
      terraform init \
        -backend-config="resource_group_name=your-resource-group" \
        -backend-config="storage_account_name=yourstorageaccount" \
        -backend-config="container_name=tfstate" \
        -backend-config="key=terraform.tfstate"

      echo "--- Terraform plan"
      terraform plan -out=tfplan

      echo "--- Uploading plan artifact"
      buildkite-agent artifact upload tfplan
    plugins:
      - docker-compose#v5.12.1:
          run: terraform
          propagate-environment: true
          mount-buildkite-agent: true

  - block: ":rocket: Deploy?"
    prompt: "Review the plan output above and approve to apply"

  - label: ":terraform: apply"
    key: terraform-apply
    depends_on: terraform-plan
    command: |
      echo "--- Getting OIDC token"
      export ARM_OIDC_TOKEN=$$(buildkite-agent oidc request-token --audience api://AzureADTokenExchange)

      echo "--- Downloading plan artifact"
      buildkite-agent artifact download tfplan .

      echo "--- Terraform init"
      terraform init \
        -backend-config="resource_group_name=your-resource-group" \
        -backend-config="storage_account_name=yourstorageaccount" \
        -backend-config="container_name=tfstate" \
        -backend-config="key=terraform.tfstate"

      echo "--- Terraform apply"
      terraform apply tfplan
    plugins:
      - docker-compose#v5.12.1:
          run: terraform
          propagate-environment: true
          mount-buildkite-agent: true
A few things to note about this pipeline:
- Each step requests a fresh OIDC token independently. Tokens are short-lived and can't be shared between steps.
- The Docker Compose Buildkite plugin with
propagate-environment: trueautomatically passes all pipeline environment variables (theARM_*values) into the container, removing the need for explicit-eflags. -
mount-buildkite-agent: truemakes thebuildkite-agentbinary available inside the container. This is required for requesting OIDC tokens and uploading/downloading artifacts. The Docker Compose Buildkite plugin defaults this tofalse. - The plan step saves the plan to a file (
-out=tfplan) and uploads it as a Buildkite artifact. The apply step downloads that exact plan and applies it, so you're always applying exactly what was reviewed. - The
blockstep between plan and apply gives you a chance to review the plan before deploying. - Backend configuration values are passed using
-backend-configflags at init time, keeping the Terraform code environment-agnostic. - The
$$prefix on thebuildkite-agentcommand prevents Buildkite from interpolating the command substitution at pipeline upload time. The command runs at step execution time inside the container.
Docker Compose configuration
The pipeline expects a docker-compose.yml in your repository root:
services:
  terraform:
    image: hashicorp/terraform:1.9.1
    entrypoint: []
    working_dir: /workspace
    volumes:
      - ".:/workspace"
The entrypoint: [] line is required. The hashicorp/terraform Docker image sets terraform as its default entrypoint. Without clearing it, the Docker Compose Buildkite plugin can't execute shell commands inside the container because Docker will try to pass the shell command as arguments to the terraform binary.
Terraform configuration
The Terraform configuration uses the AzureRM provider with OIDC enabled. The backend block is intentionally minimal. The resource group, storage account, container, and state key are all passed using -backend-config at init time.
terraform {
  required_version = ">= 1.5"

  required_providers {
    azurerm = {
      source  = "hashicorp/azurerm"
      version = "~> 3.0"
    }
  }

  backend "azurerm" {
    use_oidc = true
  }
}

provider "azurerm" {
  features {}
  use_oidc = true
}
How OIDC token exchange works
When your pipeline step runs:
- The step calls
buildkite-agent oidc request-tokento get a JSON Web Token (JWT) from the Buildkite agent. - The
sub(subject) claim in the JWT contains the pipeline UUID by default, or a different identifier if--subject-claimwas used. - The
aud(audience) claim in the JWT containsapi://AzureADTokenExchange. - The step presents this JWT to Microsoft Entra ID.
- Entra ID validates the JWT against the Federated Identity Credential configuration (matching the issuer, subject, and audience).
- If valid, Entra ID issues an Azure access token for the App Registration's service principal.
- The step uses this Azure access token to access Azure resources according to its RBAC roles.
Monitoring OIDC sign-ins
When a Buildkite pipeline authenticates with Azure using OIDC, the sign-in is recorded in Microsoft Entra ID's sign-in logs under Service principal sign-ins.
To view these sign-ins:
- Sign in to the Microsoft Entra admin center.
- Browse to Identity > Monitoring & health > Sign-in logs.
- Select the Service principal sign-ins tab.
- Filter by the App Registration name (for example,
buildkite-oidc-example) to see sign-in activity from your Buildkite pipelines.
These logs show whether each authentication attempt succeeded or failed, along with details like the IP address of the Buildkite agent, the time of the sign-in, and any error codes. This is useful for debugging OIDC configuration issues and auditing which pipelines are accessing your Azure resources.
Learn more about sign-in logs in Sign-in logs in Microsoft Entra ID on Microsoft Learn.
Custom subject claims
By default, the sub claim in a Buildkite OIDC token contains the pipeline UUID. The --subject-claim flag lets you change the sub claim to a different immutable identifier, giving you control over how broadly or narrowly Azure trust is scoped.
Allowed subject claims
Only immutable identifiers are allowed as subject claims. Mutable values like slugs and branch names are excluded because renaming them would silently break federated identity credentials.
| Claim | Description | Scope |
|---|---|---|
pipeline_id |
The pipeline UUID (default) | A single pipeline |
cluster_id |
The cluster UUID | All pipelines in a cluster |
queue_id |
The queue UUID | All pipelines targeting a queue |
organization_id |
The organization UUID | All pipelines in the organization |
build_id |
The build UUID | A single build (one-time use) |
job_id |
The job UUID | A single job (one-time use) |
agent_id |
The agent UUID | A single agent |
Choosing a subject claim
The right subject claim depends on how you want to balance the number of federated identity credentials against the breadth of access.
-
pipeline_id(default): One credential per pipeline. Tight scoping, but requires a new Federated Identity Credential for each pipeline that needs Azure access. -
cluster_id: One credential per cluster. Any pipeline in the cluster can authenticate. Fewer credentials to manage, but broader access. -
queue_id: One credential per queue. Useful when different queues have different trust boundaries (for example, production versus staging queues). -
organization_id: One credential for the entire organization. The broadest scope. Any pipeline in the organization can authenticate with the same Azure App Registration. -
build_id,job_id,agent_id: Extremely narrow scope, typically used for auditing or one-time access rather than ongoing trust relationships.
Using a custom subject claim
To use a custom subject claim, pass the --subject-claim flag when requesting the OIDC token:
BUILDKITE_OIDC_TOKEN=$(buildkite-agent oidc request-token --audience "api://AzureADTokenExchange" --subject-claim cluster_id)
Then set the Subject identifier in the Azure Federated Identity Credential to the corresponding UUID. For example, if you use --subject-claim cluster_id, set the Subject identifier to your cluster's UUID.
The subject claim value must also be included as an optional claim in the token. If you use --subject-claim cluster_id, the cluster_id claim is automatically included. You don't need to pass --claim cluster_id separately.
Known limitations
Azure federated identity credentials require an exact match on the OIDC token's subject claim. This creates constraints around access control and trust, regardless of which subject claim you use.
Access control is scoped to a single identifier
Azure's federated identity credentials match on the sub claim only. You can't restrict Azure access by branch, build source, or other build context.
Any build that produces a token with a matching subject can authenticate with Azure, whether it was triggered from main, a feature branch, or a manual build.
Untrusted builds can authenticate to Azure
Because OIDC trust is tied to the token's subject claim, it doesn't distinguish between a build triggered from main and one triggered by an unreviewed pull request. If your pipeline accepts public pull requests and has build forks enabled, anyone who can open a PR against that repo can add a step that requests an OIDC token and hits your Azure resources with whatever RBAC roles you've assigned. This applies whether you use the default pipeline_id subject or a broader claim like cluster_id.
This is a common constraint across CI/CD providers that support OIDC. Palo Alto's Unit 42 team demonstrated real-world attacks using this pattern at DEF CON 32, and the tj-actions/changed-files supply chain attack in March 2025 showed how compromised tooling inside a pipeline can exfiltrate tokens.
To reduce the risk:
- Separate CI and CD pipelines. Run tests on one pipeline, deployments on another. Only configure OIDC on the deploy pipeline where you control what triggers builds and what code runs.
- Scope RBAC roles to the minimum required. Don't assign Contributor at the subscription level when a single resource group will do. See Microsoft's guidance on best practices for Azure RBAC.
- Restrict who can trigger builds. Use the pipeline-level permissions in Buildkite Pipelines to control who can create builds on pipelines with OIDC configured.
- Monitor sign-ins in Entra ID. Check the Service principal sign-in logs for unexpected activity. See the Monitoring OIDC sign-ins section above.
Getting tighter control
To limit what your pipelines can do in Azure:
-
Use custom subject claims to match your trust boundaries. Use
pipeline_id(the default) for tight per-pipeline scoping,cluster_idorqueue_idfor shared infrastructure, ororganization_idwhen a single credential should cover all pipelines. - Use separate App Registrations per environment. Create one for production, one for staging, each with RBAC roles scoped to their own resources and linked to separate Buildkite pipelines or clusters. This gives you isolation between environments.
- Scope RBAC roles tightly. Assign roles to the smallest resource possible (a single resource group, not the whole subscription). Authentication might succeed, but the pipeline can only touch what it's been granted.
- Apply Conditional Access Policies. Organizations with Entra ID P1/P2 can use Conditional Access for workload identities to restrict authentication by IP range or other conditions.
Troubleshooting
Common errors when setting up OIDC between Buildkite Pipelines and Azure, and how to resolve them.
"AADSTS70021: No matching federated identity record found"
The subject in the OIDC token doesn't match the Subject identifier in the Federated Identity Credential. Check that you're using the correct pipeline UUID (just the UUID, not a prefixed string).
"AADSTS700016: Application not found in the directory"
The Client ID is incorrect or the App Registration doesn't exist in the specified tenant.
"Storage account key access is disabled"
If you've disabled shared key access on a storage account (recommended), make sure the service principal has the Storage Blob Data Contributor role on the storage account, not just Contributor.
Token expired errors
OIDC tokens are short-lived. Each pipeline step must request its own token at the start of execution. Tokens cannot be passed between steps.
Terraform can't authenticate to the storage backend
Make sure ARM_USE_OIDC and ARM_USE_AZUREAD are both set to true. The AzureRM backend needs both to authenticate with OIDC for state storage operations.