Migrate from Jenkins
This guide helps Jenkins users migrate to Buildkite Pipelines, and covers key differences between the products.
Buildkite Pipelines is a modern and flexible continuous integration and deployment (CI/CD) platform that provides a powerful and scalable build infrastructure for your applications.
While Jenkins and Buildkite Pipelines have similar goals as CI/CD products, their approach differs. Buildkite Pipelines offers a hybrid model consisting of the following:
- A software-as-a-service (SaaS) platform for visualization and management of CI/CD pipelines.
- Agents for executing jobs—hosted by you, either on-premises or in the cloud.
Buildkite addresses the pain points of Jenkins' users, namely its security issues (both in its base code and plugins), time-consuming setup, and speed. This approach makes Buildkite more secure, scalable, and flexible.
Follow the steps in this guide for a smooth migration from Jenkins to Buildkite Pipelines.
Understand the differences
Most of the concepts will likely be familiar, but there are some differences to understand about the approaches.
System architecture
While Jenkins is a general automation engine with plugins to add additional features, Buildkite Pipelines is a product specifically aimed at CI/CD. You can think of Buildkite Pipelines like Jenkins with the Pipeline suite of plugins. To simplify it, we'll refer to Jenkins Pipeline as just Jenkins and Buildkite Pipelines as Buildkite.
At a high level, Buildkite follows a similar architecture to Jenkins:
- A central control plane that coordinates work and displays results through a web interface.
- Jenkins: A controller.
- Buildkite: The Buildkite dashboard.
- A program that executes the work it receives from the control plane.
- Jenkins: A combination of nodes, executors, and agents.
- Buildkite: Buildkite agents.
However, while you're responsible for scaling and operating both components in Jenkins, Buildkite manages the control plane as a SaaS offering (through the Buildkite dashboard). This reduces the operational burden on your team, as Buildkite takes care of platform maintenance, updates, and availability. The Buildkite dashboard also handles monitoring tools like logs, user access, and notifications.
The program that executes work is called an agent in Buildkite (also known as the Buildkite agent). An agent is a small, reliable, and cross-platform build runner that connects your infrastructure to Buildkite. The Buildkite agent polls Buildkite for work, runs jobs, and reports results. You can install these agents on local machines, cloud servers, or other remote machines. The Buildkite agent code is open-source, and is accessible from GitHub.
The following diagram shows the split in Buildkite between its SaaS platform and Buildkite agents running in your infrastructure.
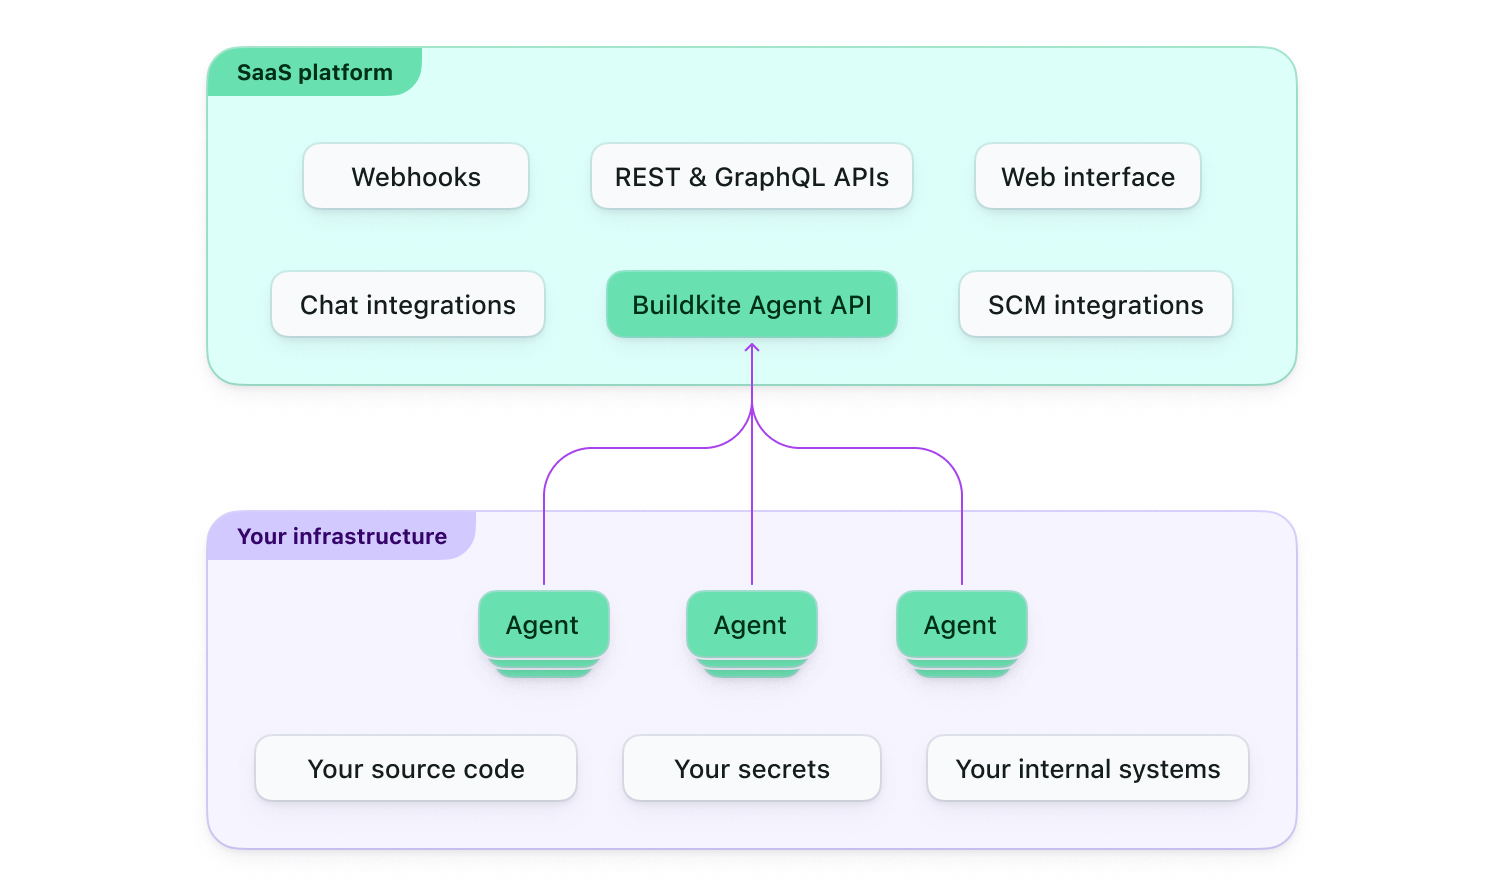
The diagram shows that Buildkite provides a web interface, handles integrations with third-party tools, and offers APIs and webhooks. By design, sensitive data, such as source code and secrets, remain within your environment and are not seen by Buildkite. This decoupling provides flexibility, as you can scale your agents and build environment independently, while Buildkite manages the coordination of these agents, build scheduling, as well as associated metrics and insights available through its web interface.
In Jenkins, concurrency is managed through multiple executors within a single node. In Buildkite, multiple agents can run on either a single machine or across multiple machines.
More recently, Buildkite has provided its own hosted agents feature (as an alternative to this self-hosted, hybrid architecture, described above), as a managed solution that suits smaller teams, including those wishing to get up and running with Pipelines more rapidly.
See Buildkite Pipelines architecture to learn more about how you can set up Buildkite to work with your organization.
Security
Security is crucial in CI/CD, protecting sensitive information, system integrity, and compliance with industry standards. Jenkins and Buildkite have different approaches to security, which impacts how you manage your CI/CD pipelines' security.
Securing a Jenkins instance requires:
- Careful configuration.
- Plugin management.
- Regular updates to address security vulnerabilities.
You must consider vulnerabilities in both Jenkins' own code base and plugins. Additionally, since Jenkins is a self-hosted solution, you are responsible for securing the underlying infrastructure, network, and storage. Some updates require you to take Jenkins offline to perform them, leaving your team without access to CI/CD resources during that period.
Buildkite's hybrid architecture, which combines the centralized Buildkite SaaS platform with your own self-hosted Buildkite agents, provides a unique approach to security. Buildkite takes care of the security of the SaaS platform, including user authentication, pipeline management, and the web interface. Self-hosted Buildkite agents, which run on your infrastructure, allow you to maintain control over the environment, security, and other build-related resources. This separation reduces the operational burden and allows you to focus on securing the environments where your code is built and tested.
While Buildkite provides its own secrets management capabilities through the Buildkite platform, the Buildkite platform can also be configured so that it doesn't store your secrets. Furthermore, Buildkite does not have or need access to your source code. Only the agents you host within your infrastructure would need access to clone your repositories, and your secrets that provide this access can also be managed through secrets management tools hosted within your infrastructure. This gives you all the benefits of a SaaS platform without many of the common security concerns.
Both Jenkins and Buildkite support multiple authentication providers and offer granular access control. However, Buildkite's SaaS platform provides a more centralized and streamlined approach to user management, making it easier to enforce security policies and manage user access across your organization.
See the Security and Secrets sections of these docs to learn more about how you can secure your Buildkite build environment, as well as manage secrets in your own infrastructure.
Pipeline configuration concepts
When migrating your CI/CD pipelines from Jenkins to Buildkite, it's important to understand the differences in pipeline configuration concepts.
Like Jenkins, Buildkite lets you create pipeline definitions in the web interface or one or more related files checked into a repository. Most people prefer the latter, which allows pipeline definitions to be kept with the code base it builds, managed in source control. The equivalent of a Jenkinsfile in Buildkite is a pipeline.yml. You'll learn more about these differences further on in the Files and syntax of Pipeline translation fundamentals.
In Jenkins, the core description of work is a job. A job contains stages with steps and can trigger other jobs. You use a job to upload a Jenkinsfile from a repository. Installing the Pipeline plugin lets you describe a workflow of jobs as a pipeline. Buildkite uses similar terms in different ways, where a pipeline is the core description of work.
A Buildkite pipeline contains different types of steps for different tasks:
- Command step: Runs one or more shell commands on one or more agents.
- Wait step: Pauses a build until all previous jobs have completed.
- Block step: Pauses a build until unblocked.
- Input step: Collects information from a user.
- Trigger step: Creates a build on another pipeline.
- Group step: Displays a group of sub-steps as one parent step.
Triggering a Buildkite pipeline creates a build, and any command steps are dispatched as jobs to run on agents. A common practice is to define a pipeline with a single step that uploads the pipeline.yml file in the code repository. The pipeline.yml contains the full pipeline definition and can be generated dynamically.
Unlike the terms job and pipeline, the concept of a step in both Jenkins and Buildkite is analogous.
Plugin system
Plugins are an essential part of both Jenkins and Buildkite, and they help you extend these products to further customize your CI/CD workflows.
Rather than managing plugins through a web-based system like Jenkins, in Buildkite, you manage plugins directly in pipeline definitions. This means that teams can manage plugins at the pipeline level, rather than there being a need to manage plugins at a monolithic system-wide level.
Jenkins plugins are typically Java-based, run in the Jenkins controller's Java virtual machine, and are shared across all pipelines. Therefore, a failure with one of these plugins can crash your entire Jenkins instance. Furthermore, since Jenkins plugins are closely integrated with Jenkins core, compatibility issues can often be encountered when either Jenkins core or its plugins are upgraded.
Buildkite plugins are shell-based, run on individual Buildkite agents, and are pipeline- or even step-specific with independent versioning, such that plugins are only loosely coupled with Buildkite. Therefore, plugin failures are isolated to individual builds, and issues are rare whenever you use newer versions of plugins in Buildkite pipelines.
Try out Buildkite
With a basic understanding of the differences between Buildkite and Jenkins, if you haven't already done so, run through the Getting started with Pipelines guide to get yourself set up to run pipelines in Buildkite, and create your own pipeline.
Provision agent infrastructure
Buildkite agents:
- Are where your builds, tests, and deployments run.
- Can either run as Buildkite hosted agents, or on your infrastructure (known as self-hosted), providing flexibility and control over the environment and resources. Operating agents in a self-hosted environment is similar in approach to hosting nodes in Jenkins.
If running self-hosted Buildkite agents, you'll need to consider the following:
Infrastructure type: Agents can run on various infrastructure types, including on-premises, cloud (AWS, GCP, Azure), or container platforms (Docker, Kubernetes). Based on your analysis of the existing Jenkins nodes, choose the infrastructure type that best suits your organization's needs and constraints.
Resource usage: Agent infrastructure is similar to the requirements for nodes in Jenkins, without operating the controller. Evaluate your Jenkins nodes' resource usage (CPU, memory, and disk space) to determine the requirements for your Buildkite agent infrastructure.
Platform dependencies: To run your pipelines, you'll need to ensure the agents have the necessary dependencies, such as programming languages, build tools, and libraries. Take note of the operating systems, libraries, tools, and dependencies installed on your Jenkins nodes. This information will help you configure your Buildkite agents.
Network configurations: Review the network configurations of your Jenkins nodes, including firewalls, proxy settings, and network access to external resources. These configurations will guide you in setting up the network environment for your Buildkite agents. The Buildkite agent works by polling Buildkite's agent API over HTTPS. There is no need to forward ports or provide incoming firewall access.
Agent scaling: Evaluate the number of concurrent builds and the build queue length in your Jenkins nodes to estimate the number of Buildkite agents needed. Keep in mind that you can scale Buildkite agents independently, allowing you to optimize resource usage and reduce build times.
Build isolation and security: Consider using separate agents for different projects or environments to ensure build isolation and security. You can use agent tags and clusters to target specific agents for specific pipeline steps, allowing for fine-grained control over agent allocation.
You'll continue to adjust the agent configuration as you monitor performance to optimize build times and resource usage for your needs.
See the Installation guides when you're ready to install an agent and follow the instructions for your infrastructure type.
Pipeline translation fundamentals
A pipeline is a container for modeling and defining workflows. Both Jenkins and Buildkite can read a pipeline (configuration) file checked into a repository, which defines a workflow.
Before translating any pipeline over from Jenkins to Buildkite, you should be aware of the following fundamental differences in how pipelines are written, and how their steps are executed and built by agents. You can then assess the goals of your Jenkins pipelines to see how you can translate them to achieve the same goals with Buildkite.
Files and syntax
This table outlines the fundamental differences in pipeline files and their syntax between Jenkins and Buildkite.
| Pipeline aspect | Jenkins | Buildkite |
|---|---|---|
| Configuration file | Jenkinsfile |
pipeline.yml |
| Syntax | Groovy-based domain-specific language (DSL) | YAML |
| Structure | Strong hierarchy | Flat structure (more readable) |
Buildkite's YAML-based pipeline syntax and definitions, along with its flat structure, is simpler, more human-readable, and easier to understand. Furthermore, you can even generate pipeline definitions at build-time with the power and flexibility of dynamic pipelines.
Step execution
By default, Jenkins runs its pipeline steps in sequence, whereas Buildkite runs steps simultaneously (that is, in parallel) on any available agents that can run them. However, you can achieve the opposite of these default behaviors in each products' pipelines.
To make a Jenkins pipeline run its steps in parallel, the parallel directive is used explicitly in the Jenkins pipeline. For instance, in the following Jenkins pipeline snippet, the Lint and Unit Tests steps are run simultaneously.
// Jenkins: Explicit parallelization required to run steps in parallel
parallel(
    "Lint": { sh 'npm run lint' },
    "Unit Tests": { sh 'npm test' }
)
Conversely, to make a Buildkite pipeline run its steps in a specific order, use the depends_on attribute in the step you want to run after others have run first. For instance, in the following Buildkite pipeline example, the Lint and Test steps are run in parallel (by default) first, whereas the Build step is run after the Lint and Test steps have completed.
# Buildkite: Explicit sequencing is required to make steps run in sequence
steps:
  - label: "Lint"
    id: lint
    commands: [npm run lint]

  - label: "Test"
    id: test
    commands: [npm test]

  - label: "Build"
    depends_on: [lint, test] # Explicit dependency
    commands: [npm run build]
Workspace state
In Jenkins, all stages and steps in a pipeline share the same workspace. This means that dependencies installed in one stage are automatically available in subsequent stages. For instance, in the following Jenkins pipeline snippet, the Test stage's step can make use of the node_modules artifacts installed by the previously executed Install stage's step.
// Jenkins: All stages share the same workspace.
stage('Install') {
    sh 'npm install' // Creates node_modules
}

stage('Test') {
    sh 'npm test'    // Uses the node_modules installed in the 'Install' stage
}
In Buildkite, each step is executed in a fresh workspace. Therefore, even if you implement a wait step, artifacts from previously processed steps won't be available in subsequent steps.
# This won't work in Buildkite
steps:
  - label: Install dependencies
    command: npm install

  - wait

  - label: Run tests
    command: npm test # Fails because node_modules won't be there
However, there are have several options for sharing state between steps:
-
Reinstall per step: Simple for fast-installing dependencies like
npm ci(instead ofnpm install). For instance, from the example above:steps: # Install dependencies step - label: Run tests commands: # Obtain the required version of Node.js (22.x) - curl -fsSL https://deb.nodesource.com/setup_22.x | bash - sudo apt install nodejs # Installs this version of nodejs on the agent - npm ci # (Re-)installs node_modules - npm test # node_modules will be available Buildkite artifacts: You can upload build artifacts from one step, which can be used in a subsequently processed step. This works best with small files and build outputs.
Cache plugin: Similar to build artifacts, you can also use the Buildkite cache plugin, which is ideal for larger dependencies using cloud storage (S3, GCS).
External storage: Custom solutions for complex state management.
Agent targeting
Jenkins uses a push-based agent targeting model, where the controller assigns work to pre-registered agents based on labels.
Conversely, Buildkite uses a pull-based agent targeting model, where agents poll queues for work. This pull-based agent targeting model approach provides better security (no incoming connections to agents), easier scaling (through ephemeral agents), and more resilient networking. However, this difference between Jenkins and Buildkite may likely require you to rethink your agent topology when provisioning your agent infrastructure.
Plugins
Following on from Plugin system, many popular Jenkins plugins become unnecessary in Buildkite due to native features like artifact handling, build visualization, and emoji support.
Translate an example Jenkins pipeline
This section guides you through the process of translating a declarative Jenkins pipeline example (which builds a Node.js app) into a Buildkite pipeline. This pipeline demonstrates typical features found in many Jenkins pipelines, which include:
- Multiple
stagedirectives to group steps for install, test, and build stages of the pipeline (executed sequentially). - The
matrixdirective to process this set of sequential stages in parallel using different versions of a build tool (that is, Node.js). - A
postsection that uses the Jenkins corearchiveArtifactsstep to save the artifact to storage.
Step 1: Copy or fork the jenkins-to-buildkite repository
The declarative Jenkins pipeline example can be found in the jenkins-to-buildkite repository.
Make a copy or fork this repository (within your own GitHub account) to examine it further. This repository has its own containerized version of Jenkins, which you can run locally to see how it builds the Jenkins pipeline and app included within this repository.
In your Buildkite organization, which you would have created or began working with when trying out Buildkite, create a new pipeline for this jenkins-to-buildkite repository, so that you can see and compare the same Node.js project being built in both Jenkins and Buildkite.
Step 2: Examine the Jenkins pipeline
Open your Jenkinsfile to examine its stages, steps, its matrix and post-processed steps.
-
Identify the typical features of this pipeline:
- Matrix builds: The pipeline is built twice—once with Node.js version 20.x and the other with version 22.x.
-
Agent targeting: Agents are targeted using label-based selection, which are the Node.js versions defined within the
axessection. -
Tool management: Node.js capabilities within the pipeline steps handled by Jenkins' own built-in
nodejstool. -
Sequential stages: Each
stagewithin thestagessection is executed sequentially, with one stage containing parallel sub-steps. Also note that since thestagessection is wrapped in amatrixdirective, the entire stages section is run in parallel (that is, twice, once using each Node.js version). -
Plugin usage: The
optionsdirective uses the Jenkins AnsiColor plugin for output colorization. -
Artifact archiving: Artifacts from the test coverage and build process are saved in the pipeline's
postsection.
The execution flow of this pipeline follows a typical pattern: install dependencies, run lint and tests in parallel, and then build and archive artifacts.
Step 3: Plan the pipeline translation
Now that you understand the pipeline's overall structure, execution flow and its goals, you can now plan the translation of the Jenkins pipeline into a Buildkite one:
- Create a basic
.buildkite/pipeline.ymlstructure for your Buildkite pipeline, along with the three main Jenkins stages as Buildkite steps (lint, test, build). - Configure step dependencies in your Buildkite pipeline to ensure that steps which depend on others passing first, are only run if those other steps do pass.
- Add a Node.js installation command to each step (to address Buildkite's steps executing in fresh workspaces).
- Implement the required build matrix configuration into your Buildkite pipeline.
- Implement build artifact collection to retain test coverage and build outputs.
- Review the verbose result and understand why it works.
- Refactor using YAML aliases to follow the DRY principle.
This approach maintains functional equivalence while taking advantage of Buildkite's strengths, such as parallel execution and native artifact support.
Step 4: Create a basic Buildkite pipeline structure
Begin by creating your initial .buildkite/pipeline.yml file with the basic step structure for the three main stages of the Jenkins pipeline, using command steps with label and id attributes:
steps:
  - label: ":eslint: Lint"
    id: lint
    commands:
      - echo "Lint step placeholder"

  - label: ":vitest: Test"
    id: test
    commands:
      - echo "Test step placeholder"

  - label: ":wrench: Build"
    commands:
      - echo "Build step placeholder"
Be aware that commands is an alias for command.
Notice the immediate differences in this pipeline syntax from Jenkins:
- YAML format instead of Groovy DSL. Each stage in the Jenkins pipeline is replaced by a single
commandstep in the Buildkite pipeline (which may consist of one or more shell commands, executable files or scripts). Each of these three steps will be dispatched as a single job to an available Buildkite agent. - Emoji support in labels without plugins.
- ID assignment for dependency references.
You should now see a clean YAML structure that's more readable than the Groovy DSL. If you save this file and commit it to your repository, Buildkite will detect it automatically.
Step 5: Configure the step dependencies
The build step should run only after lint and test complete successfully. Otherwise, running the build step when either the lint or test steps fail is a waste of resources that could result in longer running builds. Therefore, you should configure explicit dependencies on the build step, which will prevent it from running if either the lint or test steps fail:
  - label: ":wrench: Build"
    depends_on: [lint, test] # Explicit dependencies
    commands:
      - echo "Build step placeholder"
Without this depends_on attribute, all three steps would run simultaneously, due to Buildkite's parallel-by-default behavior.
You should now see that the build step will wait for both lint and test to complete. This is the key difference from Jenkins' sequential-by-default model.
Step 6: Install Node.js and dependencies
Now replace the three placeholder commands you began with earlier with real commands that install Node.js and its dependencies. Since each step begins with a fresh workspace when it dispatch as a job to run on a Buildkite agent, Node.js and its dependencies must be installed on every step:
  - label: ":eslint: Lint"
    id: lint
    commands:
      - curl -fsSL https://deb.nodesource.com/setup_{{matrix.node_version}}.x | bash
      - sudo apt install nodejs
      - cd app && npm ci
      - npm run lint
This highlights a key difference: In Jenkins, you can install plugins like NodeJS to then leverage their use within pipelines, while Buildkite requires explicit installation of such tools as part of the pipeline's build. In this example, npm ci is being used instead of npm install for faster, reproducible builds.
You should now see the pattern emerging: every step needs to set up its own environment. However, you can address this repetition later using YAML aliases.
Step 7: Implement a build matrix configuration
Now implement the build matrix for Node.js 20 and 22:
  - label: ":eslint: Lint (Node {{matrix.node_version}})"
    id: lint
    matrix:
      setup:
        node_version: [20, 22]
    commands:
      - curl -fsSL https://deb.nodesource.com/setup_{{matrix.node_version}}.x | bash
      - sudo apt install nodejs
      - cd app && npm ci
      - npm run lint
Buildkite's build matrix syntax is simpler than Jenkins—just specify the values in an array. The {{matrix.node_version}} template variable gets replaced at runtime, creating separate jobs for each Node.js version.
You should now see that this single step definition will create two separate jobs: one for Node.js version 20 and one for Node.js version 22. The label will show "Lint (Node 20)" and "Lint (Node 22)" respectively.
Step 8: Implement artifact collection
Now implement build artifact collection to capture test coverage and build outputs using the artifact_paths attribute:
  - label: ":vitest: Test (Node {{matrix.node_version}})"
    id: test
    matrix:
      setup:
        node_version: [20, 22]
    commands:
      - curl -fsSL https://deb.nodesource.com/setup_{{matrix.node_version}}.x | bash
      - sudo apt install nodejs
      - cd app && npm ci
      - npm test
    artifact_paths:
      - app/coverage/**/* # Collect test coverage

  - label: ":wrench: Build (Node {{matrix.node_version}})"
    matrix:
      setup:
        node_version: [20, 22]
    commands:
      - curl -fsSL https://deb.nodesource.com/setup_{{matrix.node_version}}.x | bash
      - sudo apt install nodejs
      - cd app && npm ci
      - npm run build
    depends_on: [lint, test]
    artifact_paths:
      - app/dist/**/*     # Collect build outputs
Buildkite provides native artifact support, which means that no plugins are required for this functionality—just specify the glob patterns for files you want to preserve.
You should now see that test coverage files are automatically collected and made available for download after each test run. Unlike Jenkins, this requires no additional plugin configuration.
Step 9: Review the verbose result
Now, look at the complete verbose version to understand exactly what's being built. This shows the full working pipeline you should now have created (along with some minor syntactical tweaks) before optimization—a crucial checkpoint to ensure everything functions correctly:
steps:
  - label: ":eslint: Lint (Node {{matrix.node_version}})"
    id: lint
    matrix:
      setup:
        node_version: [20, 22]
    commands:
      - |
        curl -fsSL https://deb.nodesource.com/setup_{{matrix.node_version}}.x | bash
        sudo apt install nodejs
        cd app && npm ci
      - npm run lint

  - label: ":vitest: Test (Node {{matrix.node_version}})"
    id: test
    matrix:
      setup:
        node_version: [20, 22]
    commands:
      - |
        curl -fsSL https://deb.nodesource.com/setup_{{matrix.node_version}}.x | bash
        sudo apt install nodejs
        cd app && npm ci
      - npm test
    artifact_paths:
      - app/coverage/**/*

  - label: ":wrench: Build (Node {{matrix.node_version}})"
    matrix:
      setup:
        node_version: [20, 22]
    commands:
      - |
        curl -fsSL https://deb.nodesource.com/setup_{{matrix.node_version}}.x | bash
        sudo apt install nodejs
        cd app && npm ci
      - npm run build
    depends_on:
      - lint
      - test
    artifact_paths:
      - app/dist/**/*
While this Buildkite pipeline YAML syntax is substantially shorter than the original Jenkins declarative pipeline's Groovy DSL syntax, there still remains clear duplication in the YAML pipeline.
However, this verbose version demonstrates that the translation of this pipeline from Jenkins to Buildkite works correctly—each step properly installs Node.js onto its Buildkite agent, sets up dependencies, and executes its remaining required commands.
You should now see a fully functional pipeline that will create a total of six jobs: lint, test, and build for each of the two Node.js versions. The build jobs will wait for their corresponding lint and test jobs to complete.
Step 10: Refactor with YAML aliases
Now that you've verified that the pipeline works, you can eliminate the duplication using YAML aliases. This refactoring maintains the same functionality while dramatically improving the pipeline code's maintainability:
common:
  install: &install |
    curl -fsSL https://deb.nodesource.com/setup_{{matrix.node_version}}.x | bash
    sudo apt install nodejs
    cd app && npm ci
  matrix: &matrix
    setup:
      node_version: [20, 22]

steps:
  - label: ":eslint: Lint (Node {{matrix.node_version}})"
    id: lint
    matrix: *matrix
    commands:
      - *install
      - npm run lint

  - label: ":vitest: Test (Node {{matrix.node_version}})"
    id: test
    matrix: *matrix
    commands:
      - *install
      - npm test
    artifact_paths:
      - app/coverage/**/*

  - label: ":wrench: Build (Node {{matrix.node_version}})"
    matrix: *matrix
    commands:
      - *install
      - npm run build
    depends_on:
      - lint
      - test
    artifact_paths:
      - app/dist/**/*
The final result is now dramatically shorter than the original Jenkins pipeline, with no duplication and cleaner, more readable structure.
You should now see a maintainable pipeline where changes to the Node.js installation process or matrix configuration only need to be made in one place. The &install creates an alias, and *install references it.
Key differences and benefits of migrating to Buildkite
This example pipeline translation demonstrates several important advantages of Buildkite's approach:
- Simpler pipeline configuration: The resulting Buildkite YAML syntax is much smaller than its Jenkins Groovy DSL.
- Execution model: Buildkite's steps are parallel by default with explicit sequencing vs Jenkins' stages, which are sequential by default with explicit parallelization.
- Plugin usage: Buildkite required no plugins, whereas Jenkins required two plugins (AnsiColor and Build Name and Description Setter)
- Tool Management: Buildkite requires explicit tool installation for each step, with full control, whereas Jenkins manages tools through the use of plugins.
- Artifact Handling: Buildkite provides native archiving and glob pattern support vs plugin-based archiving
For larger deployments, these differences become more significant:
- The fresh workspace model avoids state leakage between builds.
- The pull-based agent model simplifies scaling and security.
- Pipeline-specific plugin versioning eliminates dependency conflicts.
Be aware of common pipeline-translation mistakes, which might include:
- Forgetting about fresh workspaces (leading to missing dependencies).
- Over-parallelizing interdependent steps.
- Misunderstanding the queue-based agent targeting model.
These Buildkite-specific patterns, however, force better pipeline design that's more resilient and scalable.
Audit your Jenkins pipelines
Now that you've run through the process of translating a declarative Jenkins pipeline over to Buildkite, take an inventory of your existing Jenkins pipelines, plugins, and integrations. Determine which parts of your Jenkins setup are essential and which can be replaced or removed. This will help you decide what needs to be migrated to Buildkite.
Next steps
Explore these Buildkite resources to learn more about Buildkite's features and functionality, and how to enhance your Buildkite pipelines translated from Jenkins:
- Defining your pipeline steps for an advanced guide on how to configure Buildkite pipeline steps.
- Buildkite agent overview page for more information about the Buildkite agent guidance on how to configure it.
- Plugins directory for a catalog of Buildkite- as well as community-developed plugins to enhance your pipeline functionality.
- Dynamic pipelines to learn more about how to generate pipeline definitions at build-time with the power, and how to facilitate this feature with the Buildkite SDK.
- Buildkite agent hooks to extend or override the default behavior of Buildkite agents at different stages of its lifecycle.
- Using conditions to run pipeline builds or steps, only when specific conditions have been met.
- Annotations that allow you to add additional information to your build result pages using Markdown.
- Security and Secrets overview pages, which lead to details on how to manage secrets within your Buildkite infrastructure, as managing permissions for your teams and Buildkite pipelines themselves.
- Integrations to integrate Buildkite's functionality with other third-party tools, for example, notifications that automatically let your team know about the success of your pipeline builds.
- After configuring Buildkite Pipelines for your team, learn how to obtain actionable insights from the tests running in pipelines using Test Engine.
If you need further assistance with your Jenkins migration processes and plans, please don't hesitate to reach out to our Buildkite support team at support@buildkite.com. We're here to help you use Buildkite to build your dream CI/CD workflows.