Managing the Elastic CI Stack for AWS
This page describes common tasks for managing the Elastic CI Stack for AWS.
Docker registry support
If you want to push or pull from registries such as Docker Hub or Quay you can use the environment hook in your secrets bucket to export the following environment variables:
DOCKER_LOGIN_USER="the-user-name"DOCKER_LOGIN_PASSWORD="the-password"-
DOCKER_LOGIN_SERVER=""- optional. By default it logs in to Docker Hub
Setting these performs a docker login before each pipeline step runs, allowing you to docker push to them from within your build scripts.
If you use Amazon ECR you can set the ECRAccessPolicy parameter for the stack to either readonly, poweruser, or full depending on the access level you want your builds to have.
You can disable this in individual pipelines by setting AWS_ECR_LOGIN=false.
If you want to log in to an ECR server on another AWS account, you can set AWS_ECR_LOGIN_REGISTRY_IDS="id1,id2,id3".
The AWS ECR options are powered by an embedded version of the ECR plugin, so if you require options that aren't listed here, you can disable the embedded version as above and call the plugin directly. See its README for more examples (requires Agent v3.x).
Optimizing for slow Docker builds
For large legacy applications the Docker build process might take a long time on new instances. For these cases it's recommended to create an optimized "builder" stack which doesn't scale down, keeps a warm docker cache and is responsible for building and pushing the application to Docker Hub before running the parallel build jobs across your normal CI stack.
An example of how to set this up:
- Create a Docker Hub repository for pushing images to
- Update the pipeline's
environmenthook in your secrets bucket to perform adocker login - Create a builder stack with its own queue (for example,
elastic-builders)
Here is an example build pipeline based on a production Rails application:
steps:
  - name: ":docker: 📦"
    plugins:
      docker-compose:
        build: app
        image-repository: my-docker-org/my-repo
    agents:
      queue: elastic-builders
  - wait
  - name: "🔨"
    command: ".buildkite/steps/tests"
    plugins:
      docker-compose:
        run: app
    agents:
      queue: elastic
    parallelism: 75
Multiple instances
If you need different instances sizes and scaling characteristics for different pipelines, you can create multiple stacks. Each can run on a different Agent queue, with its own configuration, or even in a different AWS account.
Examples:
- A
docker-buildersstack that provides always-on workers with hot Docker caches (see Optimizing for slow Docker builds) - A
pipeline-uploadersstack with tiny, always-on instances for lightning fastbuildkite-agent pipeline uploadjobs. - A
deploystack with added credentials and permissions specifically for deployment.
Autoscaling
If you configure MinSize < MaxSize in your AWS autoscaling configuration, the stack automatically scales up and down based on the number of scheduled jobs.
This means you can scale down to zero when idle, which means you can use larger instances for the same cost.
Metrics are collected with a Lambda function, polling every 10 seconds based on the queue the stack is configured with. The autoscaler monitors only one queue, and the monitoring drives the scaling of the stack. You should only use one Elastic CI Stack for AWS per queue to avoid scaling up redundant agents. If you target the same queue with multiple stacks, each stack will independently scale up additional agents as if it were the only stack running, leading to over-provisioning.
Terminating the instance after the job is complete
You can set BuildkiteTerminateInstanceAfterJob to true to force the instance to terminate after it completes a job. Setting this value to true tells the stack to enable disconnect-after-job in the buildkite-agent.cfg file.
It is best to find an alternative to this setting if at all possible. The turn around time for replacing these instances is currently slow (5-10 minutes depending on other stack configuration settings). If you need single use jobs, we suggest looking at our container plugins like docker, docker-compose, and ecs, all which can be found here.
Elastic CI Stack for AWS releases
It is recommended to run the latest stable release of the CloudFormation
template, available from https://s3.amazonaws.com/buildkite-aws-stack/aws-stack.yml,
or a specific release available from the releases page.
The latest stable release can be deployed to any of our supported AWS Regions.
The most recent build of the CloudFormation stack is published to:
https://s3.amazonaws.com/buildkite-aws-stack/main/aws-stack.yml
With a version for each commit also published at:
https://s3.amazonaws.com/buildkite-aws-stack/main/${COMMIT}.aws-stack.yml
Per-commit builds for versions prior to v6.0.0, in particular for commits that are ancestors of 419f271, were published to:
https://s3.amazonaws.com/buildkite-aws-stack/master/${COMMIT}.aws-stack.ymlA main branch release can also be deployed to any of our supported AWS Regions.
GitHub branches are also automatically published to a per-branch URL
https://s3.amazonaws.com/buildkite-aws-stack/${BRANCH}/aws-stack.yml.
Branch releases can only be deployed to us-east-1.
Updating your stack
To update your stack to the latest version, use CloudFormation's stack update tools with one of the URLs from the Elastic CI Stack for AWS releases section.
To preview changes to your stack before executing them, use a CloudFormation Change Set.
Pause Auto Scaling
The CloudFormation template supports zero downtime deployment when updating. If you are concerned about causing a service interruption during the template update, use the AWS Console to temporarily pause auto scaling.
Open the CloudFormation console and select your stack instance. Using the
Resources tab, find the AutoscalingFunction. Use the Lambda console to find
the function's Triggers and Disable the trigger rule. Next, find the stack's
AgentAutoScaleGroup and set the DesiredCount to 0. Once the remaining
instances have terminated, deploy the updated stack and undo the manual
changes to resume instance auto scaling.
Using custom IAM roles
You can use an existing IAM role instead of letting the stack create one. This is useful for sharing a role across multiple stacks, or managing IAM roles outside of the stack.
To use a custom role, pass a pre-existing role's ARN to the Terraform variable instance_role_arn, or the CloudFormation Parameter InstanceRoleARN.
For the Agent Scaler Lambda, the ASG Process Suspender Lambda, or the Stop Buildkite agents Lambda, you can also provide custom roles using the Terraform variables scaler_lambda_role_arn, asg_process_suspender_role_arn, and stop_buildkite_agents_role_arn. Custom Lambda roles are currently only supported when using Terraform.
IAM policy requirements
As a baseline, a custom IAM role needs the same permissions the stack would normally create. At minimum, Buildkite agents need an access to:
- SSM for agent tokens and instance management
- Auto Scaling for instance lifecycle management
- AWS CloudWatch for logs and metrics
- AWS CloudFormation for stack resource information (AWS CloudFormation-specific)
- EC2 for instance metadata
The following additional policies may also apply if using additional features:
- Amazon S3 access for AWS S3 secrets and custom artifact buckets
- KMS for encrypted parameters or pipeline signing
- ECR for accessing container images
IAM policy examples
To get started, we've included the policies that are created via the AWS CloudFormation and Terraform stacks.
Some of the resources are generated dynamically when running either of the infrastructure-as-code solutions, so you will need to update them accordingly.
Core agent policy
The below policy set is the minimum requirement for the Elastic CI Stack for AWS:
{
    "Version": "2012-10-17",
    "Statement": [
        {
            "Effect": "Allow",
            "Action": [
                "autoscaling:DescribeAutoScalingInstances",
                "cloudwatch:PutMetricData",
                "cloudformation:DescribeStackResource",
                "ec2:DescribeTags"
            ],
            "Resource": "*"
        },
        {
            "Sid": "TerminateInstance",
            "Effect": "Allow",
            "Action": [
                "autoscaling:SetInstanceHealth",
                "autoscaling:TerminateInstanceInAutoScalingGroup"
            ],
            "Resource": "arn:aws:autoscaling:*:*:autoScalingGroup:*:autoScalingGroupName/YOUR_STACK_NAME-AgentAutoScaleGroup-*"
        },
        {
            "Sid": "Logging",
            "Effect": "Allow",
            "Action": [
                "logs:CreateLogGroup",
                "logs:CreateLogStream",
                "logs:PutLogEvents",
                "logs:DescribeLogGroups",
                "logs:DescribeLogStreams",
                "logs:PutRetentionPolicy"
            ],
            "Resource": "*"
        },
        {
            "Sid": "Ssm",
            "Effect": "Allow",
            "Action": [
                "ssm:DescribeInstanceProperties",
                "ssm:ListAssociations",
                "ssm:PutInventory",
                "ssm:UpdateInstanceInformation",
                "ssmmessages:CreateControlChannel",
                "ssmmessages:CreateDataChannel",
                "ssmmessages:OpenControlChannel",
                "ssmmessages:OpenDataChannel",
                "ec2messages:AcknowledgeMessage",
                "ec2messages:DeleteMessage",
                "ec2messages:FailMessage",
                "ec2messages:GetEndpoint",
                "ec2messages:GetMessages",
                "ec2messages:SendReply"
            ],
            "Resource": "*"
        },
        {
            "Effect": "Allow",
            "Action": "ssm:GetParameter",
            "Resource": "arn:aws:ssm:*:*:parameter/YOUR_AGENT_TOKEN_PARAMETER_PATH"
        }
    ]
}
S3 secrets bucket
When the S3 secrets bucket is enabled, the following statement is required:
{
    "Version": "2012-10-17",
    "Statement": [
        {
            "Sid": "SecretsBucket",
            "Effect": "Allow",
            "Action": [
                "s3:Get*",
                "s3:List*"
            ],
            "Resource": [
                "arn:aws:s3:::YOUR_SECRETS_BUCKET",
                "arn:aws:s3:::YOUR_SECRETS_BUCKET/*"
            ]
        }
    ]
}
S3 artifacts bucket
When using the custom Artifacts Storage in S3, the following statement is required:
{
    "Version": "2012-10-17",
    "Statement": [
        {
            "Sid": "ArtifactsBucket",
            "Effect": "Allow",
            "Action": [
                "s3:GetObject",
                "s3:GetObjectAcl",
                "s3:GetObjectVersion",
                "s3:GetObjectVersionAcl",
                "s3:ListBucket",
                "s3:PutObject",
                "s3:PutObjectAcl",
                "s3:PutObjectVersionAcl"
            ],
            "Resource": [
                "arn:aws:s3:::YOUR_ARTIFACTS_BUCKET",
                "arn:aws:s3:::YOUR_ARTIFACTS_BUCKET/*"
            ]
        }
    ]
}
KMS
When using KMS keys for signed pipelines or encrypted parameters, the following statement is required:
{
    "Version": "2012-10-17",
    "Statement": [
        {
            "Effect": "Allow",
            "Action": [
                "kms:Decrypt"
            ],
            "Resource": "arn:aws:kms:*:*:key/YOUR_KMS_KEY_ID"
        }
    ]
}
Lambda roles
When using custom IAM roles for the Agent Scaler Lambda, the ASG Process Suspender Lambda, or the Stop Buildkite agents Lambda, the following additional permissions are required beyond the core agent policy:
{
    "Version": "2012-10-17",
    "Statement": [
        {
            "Sid": "ScalerLambdaAutoScaling",
            "Effect": "Allow",
            "Action": [
                "autoscaling:DescribeAutoScalingGroups",
                "autoscaling:DescribeScalingActivities",
                "autoscaling:SetDesiredCapacity"
            ],
            "Resource": "*"
        },
        {
            "Sid": "ScalerLambdaSSMToken",
            "Effect": "Allow",
            "Action": [
                "ssm:GetParameter"
            ],
            "Resource": "arn:aws:ssm:*:*:parameter/YOUR_AGENT_TOKEN_PARAMETER_PATH"
        },
        {
            "Sid": "AsgProcessSuspender",
            "Effect": "Allow",
            "Action": [
                "autoscaling:SuspendProcesses"
            ],
            "Resource": "*"
        },
        {
            "Sid": "StopBuildkiteAgentsDescribeAsg",
            "Effect": "Allow",
            "Action": [
                "autoscaling:DescribeAutoScalingGroups"
            ],
            "Resource": "*"
        },
        {
            "Sid": "StopBuildkiteAgentsModifyAsg",
            "Effect": "Allow",
            "Action": [
                "autoscaling:UpdateAutoScalingGroup"
            ],
            "Resource": "arn:aws:autoscaling:*:*:autoScalingGroup:*:autoScalingGroupName/YOUR_STACK_NAME-*"
        },
        {
            "Sid": "StopBuildkiteAgentsSSMDocument",
            "Effect": "Allow",
            "Action": [
                "ssm:SendCommand"
            ],
            "Resource": "arn:aws:ssm:*::document/AWS-RunShellScript"
        },
        {
            "Sid": "StopBuildkiteAgentsSSMInstances",
            "Effect": "Allow",
            "Action": [
                "ssm:SendCommand"
            ],
            "Resource": "arn:aws:ec2:*:*:instance/*",
            "Condition": {
                "StringEquals": {
                    "aws:ResourceTag/aws:autoscaling:groupName": "YOUR_ASG_NAME"
                }
            }
        },
        {
            "Sid": "LambdaLogging",
            "Effect": "Allow",
            "Action": [
                "logs:CreateLogGroup",
                "logs:CreateLogStream",
                "logs:PutLogEvents"
            ],
            "Resource": "arn:aws:logs:*:*:log-group:/aws/lambda/YOUR_STACK_NAME-*"
        }
    ]
}
When using Elastic CI mode for the Scaler Lambda, the following additional permissions are also required:
{
    "Version": "2012-10-17",
    "Statement": [
        {
            "Sid": "ElasticCIModeEC2",
            "Effect": "Allow",
            "Action": [
                "ec2:DescribeInstances"
            ],
            "Resource": "*"
        },
        {
            "Sid": "ElasticCIModeSSM",
            "Effect": "Allow",
            "Action": [
                "ssm:SendCommand",
                "ssm:GetCommandInvocation"
            ],
            "Resource": [
                "arn:aws:ssm:*::document/AWS-RunShellScript",
                "arn:aws:ec2:*:*:instance/*"
            ]
        },
        {
            "Sid": "ElasticCIModeTerminate",
            "Effect": "Allow",
            "Action": [
                "ec2:TerminateInstances"
            ],
            "Resource": "arn:aws:ec2:*:*:instance/*",
            "Condition": {
                "StringEquals": {
                    "ec2:ResourceTag/aws:autoscaling:groupName": "YOUR_ASG_NAME"
                }
            }
        }
    ]
}
Trust policy
The following is the trust policy that is created for all the Elastic CI Stack for AWS instance roles:
{
    "Version": "2012-10-17",
    "Statement": [
        {
            "Effect": "Allow",
            "Principal": {
                "Service": [
                    "autoscaling.amazonaws.com",
                    "ec2.amazonaws.com"
                ]
            },
            "Action": "sts:AssumeRole"
        }
    ]
}
When using custom IAM roles for the Agent Scaler Lambda, the ASG Process Suspender Lambda, or the Stop Buildkite agents Lambda, the trust policy must include lambda.amazonaws.com in your Trust Policy:
{
    "Version": "2012-10-17",
    "Statement": [
        {
            "Effect": "Allow",
            "Principal": {
                "Service": [
                    "autoscaling.amazonaws.com",
                    "ec2.amazonaws.com",
                    "lambda.amazonaws.com"
                ]
            },
            "Action": "sts:AssumeRole"
        }
    ]
}
ECR managed policies
For ECR access, the most straightforward approach is to utilize one of the pre-existing roles provided by AWS:
arn:aws:iam::aws:policy/AmazonEC2ContainerRegistryReadOnlyarn:aws:iam::aws:policy/AmazonEC2ContainerRegistryPowerUserarn:aws:iam::aws:policy/AmazonEC2ContainerRegistryFullAccess
CloudFormation configuration
When creating a stack with AWS CloudFormation, a role can be passed as an ARN, for example:
Parameters:
  InstanceRoleARN: "arn:aws:iam::123456789012:role/MyBuildkiteRole"
In AWS CloudFormation, IAM roles are limited to a maximum of 10 paths, for example:
Parameters:
  InstanceRoleARN: "arn:aws:iam::123456789012:role/a/b/c/d/e/f/g/h/i/j/MyBuildkiteRole"
Terraform configuration
When using Terraform, there is no limit on the number of paths that can be used within an ARN. You can pass the value of your IAM Role's ARN to var.instance_role_arn and get started.
For Lambda functions, you can provide custom role Amazon Resource Names (ARNs) in terraform.tfvars:
instance_role_arn                  = "arn:aws:iam::123456789012:role/MyBuildkiteRole"
scaler_lambda_role_arn             = "arn:aws:iam::123456789012:role/MyBuildkiteRole"
asg_process_suspender_role_arn     = "arn:aws:iam::123456789012:role/MyBuildkiteRole"
stop_buildkite_agents_role_arn     = "arn:aws:iam::123456789012:role/MyBuildkiteRole"
You can use the same role for all resources, or provide different roles for each Lambda function and the EC2 instances.
CloudWatch metrics
Metrics are calculated every minute from the Buildkite API using a Lambda function.
You can view the stack's metrics under Custom Namespaces > Buildkite within CloudWatch.
Reading instance and agent logs
Each instance streams file system logs such as /var/log/messages and /var/log/docker into namespaced AWS log groups. A full list of files and log groups can be found in the relevant Linux CloudWatch agent config.json file.
Within each stream the logs are grouped by instance ID.
To debug an agent:
- Find the instance ID from the agent in Buildkite
- Go to your CloudWatch Logs Dashboard
- Choose the desired log group
- Search for the instance ID in the list of log streams
Customizing instances with a bootstrap script
You can customize your stack's instances by using the BootstrapScriptUrl stack parameter to run a script on instance boot. The script executes before the Buildkite agent starts and runs with elevated privileges, making it useful for installing software, configuring settings, or performing other customizations.
The stack parameter accepts a URI that specifies the location and retrieval method for your bootstrap script. Supported URI schemes include:
- S3 object URI (for example,
s3://my-bucket-name/my-bootstrap.sh) retrieves the script from an S3 bucket using the AWS S3 API. The instance's IAM role must haves3:GetObjectpermission for the specified object. - HTTPS URL (for example,
https://www.example.com/config/bootstrap.sh) downloads the script usingcurlcommand on Linux orInvoke-WebRequeston Windows. The URL must be publicly accessible. - Local file path (for example,
file:///usr/local/bin/my-bootstrap.sh) references a script already present on the instance's filesystem. This is particularly useful when customizing the AMI to include bootstrap scripts.
For private S3 objects, you need to create an IAM policy to allow the instances to read the file. The policy should include:
{
  "Version": "2012-10-17",
  "Statement": [
    {
      "Effect": "Allow",
      "Action": [
        "s3:GetObject"
      ],
      "Resource": ["arn:aws:s3:::my-bucket-name/my-bootstrap.sh"]

    }
  ]
}
After creating the policy, you must specify the policy's ARN in the ManagedPolicyARNs stack parameter.
Configuring agent environment variables
You can configure environment variables for the Buildkite agent process by using the AgentEnvFileUrl stack parameter. These environment variables apply to the agent process itself and are useful for configuring proxy settings, debugging options, or other agent-specific configuration. These variables are not the same as build environment variables, which should be configured in your pipeline.
The parameter accepts a URI that specifies the location and retrieval method for an environment file. Supported URI schemes include:
- S3 object URI (for example,
s3://my-bucket-name/agent.env) retrieves the environment file from an S3 bucket using the AWS S3 API. The instance's IAM role must haves3:GetObjectpermission for the specified object. - SSM parameter path (for example,
ssm:/buildkite/agent/config) retrieves environment variables from AWS Systems Manager Parameter Store. The instance's IAM role must havessm:GetParameterpermission. All parameters under the specified path are retrieved recursively with decryption enabled forSecureStringparameters. The last segment of each parameter path becomes the environment variable name in uppercase (for example,/buildkite/agent/config/http_proxybecomesHTTP_PROXY). - HTTPS URL (for example,
https://www.example.com/config/agent.env) downloads the environment file usingcurlcommand on Linux orInvoke-WebRequeston Windows. The URL must be publicly accessible. - Local file path (for example,
file:///etc/buildkite/agent.env) references an environment file already present on the instance's filesystem. This is useful when customizing the AMI to include environment configuration.
The environment file must contain variables in the format KEY="value", with one variable per line.
For private S3 objects, you must create an IAM policy to allow the instances to read the file. For SSM parameters, the IAM policy should include ssm:GetParameter permission for the specified parameter path. After creating the policy, you must specify the policy's ARN in the ManagedPolicyARNs stack parameter.
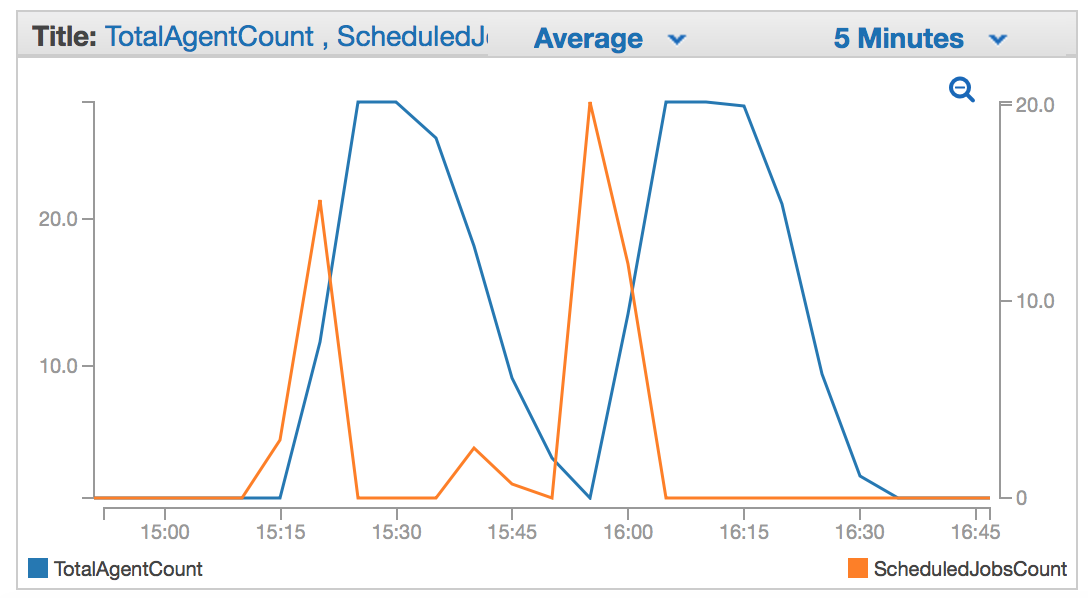
Health monitoring
You can assess and monitor health and proper function of the Elastic CI Stack for AWS using a combination of the following tools:
Auto Scaling group Activity logs found on the EC2 Auto Scaling dashboard. They display the actions taken by the Auto Scaling group (failures, scale in/out, etc.).
CloudWatch Metrics the Buildkite namespace contains
ScheduledJobsCount,RunningJobsCount, andWaitingJobsCountmeasurements for the Buildkite Queue your Elastic CI Stack for AWS was configured to poll. These numbers are fed to the Auto Scaling group by the scaling Lambda.CloudWatch Logs log streams for the Buildkite agent and EC2 Instance system console.