Deployments with Buildkite
There are many ways to set up both manual and continuous deployment workflows using Buildkite. This covers various ways of architecting deployment pipelines, common workflows, and how to integrate with external deployment systems.
Single deployment steps
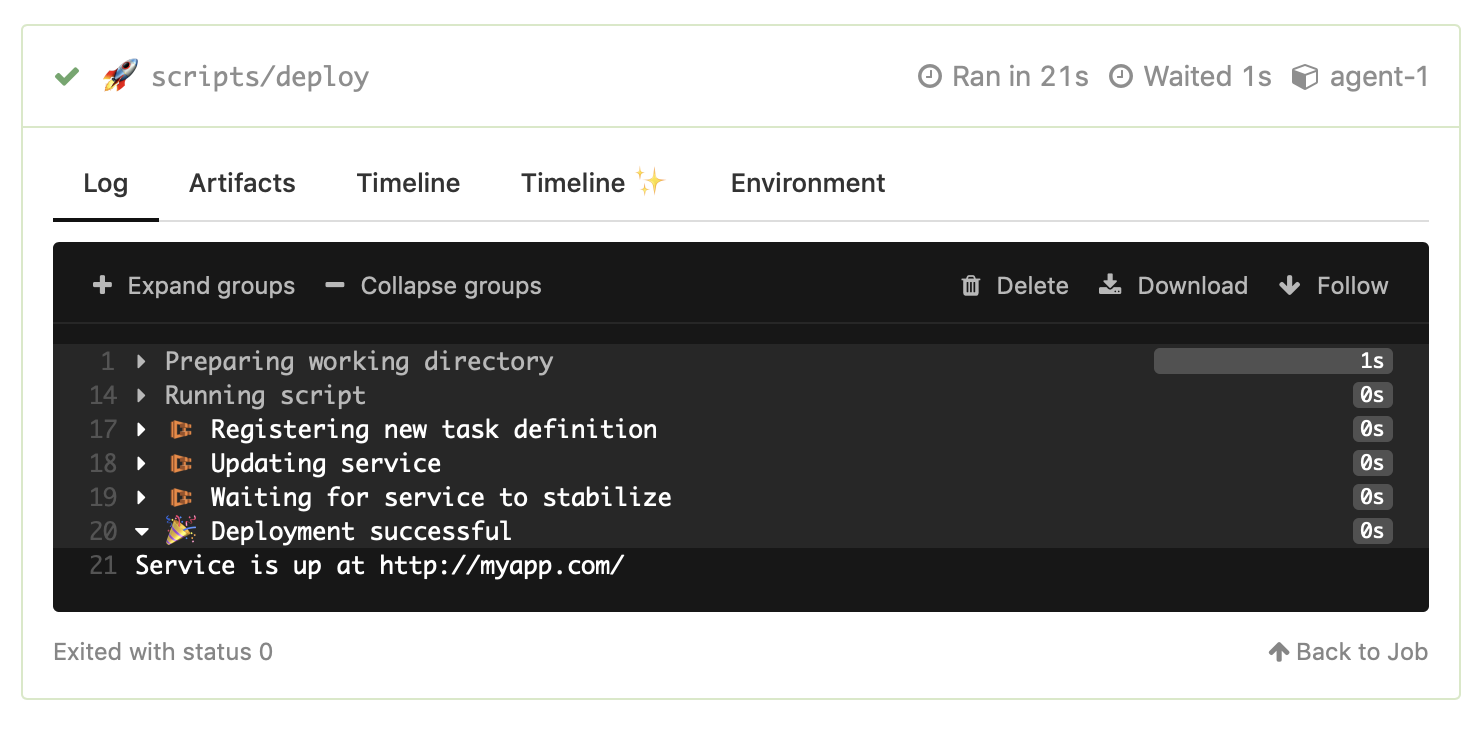
Adding a deployment step that runs after your tests pass is the simplest way to deploy from a Buildkite pipeline.
The example pipeline.yml below shows how to set up continuous deployment using a single step that runs after the tests pass.
steps:
  - label: "🔨"
    command: "scripts/tests"

  - wait

  - label: "🚀"
    command: "scripts/deploy"
    if: build.branch == 'main'
    concurrency: 1
    concurrency_group: "my-app-deploy"
This pipeline uses a conditional to only run on commits to the main branch, and sets a concurrency limit of 1 to ensure that only one deployment happens at a time.
Dedicated deployment pipelines
A dedicated deployment pipeline separates your deploy steps from any other testing and building steps. Creating deployment pipelines makes it easier to:
- Separate deployment failures from test failures
- Separate test and deployment pipeline.yml files
- Re-run failed deployments
- Simplify adding rollback steps
- Group other deploy-related tasks with the deployment steps
- Use teams for role based access control
- Allowlist deploy pipelines in agent hooks
A common pattern is to have two separate pipelines, each with its own pipeline.yml file in your project's repository:
.buildkite/tests.pipeline.yml
.buildkite/deploy.pipeline.yml
For example, your app's test pipeline (with slug my-app) runs on every git commit, and is configured to upload the following .buildkite/tests.pipeline.yml file:
steps:
  - label: "🔨"
    command: "scripts/tests"

  - wait

  # This makes sure that deploys are triggered in the same order as the
  # test builds, no matter which test builds finish first.
  - label: "Concurrency gate"
    command: "exit 0"
    concurrency: 1
    concurrency_group: "my-app-deploy-concurrency-gate"

  - wait

  - label: "🚀"
    trigger: "my-app-deploy"
    if: build.branch == 'main'
    build:
      commit: "$BUILDKITE_COMMIT"
Once the tests run successfully, if the commit is on the main branch then continuous deployment is done by triggering a build on the deployment pipeline.
The deployment pipeline (with slug my-app-deployment) could be configured to upload the following .buildkite/deploy.pipeline.yml file:
steps:
  - label: "🚀"
    command: "scripts/deploy"
    if: build.branch == 'main'
    concurrency: 1
    concurrency_group: "my-app-deploy"
This pipeline runs the deployment script, and sets a concurrency limit of 1 to ensure that only one deployment happens at a time.
You can add any of the pipeline step types to add additional capabilities to your deployment pipelines, such as manual approval steps, teams permission checks, or additional API calls.
Manual approval steps
Adding a manual approval to your pipeline before your deployment ensures that a deploy never goes out without explicit approval.
You can use block steps to add manual approvals before any deploy scripts or triggers.
The below example uses the same pipeline as the Single deployment step section, but adds a block step before the step that performs the deploy:
steps:
  - label: "🔨"
    command: "scripts/tests"

  - block: "Deploy"
    prompt: "Deploy to production?"

  - label: "🚀"
    command: "scripts/deploy"
    if: build.branch == 'main'
    concurrency_group: "my-app-deploy"
    concurrency: 1
Until the block step is manually unblocked either in Buildkite or using an API call, the build will be paused and the "🚀" deployment step will not run.
Deployment plugins
There are Buildkite plugins available for various systems and tools. For example, the ECS Deploy plugin and the AWS Lambda Deploy plugin.
The following example shows how to use the ECS Deploy plugin to automatically deploy an pre-built Docker image to an AWS ECS service:
steps:
  - block: "Deploy"
    prompt: "Deploy to production?"
  - label: ":ecs: 🚀"
    concurrency: 1
    concurrency_group: "rails-app-deploy"
    plugins:
      - ecs-deploy#v1.3.0:
        cluster: "production"
        service: "app"
        task-definition: "production-deploy/rails-app.json"
        task-family: "rails-app"
        image: "my.ecr.repo/rails-app:${BUILDKITE_COMMIT}"
        task-role-arn: "deployer"
        deployment-configuration: "100/200"
You can find the latest deployment plugins in the plugins directory. If there's no plugin for your deployment service of choice, see the Writing plugins documentation for information on how to write your own.
External deployment systems
You can deploy applications to services like Kubernetes, Argo CD, Heroku, or ECS from a script in a Buildkite command step, similar to how you'd do so on a command line. Learn more about these processes from the following relevant pages for walk-throughs with examples:
In more complex environments you can use external deployment/delivery systems such as Spinnaker, Shipit, Samson, or Octopus. You can call the deployment system's CLI tool or API from a script in a Buildkite command step, similar to how you'd do it on a command line.
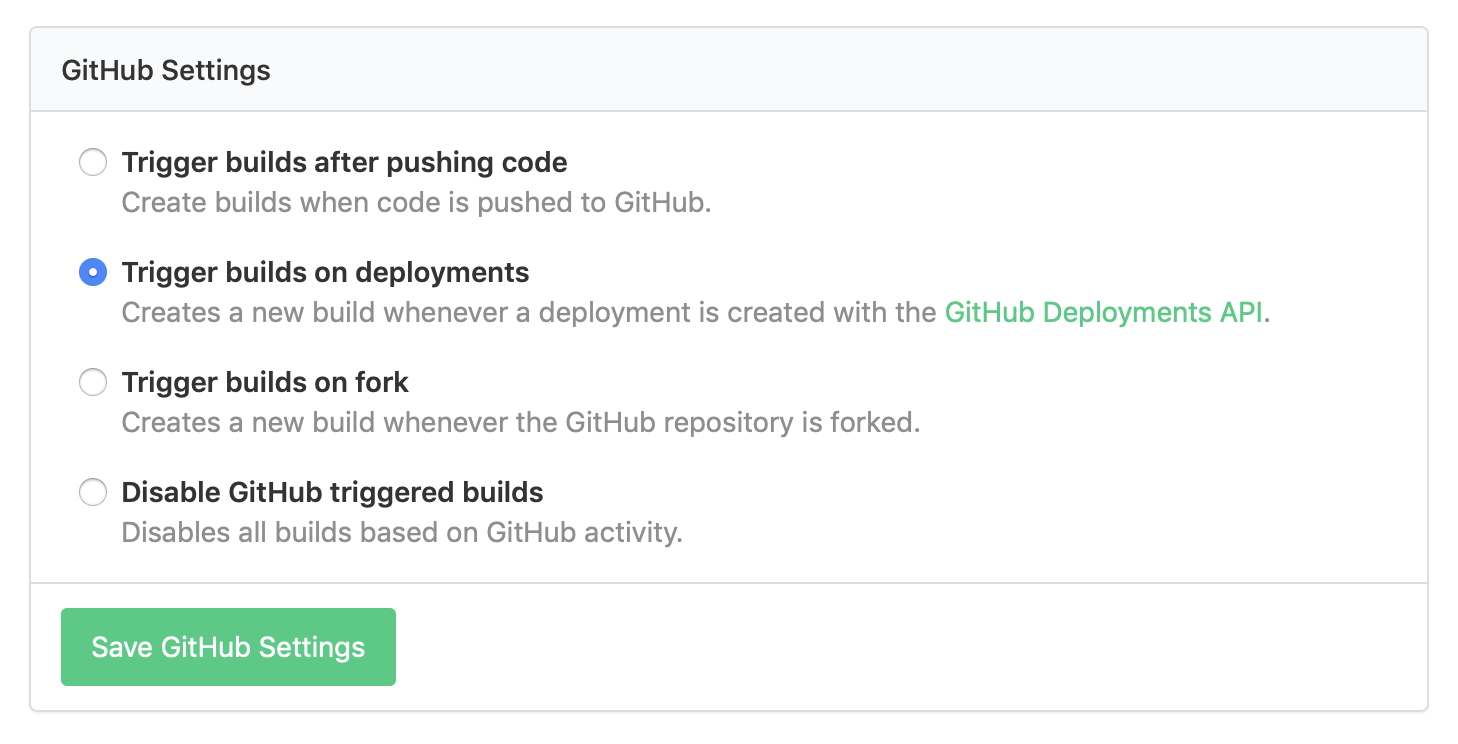
GitHub deployments
You can set up your pipelines to create a build whenever there is a deployment created in GitHub. You can trigger these builds using a call to GitHub's Deployments REST API, or using the GitHub Slack app's /github deploy my-org/my-repo command.
To enable builds to be created from GitHub deployment events, create a pipeline and select 'Trigger builds on deployment' in your Buildkite pipeline's GitHub settings:
To customize the deployment's environment name and URL in GitHub, you can set the following two build meta-data values in the pipeline that performs the deployment:
buildkite-agent meta-data set "github_deployment_status:environment" "staging"
buildkite-agent meta-data set "github_deployment_status:environment_url" "https://staging.my-app-dev.com/"