Build exports
Build exports is only available on an Enterprise plan, which has a build retention period of 12 months.
If you need to retain build data beyond the retention period in your Buildkite plan, you can export the data to your own Amazon S3 bucket or Google Cloud Storage (GCS) bucket.
If you don't configure a bucket, Buildkite stores the build data for 18 months in case you need it. You cannot access this build data through the API or Buildkite dashboard, but you can request the data by contacting support.
Builds from deleted pipelines are not exported
When a pipeline is deleted, all of its associated builds are also deleted and will not be exported.
If you need to retain builds to preserve their data and be able to export them, archive the pipeline instead.
How it works
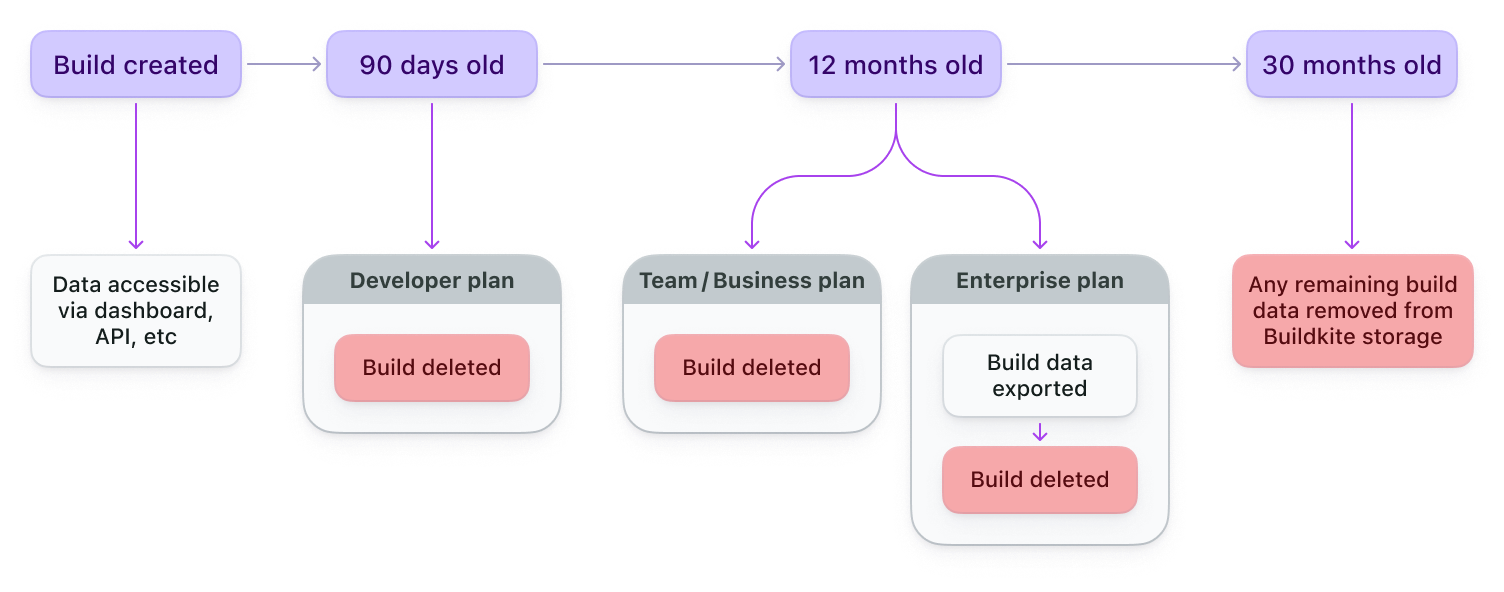
Builds older than the build retention limit are automatically exported as JSON using the build export strategy (S3 or GCS) you have configured. If you haven't configured a bucket for build exports, Buildkite stores that build data as JSON in our own Amazon S3 bucket for a further 18 months in case you need it. The following diagram outlines this process.

Buildkite exports each build as multiple gzipped JSON files, which include the following data:
buildkite/build-exports/org={UUID}/date={YYYY-MM-DD}/pipeline={UUID}/build={UUID}/
├── annotations.json.gz
├── artifacts.json.gz
├── build.json.gz
├── step-uploads.json.gz
└── jobs/
    ├── job-{UUID}.json.gz
    └── job-{UUID}.log
The files are stored in the following formats:
- Annotations
- Artifacts (as meta-data)
-
Builds (but without
jobs, as they are stored in separate files) - Jobs (as would be embedded in a Build via the REST API)
Configure build exports
To configure build exports for your organization, you'll need to prepare an Amazon S3 or GCS bucket before enabling exports in the Buildkite dashboard.
Prepare your Amazon S3 bucket
- Read and understand Security best practices for Amazon S3.
- Your bucket must be located in Amazon's
us-east-1region. - Your bucket must have a policy allowing cross-account access as described here and demonstrated in the example below¹.
- Allow Buildkite's AWS account
032379705303tos3:GetBucketLocation. - Allow Buildkite's AWS account
032379705303tos3:PutObjectkeys matchingbuildkite/build-exports/org=YOUR-BUILDKITE-ORGANIZATION-UUID/*. - Do not allow AWS account
032379705303tos3:PutObjectkeys outside that prefix.
- Allow Buildkite's AWS account
- Your bucket should use modern S3 security features and configurations, for example (but not limited to):
- Block public access to prevent accidental misconfiguration leading to data exposure.
- ACLs disabled with bucket owner enforced to ensure your AWS account owns the objects written by Buildkite.
-
Server-side data encryption (
SSE-S3is enabled by default, we do not currently supportSSE-KMSbut let us know if you need it). - S3 Versioning to help recover objects from accidental deletion or overwrite.
- You may want to use Amazon S3 Lifecycle to manage storage class and object expiry.
- You may want to set up additional safety mechanisms for large data dumps:
- We recommend setting up logging and alerts (e.g. using AWS CloudWatch) to monitor usage and set thresholds for data upload limits.
- Use cost monitoring with AWS Budgets or AWS CloudWatch to track large or unexpected uploads that may lead to high costs. Setting budget alerts can help you detect unexpected increases in usage early.
¹ Your S3 bucket policy should look like this, with YOUR-BUCKET-NAME-HERE and
YOUR-BUILDKITE-ORGANIZATION-UUID substituted with your details:
{
    "Version": "2012-10-17",
    "Statement": [
        {
            "Sid": "BuildkiteGetBucketLocation",
            "Effect": "Allow",
            "Principal": {
                "AWS": "arn:aws:iam::032379705303:root"
            },
            "Action": "s3:GetBucketLocation",
            "Resource": "arn:aws:s3:::YOUR-BUCKET-NAME-HERE"
        },
        {
            "Sid": "BuildkitePutObject",
            "Effect": "Allow",
            "Principal": {
                "AWS": "arn:aws:iam::032379705303:root"
            },
            "Action": "s3:PutObject",
            "Resource": "arn:aws:s3:::YOUR-BUCKET-NAME-HERE/buildkite/build-exports/org=YOUR-BUILDKITE-ORGANIZATION-UUID/*"
        }
    ]
}
Your Buildkite Organization ID (UUID) can be found on the settings page described in the next section.
Prepare your Google Cloud Storage bucket
- Read and understand Google Cloud Storage security best practices and Best practices for Cloud Storage.
-
Your bucket must have a policy allowing our Buildkite service-account access as described here.
- Assign Buildkite's service-account
buildkite-production-aws@buildkite-pipelines.iam.gserviceaccount.comthe"Storage Object Creator". - Scope the
"Storage Object Creator"role using IAM Conditions to limit access to objects matching the prefixbuildkite/build-exports/org=YOUR-BUILDKITE-ORGANIZATION-UUID/*. - Your IAM Conditions should look like this, with
YOUR-BUCKET-NAME-HEREandYOUR-BUILDKITE-ORGANIZATION-UUIDsubstituted with your details:
{
  "expression": "resource.name.startsWith('projects/_/buckets/YOUR-BUCKET-NAME-HERE/objects/buildkite/build-exports/org=YOUR-BUILDKITE-ORGANIZATION-UUID/')",
  "title": "Scope build exports prefix",
  "description": "Allow Buildkite's service-account to create objects only within the build exports prefix",
}
Your Buildkite Organization ID (UUID) can be found on the organization's pipeline settings.
- Assign Buildkite's service-account
Your bucket must grant our Buildkite service-account (
buildkite-production-aws@buildkite-pipelines.iam.gserviceaccount.com)storage.objects.createpermission.-
Your bucket should use modern Google Cloud Storage security features and configurations, for example (but not limited to):
- Public access prevention to prevent accidental misconfiguration leading to data exposure.
- Access control lists to ensure your GCP (Google Cloud Provider) account owns the objects written by Buildkite.
- Data encryption options.
- Object versioning to help recover objects from accidental deletion or overwrite.
You may want to use GCS Object Lifecycle Management to manage storage class and object expiry.
Enable build exports
To enable build exports:
- Navigate to your organization's pipeline settings.
- In the Exporting historical build data section, select your build export strategy (S3 or GCS).
- Enter your bucket name.
- Select Enable Export.
Once Enable Export is selected, we perform validation to ensure we can connect to the bucket provided for export. If there are any issues with connectivity export will not get enabled and you will see an error in the UI.
Second part of validation is we upload a test file "deliverability-test.txt" to your build export bucket. Please note that this test file may not appear right away in your build export bucket as there is an internal process that needs to kick off for this to happen.