User and team permissions
Customers on any Buildkite plan can manage permissions using the teams feature. Learn more about this feature in Manage teams and permissions.
Manage teams and permissions
The teams feature allows you to apply access permissions and functionality controls for one or more groups of users (that is, teams) on each pipeline, test suite, registry, or any combination of these, throughout your organization.
To manage teams across Buildkite's applications, a Buildkite organization administrator first needs to enable this feature across their organization.
To access or enable the teams feature for your organization, or both:
Select Settings in the global navigation to access the Organization Settings page.
Select Teams to access your organization's Teams page.
If the teams feature is not enabled, select Enable Teams to activate this feature.
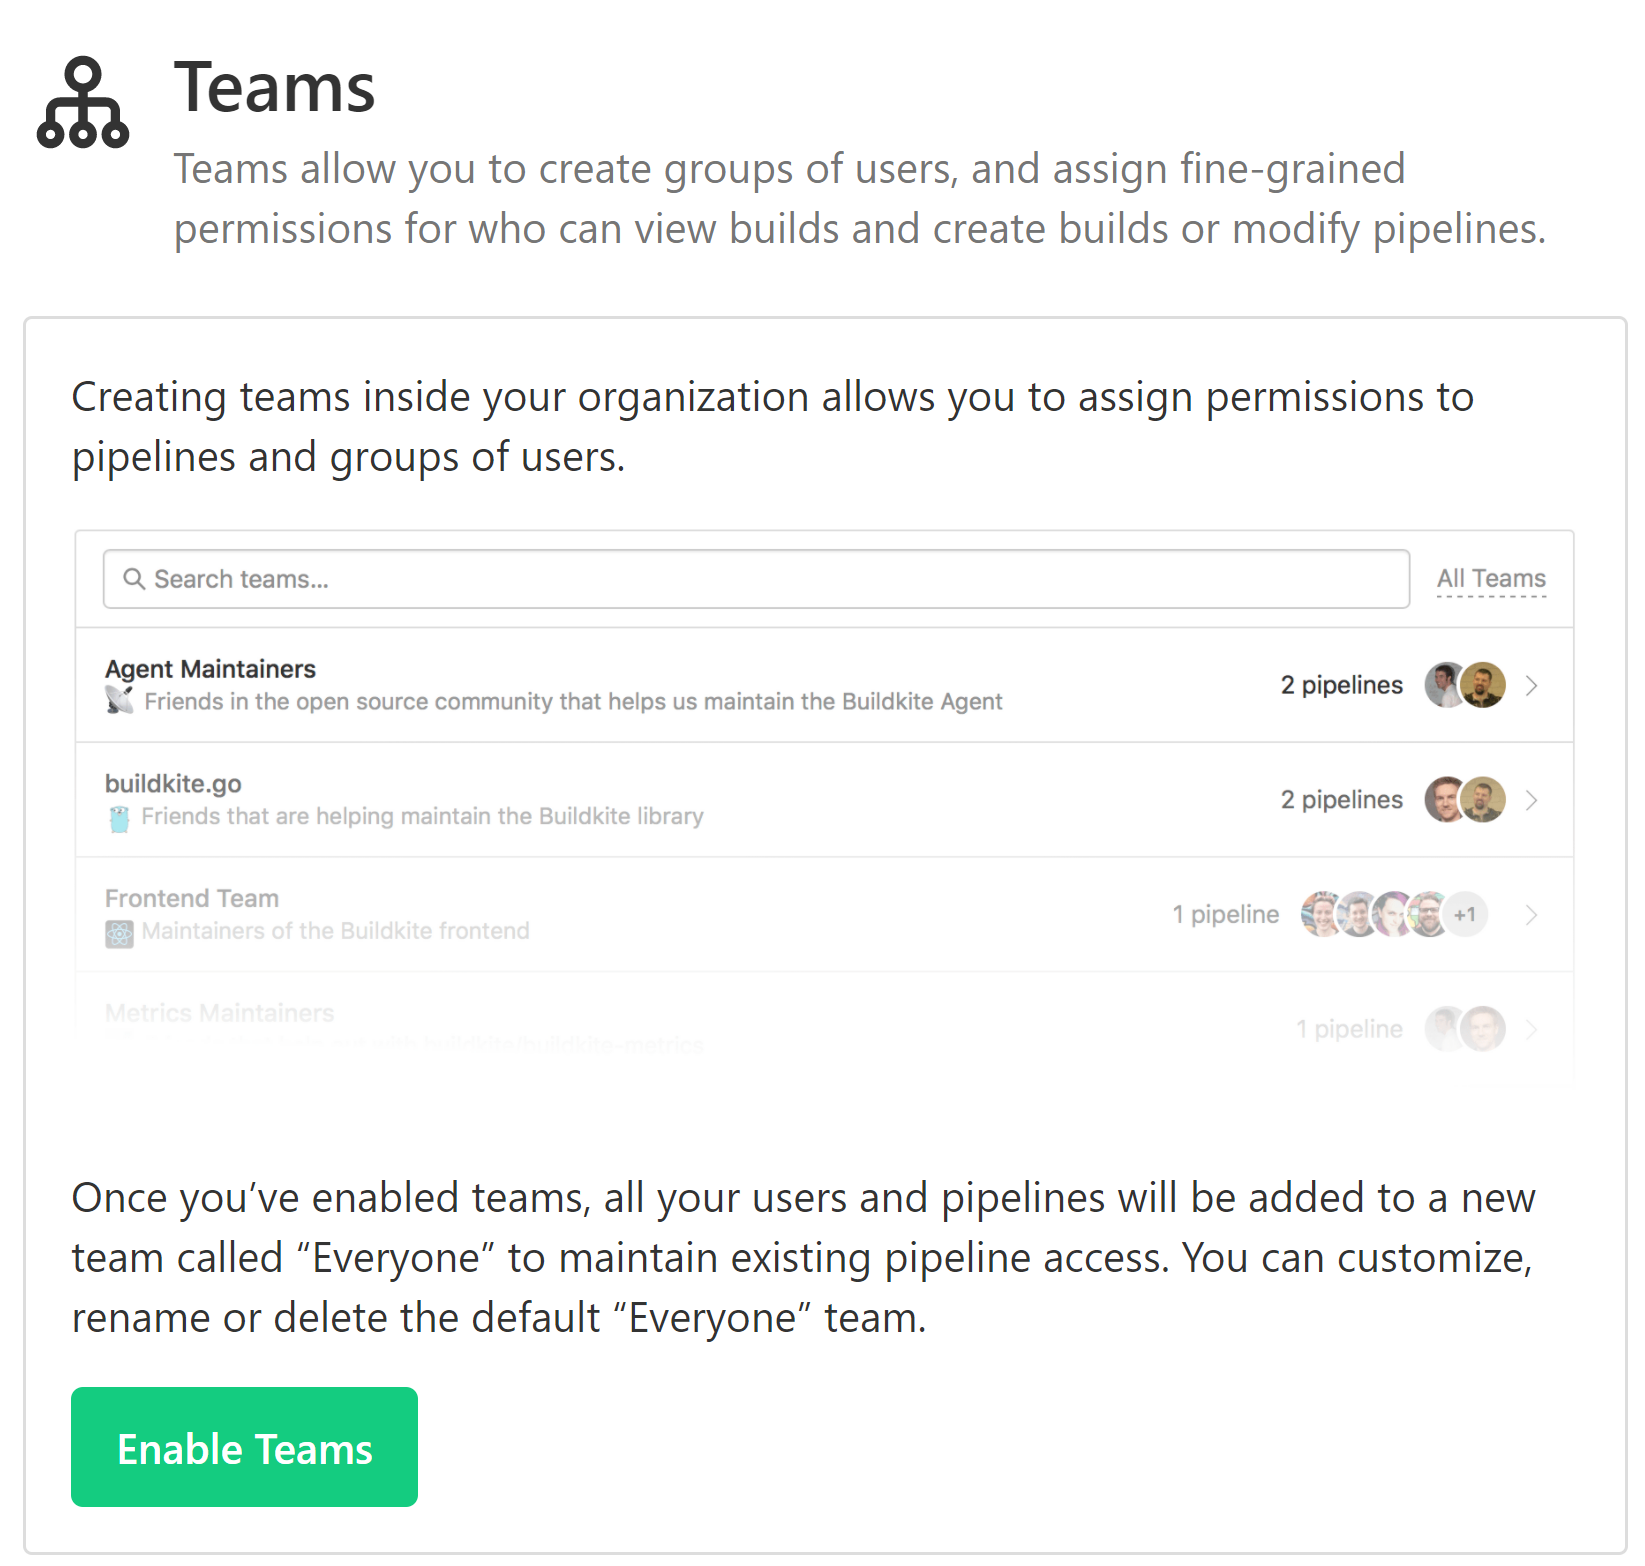
When you first enable the teams feature, a team is automatically created for your organization called Everyone, which includes all users. This maintains existing access to pipelines for all the users in your Buildkite organization.
Without the Teams feature activated, all users are able to access all items within your Buildkite organization.
Organization-level permissions
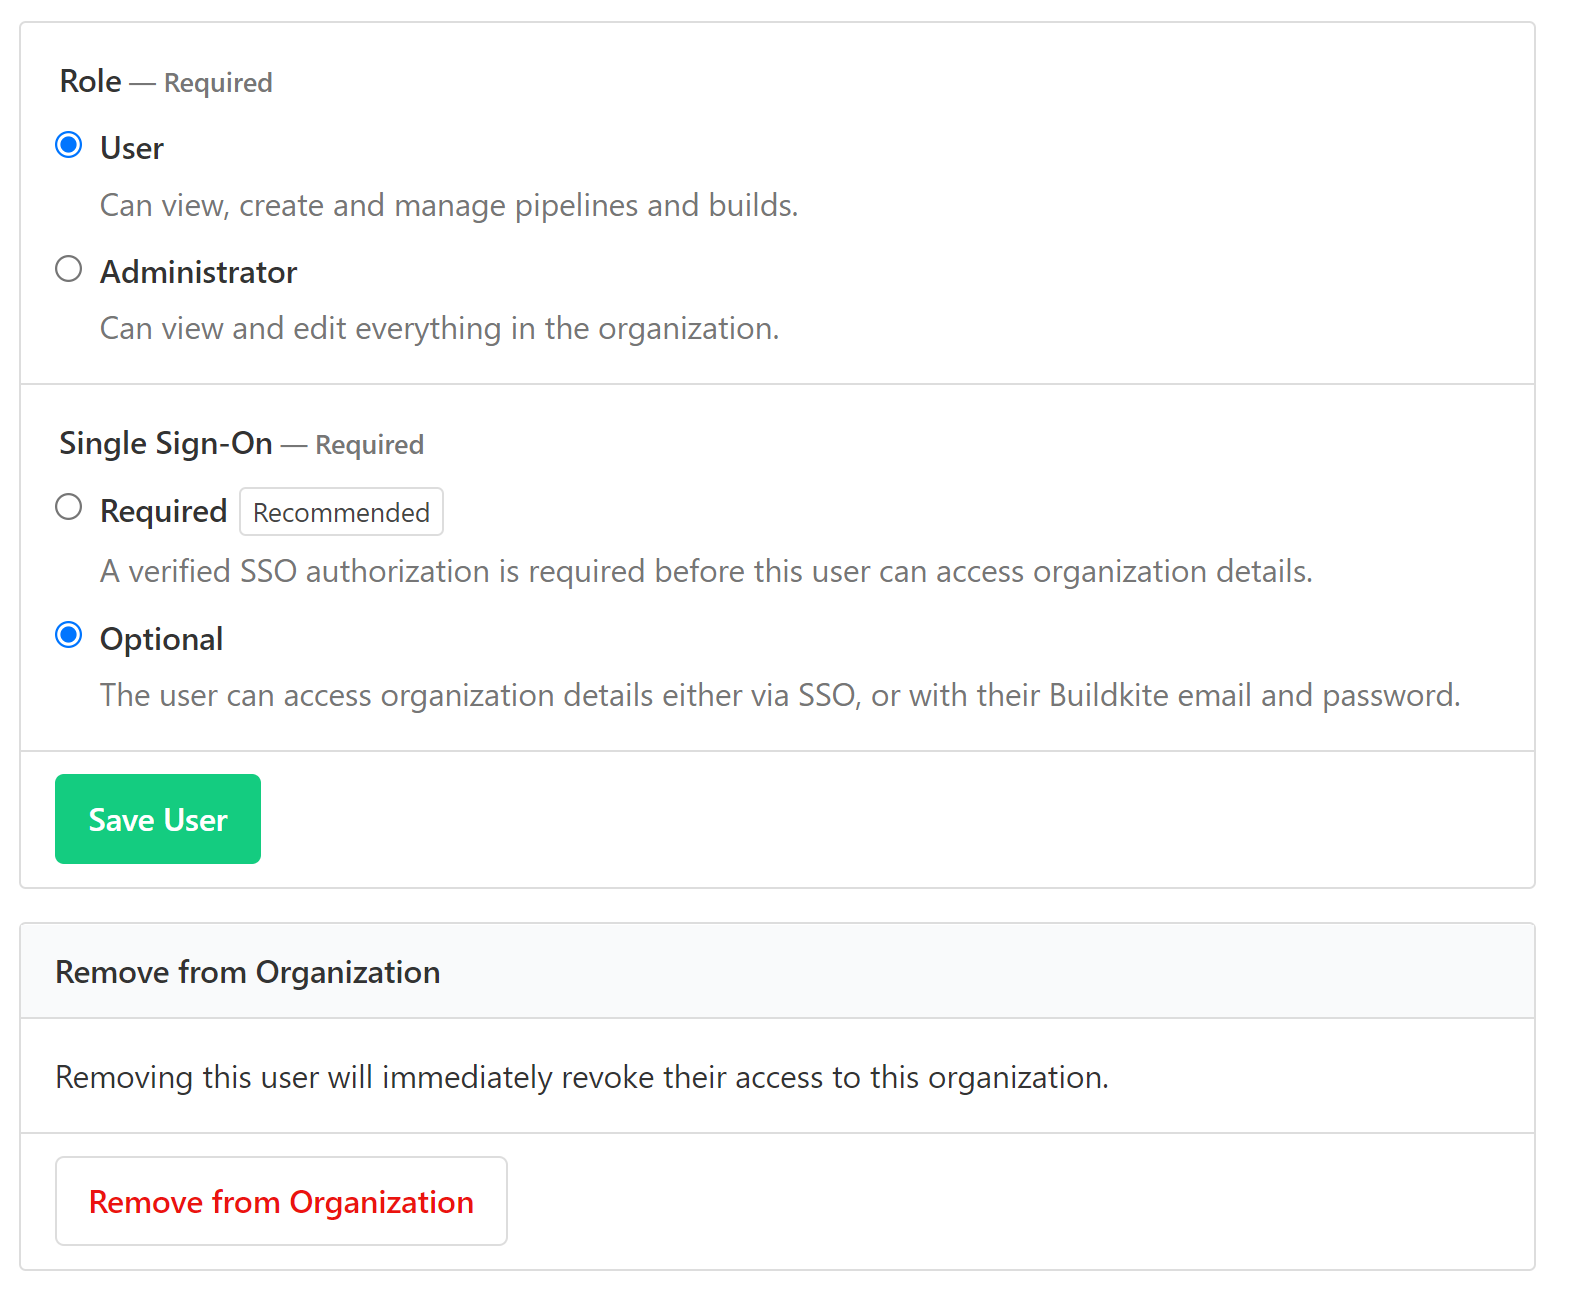
A user who is a Buildkite organization administrator can access the Organization Settings page by selecting Settings in the global navigation, and do the following throughout their Buildkite organization:
Access the Teams feature and page, by selecting Settings in the global navigation > Teams.
-
From the Teams page:
- Create a new team, using the New Team button.
-
Administer (with full control) the team-, pipeline-, test suite- and registry-level settings throughout their Buildkite organization.
Note: Registry-level settings are only available once Buildkite Package Registries has been enabled.
Delete an existing team, by selecting the team > Settings tab > Delete Team button.
Enable and disable the teams feature for their organization. This feature can only be disabled once all teams have been deleted from the organization (including the automatically-created Everyone team) using the Disable Teams button on the Teams page. Once the teams feature has been disabled, it can be re-enabled at any time.
Configure other organization-level settings for Buildkite Pipelines and Package Registries, as well as various integrations with Buildkite.
Access and view Buildkite Pipelines and Package Registries usage reports and audit logs.
Team-level permissions
A user who is a team maintainer on an existing team can:
-
Access the Teams feature and page, by selecting Teams in the global navigation > Teams.
Note: If a team maintainer is also a Buildkite organization administrator, Teams is not available in the global navigation and instead, accessing this feature is performed as an organization administrator.
-
From the Teams page:
- Add another existing user to this team, using the Add Member button from the Members tab.
- Remove a user from this team, by selecting the user's Remove button.
-
Change the permission for all users in this team on any:
- pipeline in the team to Full Access, Build & Read, or Read Only.
- test suite in the team to Full Access, or Read Only.
- registry in the team to Full Access, Read & Write, or Read Only.
To do this, select the appropriate tab (Pipelines, Test Suites or Package Registries) and then select the required permission for the item.
Note: Managing team permissions for registries is only available once Buildkite Package Registries has been enabled.
-
Edit the team's details and other settings using the Settings tab, which includes the ability to:
- Change the team's Visibility.
- Automatically add new users to this team.
- Set the Default Member Role (that is, team Member or Maintainer) for new users joining the team.
-
Set the Team Member Permissions, which allows team members to do any combination of the following in this team:
- Create pipelines
- Create test suites
- Create registries
- Delete registries
- Delete packages
Note: If these permissions are removed from a team, all team maintainers in this team will still be able to create and add new pipelines, test suites and registries within the team.
Delete the team, using the Delete button.
As indicated in the Buildkite interface, a user who is in a team is known as a Team Member, and such users have fewer permissions within the team (that is, no team management capabilities) than a Team Maintainer.
All team members in a team have the same level of access to the pipelines, test suites, and registries in the team. If you need to have more fine grained control over the pipelines, test suites or registries in a team, you can create more teams with different permissions.
Pipeline-level permissions override team member permissions
When a user belongs to multiple teams that have access to the same pipeline, the highest pipeline-level permission across all of those teams applies. For example, if a user belongs to Team A, which has Read Only access to a pipeline, and also belongs to Team B, which has Full Access to the same pipeline, the user has Full Access to that pipeline. This means the user can edit pipeline settings, create builds, and manage access, regardless of the lower permission set through Team A.
Permission levels also affect who can change a resource's access settings later.
Changing Full Access permissions on pipelines, test suites and registries
As a team maintainer, once you change the permission on any of these items away from Full Access, you could lose the ability to change the permissions on that item again. This can happen if you are no longer a member of a team that provides Full Access to this item.
A Buildkite organization administrator is required to change any item's permissions back to Full Access again.
Programmatically managing teams
You can programmatically manage your teams using our GraphQL API. If you're creating pipelines programmatically using the REST API, you can add them directly to teams using the team's UUID. More information about creating pipelines can be found in our REST API documentation.
You can also restrict agents to specific teams with the BUILDKITE_BUILD_CREATOR_TEAMS environment variable. Using agent hooks, you can allow or disallow builds based on the creator's team memberships.
Note that GitHub accepts unsigned commits, including information about the commit author and passes them along to webhooks, so you should not rely on these for authentication unless you are confident that all of your commits are trusted.
For example, the following environment hook
prevents anyone from outside of the ops team from running a build on the agent:
set -euo pipefail

if [[ ":$BUILDKITE_BUILD_CREATOR_TEAMS:" != *":ops:"* ]]; then
  echo "You must be in the ops team to run a job on this agent"
  exit 1
fi
Frequently asked questions
Is there a limit to the number of teams an organization can have?
Yes, Buildkite has a limit of 250 teams per organization. If you are an Enterprise plan customer and require additional teams, please contact support@buildkite.com.
Will users (and API tokens) still have access to their pipelines?
When you enable the teams feature, a default team called "Everyone" is created, containing all your users and pipelines. This ensures that users, and their API tokens, will still have access to their pipelines.
How does Teams work with SSO?
When a user joins the organization using SSO, they'll be automatically added to any teams that have the "Automatically add new users to this team" setting enabled.
Can I delete the "Everyone" team?
Yes, you can delete or edit the "Everyone" team. To ensure uninterrupted access to pipelines we recommend creating new teams before deleting the "Everyone" team.
Can I set separate permissions specifically on rebuilds?
No, rebuilds are in the same category with builds. Therefore, all team members with permissions to run builds on a certain pipeline are also able to perform rebuilds.
Once enabled, can I disable teams?
Yes, you can disable teams by deleting all your teams, and then selecting "Disable Teams".
Can I automate the removal of users from Buildkite?
Yes, you can automatically remove users using the GraphQL API. You'll need a GraphQL API token to do it.
You'll need to look up your organization's slug in the Organization Settings and check the name or email of the user you want to remove in the team that this user belongs to. Next, use the first query to get the user ID (make sure to replace your-organization-slug with your Buildkite organization's slug and Jane Doe with the name or email of the user you want to remove), and then run the RemoveOrganizationMember mutation with the user ID to remove the user:
query FindOrganizationMember {
  organization(slug: "your-organization-slug") {
    members(first: 1, search: "Jane Doe") {
      edges {
        node {
          id # You will need to use this info on the next step as OrganizationMember.id
          user {
            # Double check that this is the right user you are about to remove
            name
            email
          }
        }
      }
    }
  }
}
Copy the user ID you've received into the following mutation and run it to remove the user from your Buildkite organization:
mutation RemoveOrganizationMember {
  organizationMemberDelete(input: { id: "user-ID-you-copied-goes-here" }) {
    deletedOrganizationMemberID
  }
}
Removing users during a security incident
If you believe that a user account has been compromised, the recommended incident response is to remove such a user from your Buildkite organization immediately. This will entirely remove their ability to impact your organization and protect you from any further actions that the user could take.
You can remove a user in your organization's Settings in the Buildkite interface.
A Buildkite organization administrator can also delete organization members using GraphQL. To do this:
-
Find the
idfor the user to be deleted (in this exampleJane Doe):query { organization(slug: "your-organization-slug") { members(search: "Jane Doe", first: 10) { edges { node { role user { name } id } } } } } -
Use the
idfrom the previous query in a mutation:mutation deleteOrgMember { organizationMemberDelete(input: { id: "abc123" }) { organization { name } deletedOrganizationMemberID user { name } } }
Security guarantees of removing a user
When you remove a user from your organization, the active session tokens belonging to this user cannot make calls to the product that will return (or make changes to) any of the data available using the web UI, API, etc. So removing a compromised or rogue user is as effective as killing all sessions by the user.
Within Buildkite's access model, organizations don't own users, so they can't control users' sessions because users represent individuals who may be members of multiple organizations.
Removing a compromised user from your organization immediately protects all the organization's resources from that user. The user will technically still be able to view their personal settings page.
In case of a non-responsive or rogue user, or if multiple accounts are compromised, you can send a list of impacted user IDs to support@buildkite.com and ask the Buildkite support to log out the specific user or all the users out of all sessions.
As a part of the Buildkite SLA, customers on the Enterprise plan have an emergency email available for operational and security incidents. Contact your Customer Success Manager for more information.
If you suspect or have already detected a security breach, and the affected user is cooperative, they can also log out and reset their password, which will automatically reset all of their active sessions. Then you can work with the affected user to ensure their account is safe and re-add them to your Buildkite organization.
Note that resetting a password might not always be an option. If you have SSO enabled for your organization, the user in question may not even have a dedicated password for their Buildkite account.
Removing users from an organization with enabled SSO
If you're using SSO, you also need to protect against the attackers regaining organization membership by logging in again with SSO. This will not renew the revoked authorizations and does not authorize any other sessions that might still be active for the user, as a new organization member will be created. However, if the attacker has access to a Buildkite session, they may also have access to a regular session with the permissions granted for your SSO session defaults. So it is important to disable or remove such a compromised user account from your SSO.
If the attacker has control of the SSO, the scope of the security incident is beyond what could be remediated using Buildkite's tools only.
Disabling and re-enabling SSO
The other control you have is the organization membership's SSO mode. If the membership requires SSO, the user will only have access to your organization in the particular sessions authenticated through your SSO provider.
Before you proceed, make sure that you have at least one user with SSO as an optional log in requirement in your organization to make it possible for someone to log back in!
Admins of your Buildkite organization can disable and then re-enable the SSO, which will force all users in your organization to re-authorize with SSO. When you disable an SSO provider, it rescinds all active SSO authorizations for all users including the admin who disables the SSO! The admin will need to log back into the organization by using a non-SSO method.
You can disable and re-enable the SSO using GraphQL or the Buildkite UI.
Remember that if an attacker had a fully authenticated session, they've potentially configured API tokens, which will not be subject to SSO requirements. Therefore, the only truly safe response is still to remove the compromised user from your Buildkite organization.