Defining your pipeline steps
Pipeline steps are defined in YAML and are either stored in Buildkite or in your repository using a pipeline.yml file.
Defining your pipeline steps in a pipeline.yml file gives you access to more configuration options and environment variables than the web interface, and allows you to version, audit and review your build pipelines alongside your source code.
Getting started
On the Pipelines page, select New pipeline to begin creating a new pipeline.
The required fields are Git scope, Repository and Pipeline name.
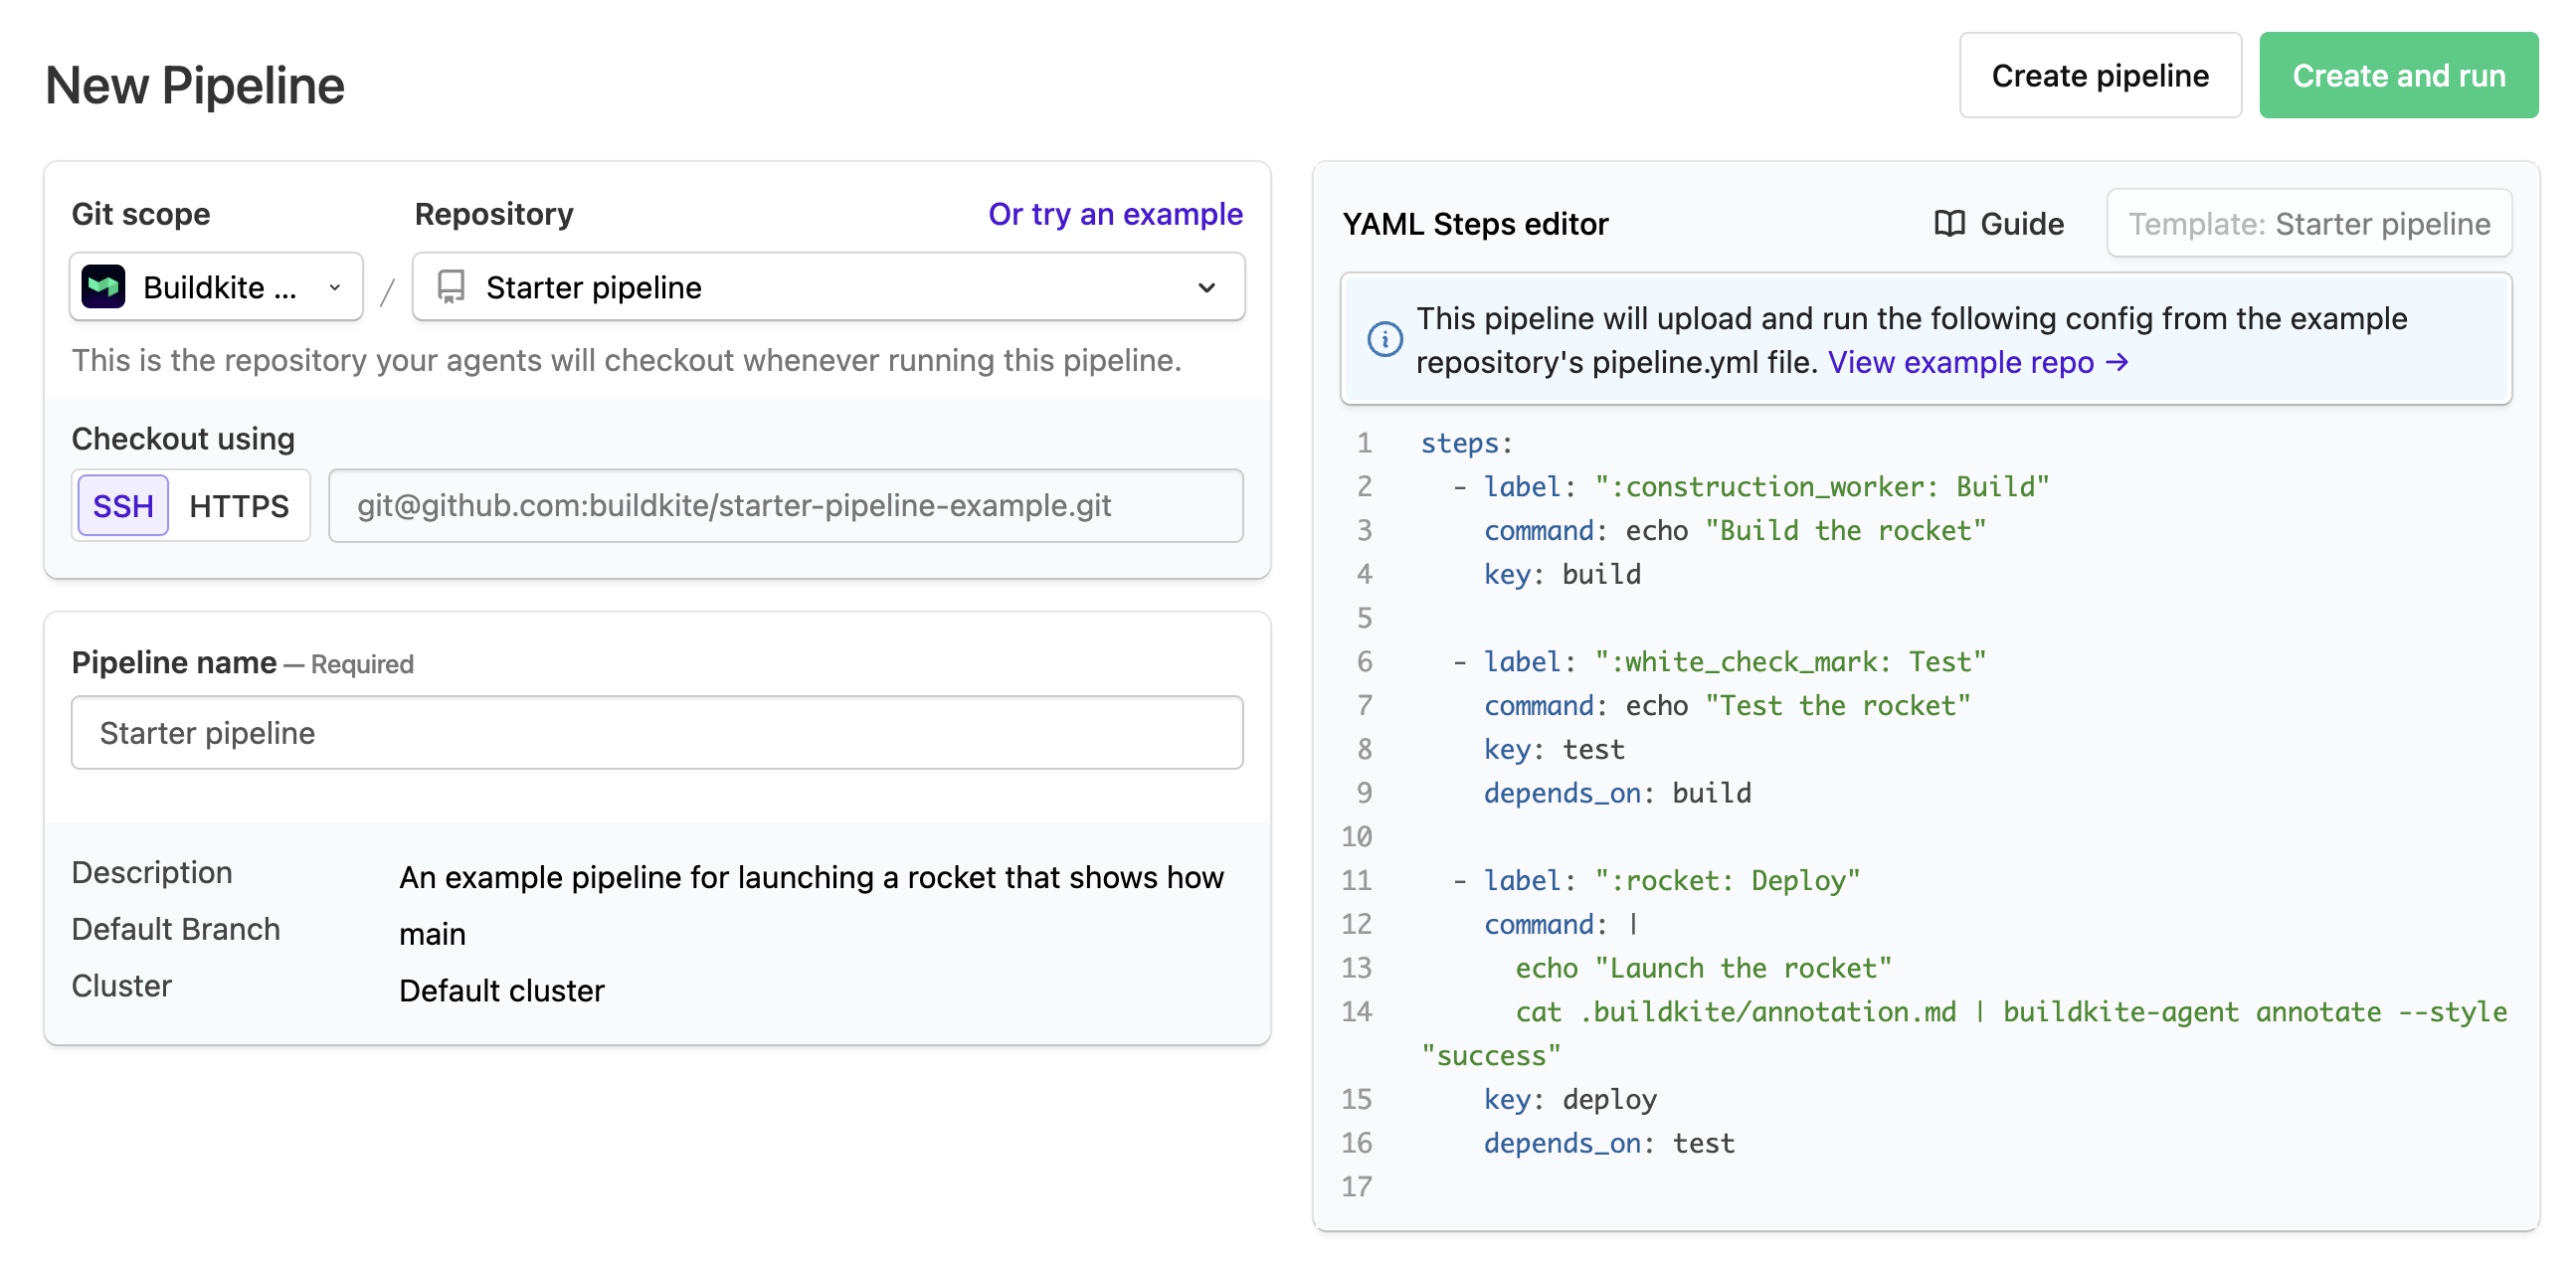
Learn more about this page from Understanding the New Pipeline page.
Both the REST API and GraphQL API can be used to create a pipeline programmatically. See the Pipelines REST API and the GraphQL API for details and examples.
Webhooks for GitHub
For a GitHub account's repositories, webhooks are automatically created for any of these repositories when a Buildkite pipeline is created for that repository. This functionality is implemented automatically once your GitHub account is connected to Buildkite using the GitHub App.
This GitHub App connection is established as part of signing up with GitHub (see Getting started with Pipelines page for details), or if you select the Git scope > Connect GitHub account option on the New Pipeline page.
Learn more about configuring the GitHub App from the GitHub page of Connect source control.
Webhooks for other repository providers
For all other repository providers, you'll need to configure the connection to your repository provider manually from the Repository Providers page. You can access this page by selecting either of the following:
- Git scope > Manage accounts from the New Pipeline page.
- Settings in the global navigation > Repository Providers (within the Integrations section).
Doing this will allow you to use repositories from the relevant Git scope > Use remote URL options.
Learn more about configuring these other repository providers from the Source control section.
Adding steps
There are two ways to define steps in your pipeline: using the YAML step editor in Buildkite or with a pipeline.yml file. The web steps visual editor is still available if you haven't migrated to YAML steps but will be deprecated in the future.
If you have not yet migrated to YAML Steps, you can do so on your pipeline's settings page. See the Migrating to YAML steps guide for more information about the changes and the migration process.
However you add steps to your pipeline, keep in mind that steps may run on different agents. It is good practice to install your dependencies in the same step that you run them.
Step defaults
If you're using YAML steps, you can set defaults which will be applied to every command step in a pipeline unless they are overridden by the step itself. You can set default agent properties and default environment variables:
-
agents- A map of agent characteristics such asosorqueuethat restrict what agents the command will run on -
env- A map of environment variables to apply to all steps
Environment variable precedence
Because you can set environment variables in many different places, be sure to check environment variable precedence to ensure your environment variables work as expected.
For example, to set steps do-something.sh and do-something-else.sh to use the something queue and the step do-another-thing.sh to use the another queue:
agents:
  queue: "something"

steps:
  - command: "do-something.sh"
  - command: "do-something-else.sh"
  - label: "Another"
    command: "do-another-thing.sh"
    agents:
      queue: "another"
YAML steps editor
To add steps using the YAML editor, click the 'Edit Pipeline' button on the Pipeline Settings page.
Starting your YAML with the steps object, you can add as many steps as you require of each different type. Quick reference documentation and examples for each step type can be found in the sidebar on the right.
pipeline.yml file
Before getting started with a pipeline.yml file, you'll need to tell Buildkite where it will be able to find your steps.
In the YAML steps editor in your Buildkite dashboard, add the following YAML:
steps:
  - label: ":pipeline: Pipeline upload"
    command: buildkite-agent pipeline upload
When you eventually run a build from this pipeline, this step will look for a directory called .buildkite containing a file named pipeline.yml. Any steps it finds inside that file will be uploaded to Buildkite and will appear during the build.
When using WSL2 or PowerShell Core, you cannot add a buildkite-agent pipeline upload command step directly in the YAML steps editor. To work around this, there are two options:
buildkite-agent pipeline upload command in a script file. In the YAML steps editor, add a command to run that script file. It will upload your pipeline.Create your pipeline.yml file in a .buildkite directory in your repo.
If you're using any tools that ignore hidden directories, you can store your pipeline.yml file either in the top level of your repository, or in a non-hidden directory called buildkite. The upload command will search these places if it doesn't find a .buildkite directory.
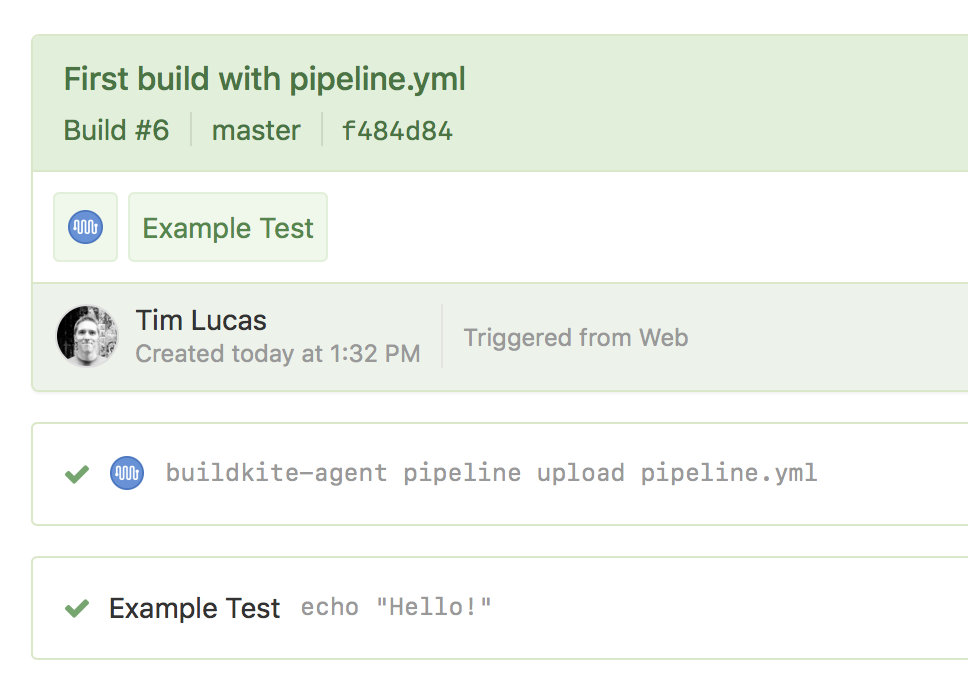
The following example YAML defines a pipeline with one command step that will echo 'Hello' into your build log:
steps:
  - label: "Example Test"
    command: echo "Hello!"
With the above example code in a pipeline.yml file, commit and push the file up to your repository. If you have set up webhooks, this will automatically create a new build. You can also create a new build using the 'New Build' button on the pipeline page.
For more example steps and detailed configuration options, see the example pipeline.yml below, or the step type specific documentation:
You can also upload additional steps while a build is in progress. This is not a separate step type but an action performed by an agent within the context of a job. See Dynamic pipelines for more information.
If your pipeline has more than one step and you have multiple agents available to run them, the steps will automatically run at the same time. If your steps rely on running in sequence, you can separate them with wait steps. This will ensure that any steps before the wait are completed before steps after the wait can be run.
Explicit dependencies in uploaded steps
If a step depends on an upload step, then all steps uploaded by that step become dependencies of the original step. For example, if step B depends on step A, and step A uploads step C, then step B will also depend on step C.
When a step is run by an agent, it will be run with a clean checkout of the pipeline's repository. If your commands or scripts rely on the output from previous steps, you will need to either combine them into a single script or use artifacts to pass data between steps. This enables any step to be picked up by any agent and run steps in parallel to speed up your build.
Build states
When you run a pipeline, a build is created. The following diagram shows you how builds progress from start to end.
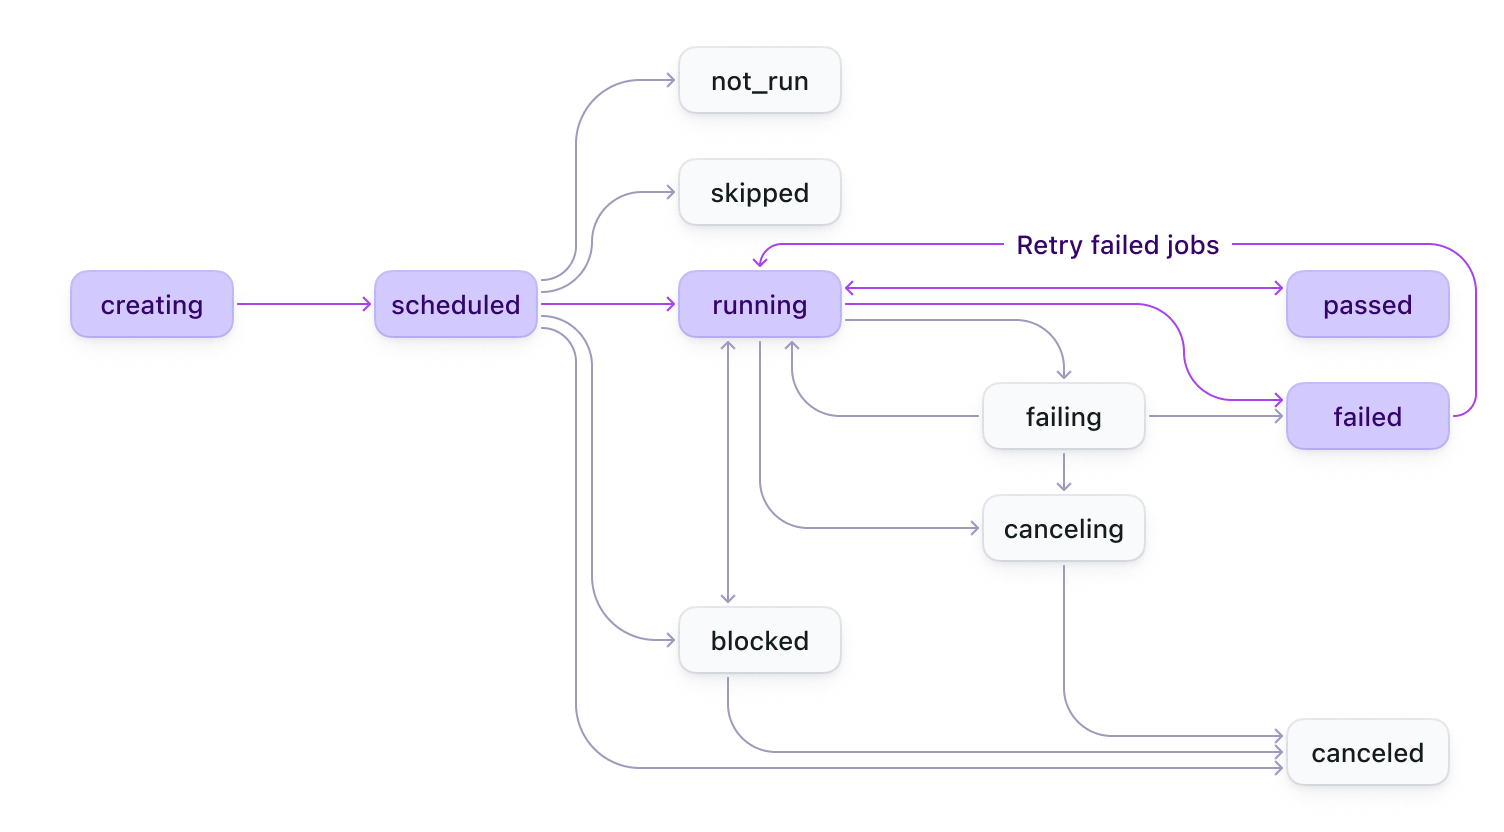
A build state can be one of of the following values:
creating, scheduled, running, passed, failing, failed, blocked, canceling, canceled, skipped, not_run.
You can query for finished builds to return builds in any of the following states: passed, failed, blocked, or canceled.
When a triggered build fails, the step that triggered it will be stuck in the running state forever.
When all the steps in a build are skipped (either by using the skip attribute or by using the if condition), the build state will be marked as not_run.
By default, all steps depend on the step that uploads them. They will not run until the uploading step is finished.
Unlike the notify attribute, the build state value for a steps attribute may differ depending on the state of a pipeline. For example, when a build is blocked within a steps section, the state value in the API response for getting a build retains its last value (for example, passed), rather than having the value blocked, and instead, the response also returns a blocked field with a value of true.
Build timestamps
Each build has several timestamps that track its lifecycle from creation to completion. The expected chronological order is: created_at → scheduled_at → started_at → finished_at.
| Timestamp | Description |
|---|---|
created_at |
When the build record was initially created in the database. This happens when a build is first triggered (using API, webhook, UI, etc.) and the build enters the creating state. |
scheduled_at |
When the build is scheduled to run. For scheduled builds (triggered from pipeline schedules), this represents the intended execution time. |
started_at |
When the build begins executing (transitions from scheduled to started state). This occurs when the first job starts running, marking the build as active. |
finished_at |
When the build reaches a terminal state (passed, failed, canceled, skipped, or not_run). This is set when all jobs are complete and the build's final state is determined. |
A build's started_at timestamp can be more recent than some of its job's started_at timestamps. This occurs when builds move from terminal states back to non-terminal states when failed jobs are retried.
Job states
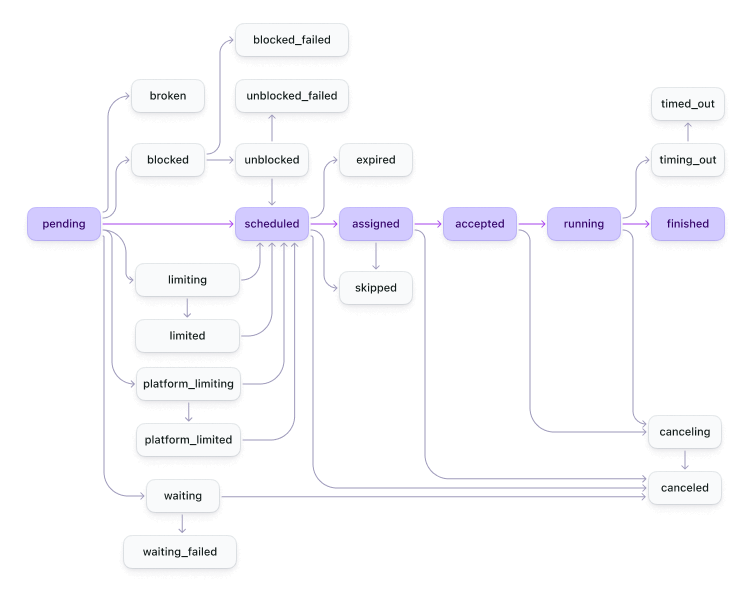
When you run a pipeline, a build is created. Each of the steps in the pipeline ends up as a job in the build, which then get distributed to available agents. Job states have a similar flow to build states but with a few extra states. The following diagram shows you how jobs progress from start to end.
The table of job states below describes the internal lifecycle states, where finished is the terminal state. The REST API flattens finished into passed or failed based on the job's exit status, so jobs[].state will be passed or failed rather than finished. The GraphQL API uses finished for all completed jobs, regardless of exit status.
| Job state | Description |
|---|---|
pending |
The job has just been created and doesn't have a state yet. |
waiting |
The job is waiting on a wait step to finish. |
waiting_failed |
The job was in a waiting state when the build failed. |
blocked |
The job is waiting on a block step to finish. |
blocked_failed |
The job was in a blocked state when the build failed. |
unblocked |
This block job has been manually unblocked. |
unblocked_failed |
This block job was in an unblocked state when the build failed. |
limiting |
The job is waiting on a concurrency group check before becoming either limited or scheduled. |
limited |
The job is waiting for jobs with the same concurrency group to finish. |
scheduled |
The job is scheduled and waiting for an agent. |
reserved* |
The job has been reserved by an agent stack, which is provisioning an agent to run it. |
assigned |
The job has been assigned to an agent, and it's waiting for it to accept. |
accepted |
The job was accepted by the agent, and now it's waiting to start running. |
running |
The job is running. |
finished |
The job has finished (internal lifecycle state; REST API returns passed or failed instead). |
passed |
The job finished successfully (REST API only; returned instead of finished for successful jobs). |
failed |
The job finished with a failure (REST API only; returned instead of finished for failed jobs). |
canceling |
The job is currently canceling. |
canceled |
The job was canceled. |
timing_out |
The job is timing out for taking too long. |
timed_out |
The job timed out. |
skipped |
The job was skipped. |
broken |
The job's configuration means that it can't be run. |
expired |
The job expired before it was started on an agent. |
platform_limiting |
The job is waiting for limits imposed by Buildkite to be checked before moving to platform_limited or scheduled. |
platform_limited |
The job is waiting for capacity within limits imposed by Buildkite to become available before moving to scheduled. |
* The reserved state applies only to jobs picked up through the stacks API. Traditional agents skip this state.
As well as the states shown in the diagram, the following progressions can occur:
can progress to skipped
|
can progress to canceling or canceled
|
|---|---|
pending |
accepted |
waiting |
pending |
blocked |
limiting |
limiting |
limited |
limited |
blocked |
accepted |
unblocked |
broken |
platform_limiting |
platform_limiting |
platform_limited |
platform_limited |
Differentiating between broken, skipped and canceled states:
- Jobs become
brokenwhen their configuration prevents them from running. This might be because their branch configuration doesn't match the build's branch, or because a conditional returned false. - This is distinct from
skippedjobs, which might happen if a newer build is started and build skipping is enabled. Broadly, jobs break because of something inside the build, and are skipped by something outside the build. - Jobs can be
canceledintentionally, either using the Buildkite interface or one of the APIs.
Differentiating between timing_out, timed_out, and expired states:
- Jobs become
timing_out,timed_outwhen a job starts running on an agent but doesn't complete within the timeout period. - Jobs become
expiredwhen they reach the scheduled job expiry timeout before being picked up by an agent.
See Build timeouts for information about setting timeout values.
The REST API maps the internal finished state to passed or failed based on the job's exit status. When querying job states using the REST API, you'll see passed or failed instead of finished. The REST API also lists limiting and limited as scheduled for legacy compatibility.
A job state can be one of the following values:
pending, waiting, waiting_failed, blocked, blocked_failed, unblocked, unblocked_failed, limiting, limited, scheduled, reserved, assigned, accepted, running, finished, passed, failed, canceling, canceled, expired, timing_out, timed_out, skipped, broken, platform_limiting, or platform_limited.
Note: finished is an internal lifecycle terminal state. The REST API maps finished to passed or failed based on the job's exit status, so REST API responses will display passed or failed instead of finished. The GraphQL API uses finished for all completed jobs, regardless of the exit status.
Each job in a build also has a footer that displays exit status information. It may include an exit signal reason, which indicates whether the Buildkite agent stopped or the job was canceled.
Exit status information is available in the GraphQL API but not the REST API.
Job timestamps
Each job has several timestamps that track its lifecycle from creation to completion. The expected chronological order is: created_at → scheduled_at → runnable_at → started_at → finished_at.
| Timestamp | Description |
|---|---|
created_at |
When the job record was first created in the database. This happens when a build's pipeline is processed and jobs are created in the pending state. |
scheduled_at |
When the job was intended to run. This is set during initial job creation and defaults to the job's created_at timestamp. |
runnable_at |
When the job became ready for agent assignment and eligible to run. This is set when the job transitions to the scheduled state after resolving dependencies (for example, wait steps, manual blocks, concurrency limits, or other dependencies). |
started_at |
When an agent confirmed it had started running the job (and the job transitions to the running state). This occurs after the job has been assigned to an agent, accepted by the agent, and the agent sends the first log output indicating that the execution has begun. |
finished_at |
When the job reaches a terminal state (finished, canceled, timed_out, skipped, or expired). Transitioning to this state marks the completion of the job's execution, whether successful or not. |
Platform limits
Platform limits are restrictions imposed by Buildkite on usage within your Buildkite organization. Jobs will enter the platform_limiting and platform_limited states when these limits are being evaluated or enforced.
The following platform limits may apply:
- Job concurrency limits: A Buildkite organization on the Personal plan has a total concurrency limit of three jobs that applies across both Buildkite hosted agents and self-hosted agents. When jobs are scheduled beyond this limit, they will be queued using the platform limiting states. To remove or increase this limit for your Buildkite organization, at least upgrade to the Pro plan or reach out to Buildkite support at support@buildkite.com for help.
Example pipeline
Here's a more complete example based on the Buildkite agent's build pipeline. It contains script commands, wait steps, block steps, and automatic artifact uploading:
steps:
  - label: ":hammer: Tests"
    command: scripts/tests.sh
    env:
      BUILDKITE_DOCKER_COMPOSE_CONTAINER: app

  - wait

  - label: ":package: Package"
    command: scripts/build-binaries.sh
    artifact_paths: "pkg/*"
    env:
      BUILDKITE_DOCKER_COMPOSE_CONTAINER: app

  - wait

  - label: ":debian: Publish"
    command: scripts/build-debian-packages.sh
    artifact_paths: "deb/**/*"
    branches: "main"
    agents:
      queue: "deploy"

  - block: ":shipit: Release"
    branches: "main"

  - label: ":github: Release"
    command: scripts/build-github-release.sh
    artifact_paths: "releases/**/*"
    branches: "main"

  - wait

  - label: ":whale: Update images"
    command: scripts/release-docker.sh
    branches: "main"
    agents:
      queue: "deploy"
Step types
Buildkite pipelines are made up of the following step types:
Customizing the pipeline upload path
By default the pipeline upload step reads your pipeline definition from .buildkite/pipeline.yml in your repository. You can specify a different file path by adding it as the first argument:
steps:
  - label: ":pipeline: Pipeline upload"
    command: buildkite-agent pipeline upload .buildkite/deploy.yml
A common use for custom file paths is when separating test and deployment steps into two separate pipelines. Both pipeline.yml files are stored in the same repo and both Buildkite pipelines use the same repo URL. For example, your test pipeline's upload command could be:
buildkite-agent pipeline upload .buildkite/pipeline.yml
And your deployment pipeline's upload command could be:
buildkite-agent pipeline upload .buildkite/pipeline.deploy.yml
For a list of all command line options, see the buildkite-agent pipeline upload documentation.
Targeting specific agents
To run command steps only on specific agents:
- In the agent configuration file, tag the agent
- In the pipeline command step, set the agent property in the command step
For example to run commands only on agents running on macOS:
steps:
  - command: "script.sh"
    agents:
      os: "macOS"
Further documentation
You can also upload pipelines from the command line using the buildkite-agent command line tool. See the buildkite-agent pipeline documentation for a full list of the available parameters.