Managing log output
Buildkite uses our open-source terminal-to-html tool to provide you with the best possible terminal rendering experience for your build logs, including ANSI terminal emulation to ensure spinners, progress bars, colors and emojis are rendered beautifully.
Grouping log output
You can organize your build output into collapsible sections using different grouping methods, each providing a distinct visual presentation and default behavior. Build output appears under the most recently defined heading until you define a new heading.
Collapsed groups
Use --- to create collapsed groups that users can expand to view details:
echo "--- A section of the build"
De-emphasized groups
Use ~~~ to create groups that by default are collapsed and visually de-emphasized through the use of non-bold text (can be useful for less important output):
echo "~~~ An unimportant section of the build"
Expanded groups
Use +++ to create groups that are open by default:
echo "+++ A section of the build"
If no group is explicitly expanded (+++), then the last collapsed regular group (---) gets expanded instead. If you really want all groups to be collapsed, add an empty expanded group (using a single space character) at the end of your build:
echo -e "+++ \032"
# The \032 escape sequence creates a single space character
Advanced grouping techniques
This section covers build log output grouping methods that go beyond formatting, collapsing, or expanding, and can be used for a better visual filtering of information, especially when it comes to long logs.
Opening previous groups
If you'd like to open the previously defined group, use ^^^ +++. This is useful if a command within a group fails, and you'd like to have the group already open when you view the log.
echo "--- Bundling"
bundle
if [[ $? -ne 0 ]]; then
  echo "^^^ +++"
  echo "Bundler failed, oh no!!"
fi
Creating section boundaries
Different group types can be combined to create defined start and end markers for your log output. This is useful for creating distinct sections with clear boundaries:
echo "--- Starting deployment..."
./scripts/deployment.sh
echo "~~~ Deployment complete!"
echo "--- Running tests..."
./scripts/tests.sh
echo "~~~ Tests succeeded!"
You can even include colors and emojis!
echo -e "--- Running \033[33mspecs\033[0m :cow::bell:"
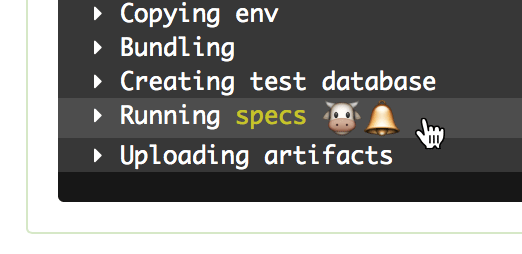
The :emoji_name: shortcode syntax is only converted into an emoji within step labels and group header lines (text following ---, +++, ~~~, or ^^^ +++). It is not substituted in regular command output. Use the actual Unicode character there instead.
steps:
  - label: ":rocket: Deploy"
    command: |
      echo "--- :rocket: Running pre-flight checks"
      echo "Checking environment..."

      echo "+++ :rocket: Running deploy script"
      ./deploy.sh

      if [[ $? -ne 0 ]]; then
        echo "^^^ +++"
        echo "🚀 Deploy failed — check the logs above"
      fi
The echo line inside the if block uses the literal 🚀 Unicode character directly. Writing :rocket: there would print as plain text rather than an emoji.
ANSI timestamps and disabling them
By default, each line of log output begins with an ANSI timestamp.
If you are running self-hosted agents, you can prevent them for generating ANSI timestamps at the start of each line of log output, by starting these agents with the --no-ansi-timestamps option.
Log output limits
If your build output exceeds 2MB then we'll only show the last 2MB of it in the rendered terminal output on your build page. In addition, your log file must not exceed the default 1,024 MiB per-job log size limit else it may fail to upload. For the full set of quotas and how to raise them, see Pipelines limits.
If your log exceeds 2MB then we highly recommend reconfiguring your build tools to filter out unnecessary lines. Sometimes this isn't always possible, so you can use the below techniques to store and filter your log.
Storing the original log
One method for storing the original log is the Unix tee command. It allows you to store the output stream of a command to a file and passing it straight through unchanged to the next command.
#!/bin/bash

set -euo pipefail

your_build_command | tee build.log | <filter command>
When this script is run it will store the original output of your_build_command to the file build.log.
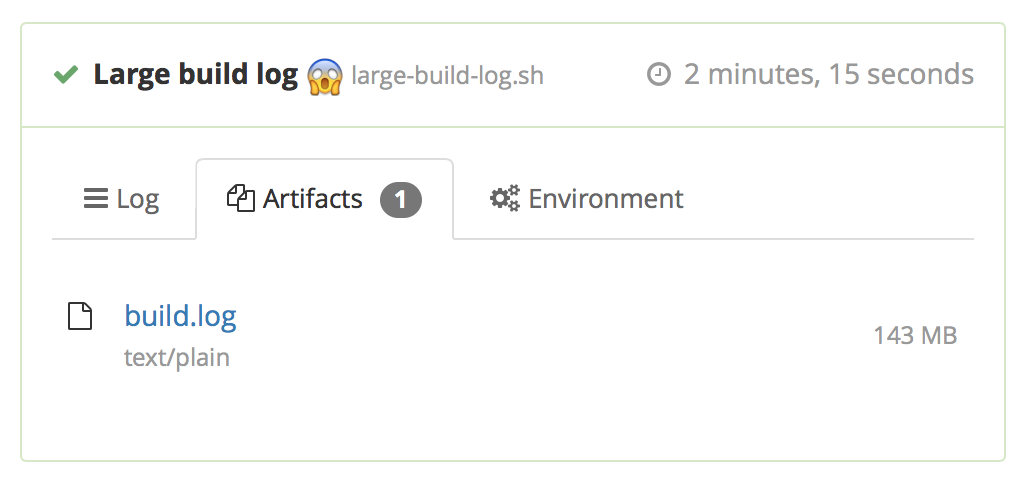
To store this file alongside your build, add the artifact_paths attribute to the command step running your script:
steps:
  - command: build.sh
    artifact_paths: "build.log"
When your build is finished the agent will upload build.log as a build artifact, which will be downloadable from the "Artifacts" tab on your build page.
The tee command almost always exits with a code of 0, and so this command won't report on the preceding command. Capturing the status of the preceding command with "${PIPESTATUS[0]}" may help with error debugging.
Filtering with grep
Grep is a Unix tool to help you filter lines of text that match a pattern. For example, the following script only sends Buildkite the matching lines as your log output, whilst storing the original log for artifact uploading.
#!/bin/bash

set -euo pipefail

your_build_command | tee build.log | grep 'some pattern'
Truncating with tail
Tail is a Unix tool that returns the last portion of a file. This is useful if your log output is exceeding the per-job log size limit. For example, the following script only sends Buildkite the last 1000MB as your log output, while storing the original log for artifact uploading.
#!/bin/bash

set -euo pipefail

your_build_command | tee build.log | tail -c1000000000
Improving Xcode logs with xcpretty
xcpretty is an open-source tool that helps to reduce, format and color-code your Xcode build output. Once you've installed xcpretty you can pipe the output of xcodebuild into it:
#!/bin/bash

set -euo pipefail

xcodebuild <build options> | tee -a build.log | xcpretty -c
Make sure to set the -o pipefail option in your buildscript as above, otherwise the build failure status might not be passed through correctly.

Encryption and security
Buildkite has zero access to your source code in the pipelines and only receives and stores the log output of the builds and build artifacts in encrypted form.
Logs are AES-encrypted, and the build artifacts are encrypted in transit and at rest using AWS encryption (KMS or S3 SSE). As a result, the keys cannot be extracted on the Buildkite's side, and the AWS solutions mitigate against zero-day attacks and other security issues. Beyond this, the control over security measures within your infrastructure is up to you.
If you choose to host your build artifacts yourself, they end up in your private AWS bucket.
If you are a Buildkite customer on the Enterprise plan, you can also set up a private AWS S3 build log archive location and store the logs in your private bucket.
To further tighten the security in a Buildkite organization, you can use the API Access Audit to track the actions of the users who have API access tokens that can access your organization's data using the REST and GraphQL API.
Redacted environment variables
Agents can redact the values of environment variables whose names match common patterns for passwords and other secure information before the build log is uploaded to Buildkite.
If the environment variable's value is shorter than the minimum length of 6 bytes, then this value will not be redacted.
The default environment variable name patterns are:
*_PASSWORD*_SECRET*_TOKEN*_PRIVATE_KEY*_ACCESS_KEY*_SECRET_KEY-
*_CONNECTION_STRING(added in Agent v3.53.0)
With these defaults, if you have an environment variable MY_SECRET="topsecret" and run a command that outputs This is topsecret info, the log output will be This is [REDACTED] info.
You can append additional patterns or replace the default patterns entirely by setting redacted-vars on your agent. For example, if you wanted to redact the value of FOO in your log output and keep the existing default patterns, the configuration setting should look like the following:
redacted-vars="*_PASSWORD, *_SECRET, *_TOKEN, *_PRIVATE_KEY, *_ACCESS_KEY, *_SECRET_KEY, *_CONNECTION_STRING, *_SOME_VALUE, FOO"
Note that if you set or interpolate a secret environment variable in your pipeline.yml it is not redacted, but doing that is not recommended.
Private build log archive storage
By default, build logs are stored in encrypted form in Buildkite's managed Amazon S3 buckets, but you can instead store the archived build logs in your private AWS S3 bucket. If you decide to store the logs in your S3 bucket, they're encrypted using SSE-S3. SSE-KMS encryption is not supported. After storing the logs in your S3 bucket, Buildkite does not retain a copy of the logs.
This feature is only available to customers on the Enterprise plan and is applied at the Buildkite organization level. If you have multiple organizations, send support a list of the organizations where this feature should be enabled.
The folder structure and file format are as follows and are not customizable:
{ORGANIZATION_UUID}/{BUILDKITE_PIPELINE_ID}/{BUILDKITE_BUILD_ID}/{BUILDKITE_JOB_ID}.log
To set up a private build log archive storage:
- Create an Amazon S3 bucket in us-east-1 location (the only region that is currently supported).
-
Provide read and write access permission policy for the Buildkite's AWS account
032379705303.Here's an example policy that contains an Amazon S3 bucket configuration with Buildkite's account number in it. Replace
my-bucketandmy-prefixplaceholders with your Amazon S3 bucket information:{ "Version": "2012-10-17", "Statement": [ { "Sid": "AllowBuildkiteToWriteObjectsInLogsPrefix", "Effect": "Allow", "Principal": { "AWS": "arn:aws:iam::032379705303:root" }, "Action": "s3:PutObject", "Resource": "arn:aws:s3:::my-bucket/my-prefix/*", "Condition": { "StringEquals": { "s3:x-amz-acl": "bucket-owner-full-control" } } }, { "Sid": "AllowBuildkiteToReadObjectsInLogsPrefix", "Effect": "Allow", "Principal": { "AWS": "arn:aws:iam::032379705303:root" }, "Action": "s3:GetObject", "Resource": "arn:aws:s3:::my-bucket/my-prefix/*" }, { "Sid": "AllowBuildkiteToDeleteObjectsInLogsPrefix", "Effect": "Allow", "Principal": { "AWS": "arn:aws:iam::032379705303:root" }, "Action": "s3:DeleteObject", "Resource": "arn:aws:s3:::my-bucket/my-prefix/*" }, { "Sid": "AllowBuildkiteToListBucketInLogsPrefix", "Effect": "Allow", "Principal": { "AWS": "arn:aws:iam::032379705303:root" }, "Action": "s3:ListBucket", "Resource": "arn:aws:s3:::my-bucket", "Condition": { "StringLike": { "s3:prefix": "my-prefix/*" } } } ] } Reach out to support@buildkite.com and provide the address of your Amazon S3 bucket. The Buildkite engineering team will continue the configuration to complete the setup.