Getting started with Pipelines
Welcome to Buildkite Pipelines, a secure, scalable, and flexible platform for building CI/CD workflows. This tutorial walks you through the fundamentals in three stages:
- Create a new pipeline from one of the Buildkite-provided examples, to learn the New Pipeline page and see how a build runs.
- Create your own pipeline by adding a pipeline definition to your own repository.
- Add a test suite using Test Engine — the testing layer of Buildkite Pipelines — to collect results from your test runners.
Before you start
This tutorial assumes that you're new to Buildkite Pipelines. To begin, create a free, personal Buildkite account.
From the Start building for free page, do either of the following:
Select Sign up with GitHub and then Authorize Buildkite to access your GitHub account. If prompted with the Install Buildkite page in GitHub, select All repositories (recommended), or Only select repositories to limit the installation scope.
-
Select Continue with Email, enter your Full name, Email address, and Password, then select Sign up.
- Follow the instructions on the Verify your email page and select the verification link in the email sent to that address.
- On the Create organization page, enter a name for your Buildkite organization.
Either path takes you to the New Pipeline page, where you can begin creating your new pipeline.
Create a new pipeline
A pipeline is what represents a CI/CD workflow in Buildkite Pipelines. You define each pipeline with a series of steps to run. When you trigger a pipeline, you create a build, and steps are dispatched as jobs, which are run on agents. Jobs are independent of each other and can run on different agents.
If you signed up:
- With GitHub, the New Pipeline page's Git scope is set to your GitHub account, with its most recently updated repository selected in the Repository field. To explore example pipelines instead, select Or try an example. If your GitHub account has no repositories, the Starter pipeline of the Buildkite Examples is selected automatically.
- By email, the New Pipeline page presents the Starter pipeline of the Buildkite Examples.
Understanding the New Pipeline page
The New Pipeline page has the following fields:
-
Git scope: Select from these options:
- Your GitHub account or organization.
- Buildkite Examples, which build projects across a variety of use cases.
- Use remote URL for GitLab, Bitbucket, or Any account, for any other remotely accessible Git repository. The Manage accounts option configures connections to these repository providers. See Source control for more information.
- Connect GitHub account, useful if you signed up by email and need to connect your GitHub account—this generates the same Install Buildkite step as in the GitHub sign-up process.
-
Repository: Select the Git repository available to your selected Git scope. Upon selection:
- The Checkout using option appears, where you can select SSH or HTTPS.
- For non-Buildkite Examples repositories, the Build Triggers section may appear, showing the actions that trigger a build. Clear the Trigger builds when checkbox to disable triggering.
Pipeline name: Auto-generated from your repository's name; change it here if needed.
Description ( optional ): A description shown under the pipeline name on the main Pipelines page.
Default Branch: The branch your pipeline builds by default. Leave unchanged for this tutorial.
-
Teams: The Buildkite teams with permission to build your pipeline.
Note: If you just signed up to Pipelines, this field won't appear until teams are configured. If shown, leave it unchanged for this tutorial.
Cluster: The Buildkite cluster whose agents build your pipeline. Leave unchanged for this tutorial.
-
YAML Steps editor: Define steps for your main Buildkite pipeline. To start, pick an initial pipeline from the Template dropdown:
-
Helper templates:
- Hello world: A simple example of command syntax in Buildkite pipeline YAML.
- Pipeline upload: Uploads a Buildkite pipeline stored in your repository.
- Example templates: Pipelines used to build example projects available from the Repository field when Git scope is set to Buildkite Examples.
-
Helper templates:
If you've already created a pipeline definition at .buildkite/pipeline.yml in your selected Repository, select the Pipeline upload option from the Template dropdown of the YAML Steps editor. This generates a step that uploads and runs the rest of your pipeline from that file. Learn more in Create your own pipeline.
Example pipelines
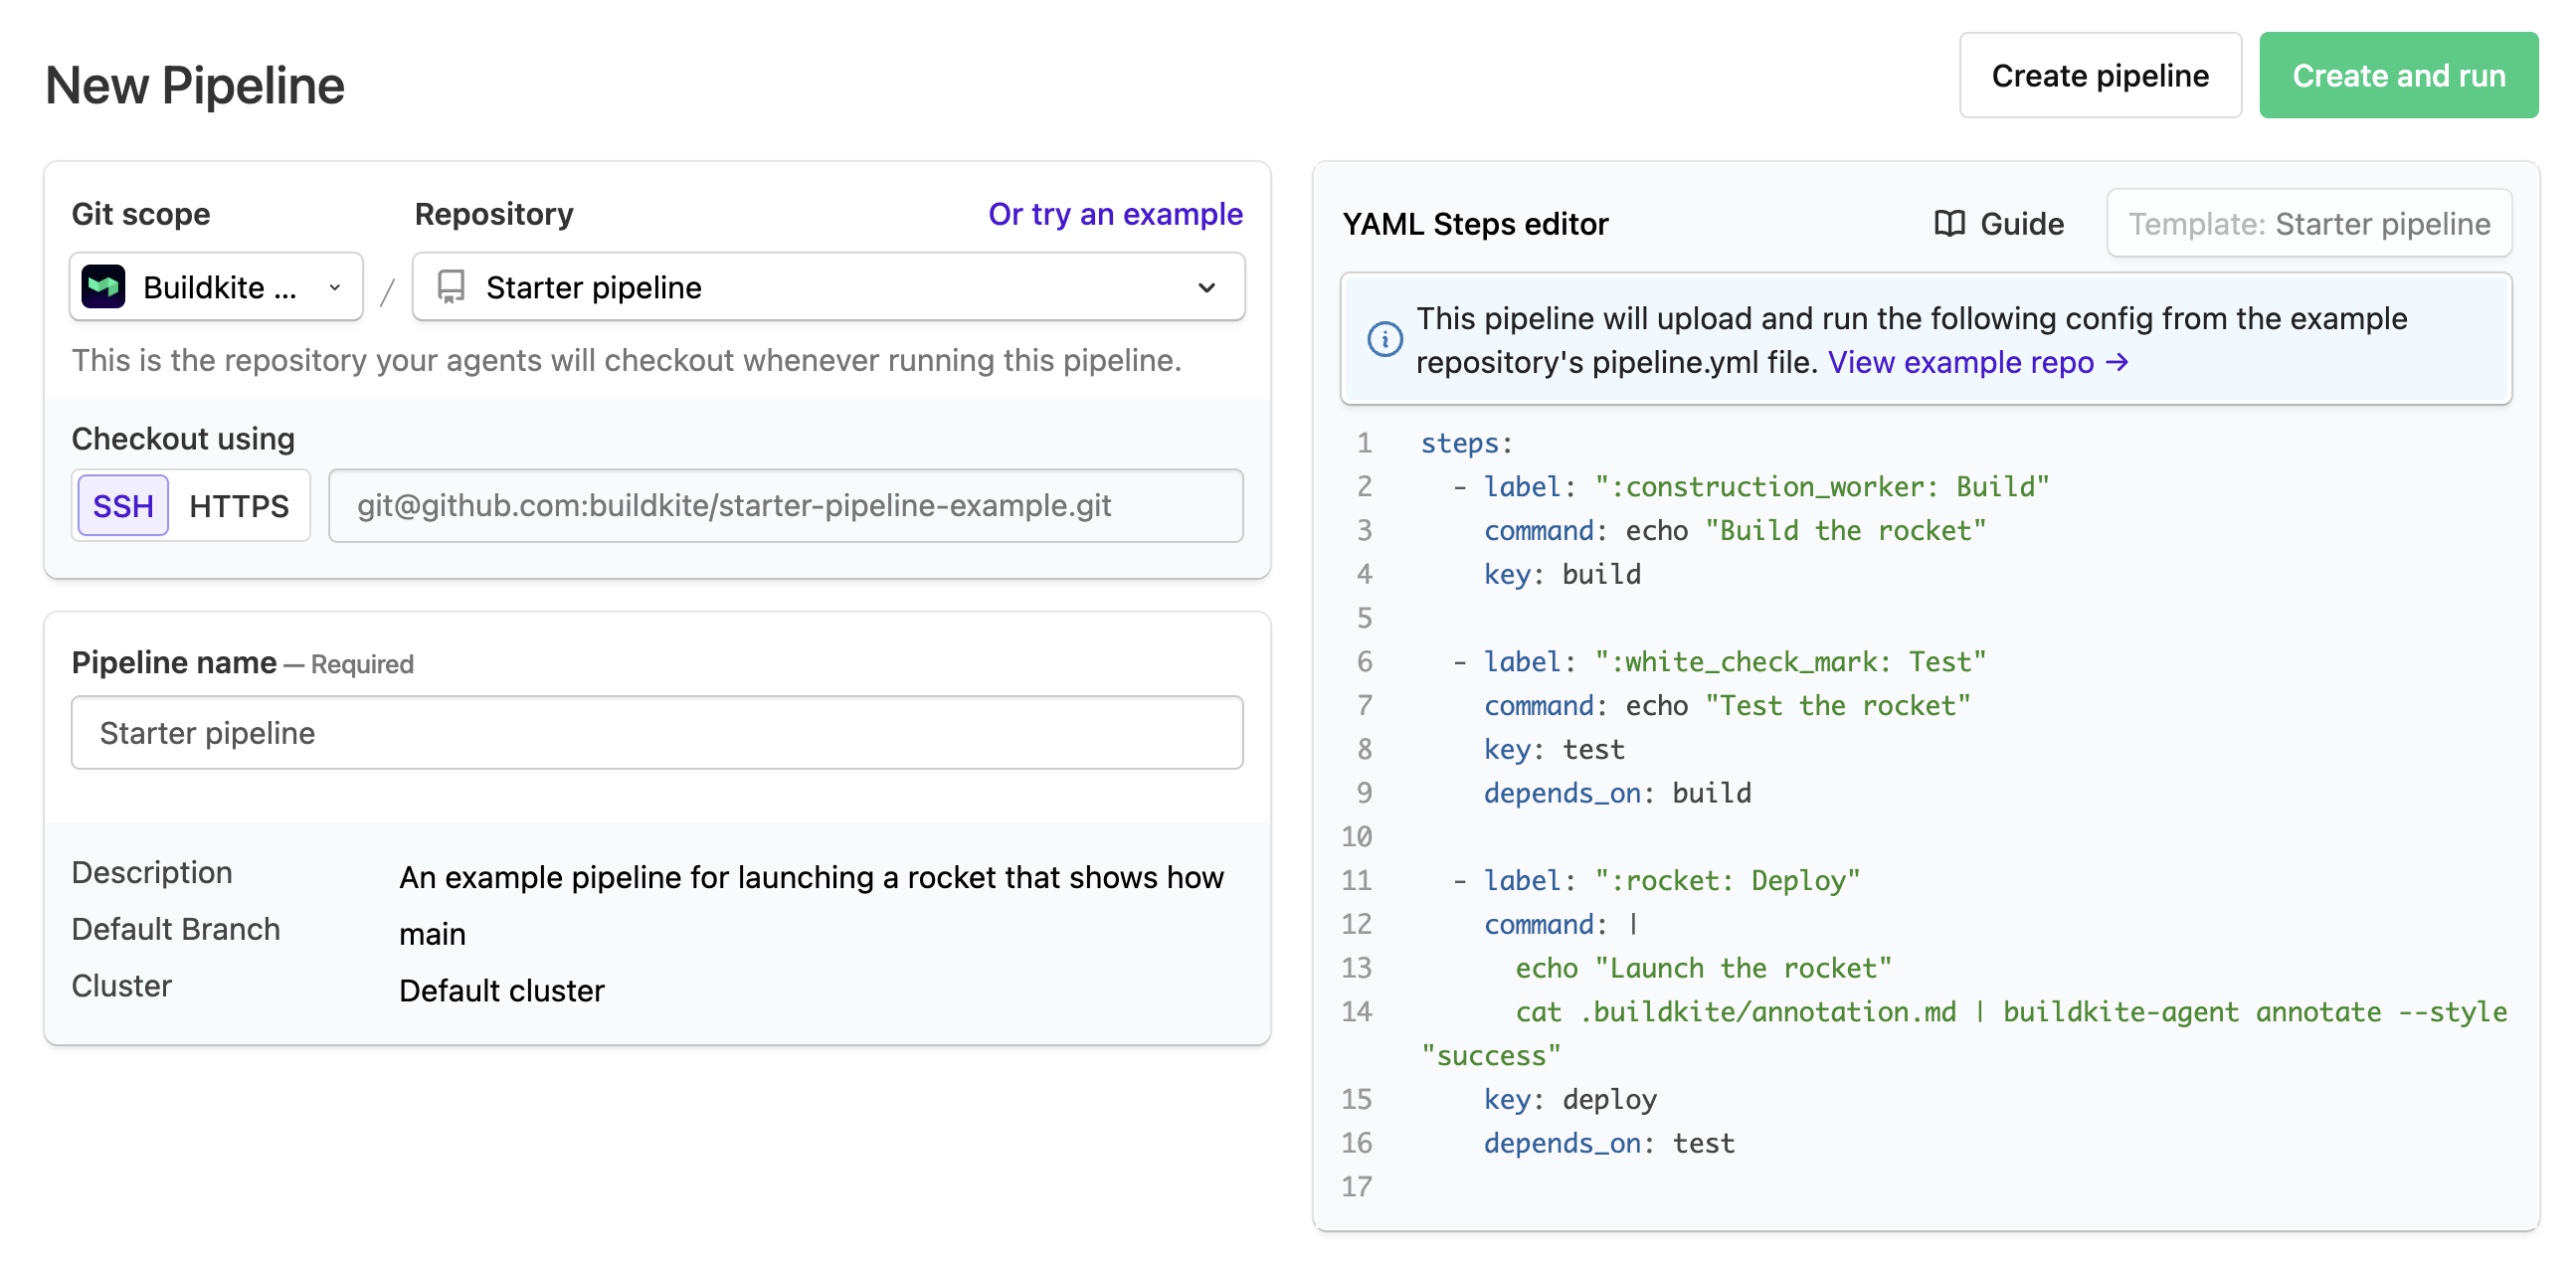
To build a sample pipeline:
- Ensure Buildkite Examples is selected in Git scope and select Starter pipeline.
- In the YAML Steps editor, note the three steps (
build,test,deploy), their job dependency order, and the annotation-related command in thedeploystep. - Select Create and run to create your Starter pipeline and run its first build.
- Once the build completes, check its Annotations tab, which displays the content of the repository's
.buildkite/annotation.mdfile.
Try creating and building other Buildkite Examples that suit the technologies you work with. More example repositories are available from the Buildkite Resources Examples page.
For each Buildkite Examples repository, the pipeline shown in the YAML Steps editor is retrieved from that repository's .buildkite/pipeline.yml file. A Buildkite pipeline commits nothing to your repository unless you explicitly instruct it to.
Create your own pipeline
This section walks you through writing a pipeline definition for your own code — stored as a .buildkite/pipeline.yml file in your repository — and creating a Buildkite pipeline that uploads and runs it. You'll need a repository (real or experimental) and a task to perform with it, such as running tests or a script.
Define the steps
Steps can do anything from building and testing your code to deploying it. Start simple and iterate, running the pipeline to verify it works as you go.
To define the steps:
- Decide the goal of the pipeline.
-
Look for an example pipeline closest to that goal, or a pipeline template for your technology stack, as a starting point.
Note: If you have a pipeline defined in another CI/CD platform (GitHub Actions, Jenkins, CircleCI, or Bitbucket Pipelines), use the Pipeline converter to convert its syntax.
In the root of your repository, create a file named
pipeline.ymlin a.buildkitedirectory.-
In
pipeline.yml, define your pipeline steps. Here's an example:steps: - label: ":hammer: Build" command: "scripts/build.sh" key: build - label: ":test_tube: Test" command: "scripts/test.sh" key: test depends_on: build - label: ":rocket: Deploy" command: "scripts/deploy.sh" key: deploy depends_on: testSee Defining steps for customization options.
Commit and push this file to your repository.
Create a pipeline
Next, create a new pipeline that uploads the pipeline definition from your repository:
- Select Pipelines to navigate to the Buildkite dashboard.
-
Select New pipeline.
Note: Use Git scope > Use remote URL to connect a Bitbucket, GitLab, or other GitHub account. After connecting, select its repositories from the Repository dropdown.
If you connected an account in Git scope, select the Repository to use.
Enter your pipeline's Pipeline name and Description (changeable later from settings).
-
In the YAML Steps editor, ensure there's a step to upload the definition from your repository. Generate this automatically using the Pipeline upload option from the Template dropdown:
steps:
  - label: ":pipeline:"
    command: buildkite-agent pipeline upload
Select Create pipeline.
On the next page, select New Build. In the dialog, enter a short Message (for example, My first build) and select Create Build. The build page opens and the build begins.
If you've configured webhooks, your pipeline triggers when you push updates to the repository. Otherwise, select New Build in the Buildkite dashboard to trigger it. To add more functionality, edit your steps and repeat. If you have trouble, reach out to support at support@buildkite.com.
A pipeline's slug (part of its URL) is derived from the pipeline's Name. Changing the Name also changes the slug, but previous slugs automatically redirect to the current one.
Using private repositories
When you create a new pipeline with a private repository URL, you'll see instructions for configuring your source control's webhooks. Once you've followed those instructions, ensure your agent's SSH keys are configured for code access (see relevant instructions for self-hosted or Buildkite hosted agents) so your agent can check out the repository.
Deriving a pipeline slug from the pipeline's name
Pipeline slugs are derived from the pipeline name you provide when the pipeline is created (unless you use the optional slug parameter to specify a custom slug).
This derivation process involves converting all space characters (including consecutive ones) in the pipeline's name to single hyphen - characters, and all uppercase characters to their lowercase counterparts. Therefore, pipeline names of either Hello there friend or Hello There Friend are converted to the slug hello-there-friend.
The maximum permitted length for a pipeline slug is 100 characters.
The following regular expression is used to derive and convert the pipeline name to its slug:
/\A[a-zA-Z0-9]+[a-zA-Z0-9\-]*\z/
Creating a new pipeline with a name that matches an existing pipeline's name results in an error.
Add a test suite
Once your pipeline runs its test runners, layer Test Engine on top to collect, analyze, and manage results. The three steps are:
- Create a test suite
- Configure a test collector in your project
- Wire the suite's API token into your pipeline
The recommended way to set up a new test suite is to add the Tests Buildkite plugin to the step that runs your tests.
The plugin is configuration-only — you can get a test suite reporting to Buildkite Test Engine through changes to pipeline.yml alone, with no modifications to your application code. Use a language-specific test collector when you want deeper framework integration.
Create a test suite
To create a new test suite:
- Select Test Suites in the global navigation.
- Select New test suite.
- On the Identify, track and fix problematic tests page, enter an optional Application name, for example,
My project. - Enter a mandatory Test suite name, for example,
My project test suite. - Enter the Default branch name that Test Engine shows trends for (changeable any time), usually
main. - Enter an optional Suite emoji using emoji syntax, for example,
:test_tube:. -
Enter an optional Suite color using
#RRGGBBsyntax. See HTML Color Codes for help choosing.Note: Select one of the testing framework buttons towards the end of the page to open detailed test collection instructions for your test runners (used in the next section). If your framework isn't listed, see Collecting test data from other test runners. Keep the relevant documentation page open.
Select Set up suite.
-
If your Buildkite organization has the teams feature enabled, select the Teams to grant access to this test suite, then Continue.
The Complete test suite setup page appears, prompting you to configure your test collector.
Configure your project with its test collector
- On the Complete test suite setup page, under Set up an integrated test collector, select the option matching your test runners.
-
Follow the instructions on the right of the page (and the documentation page opened above) to implement test collection for your project.
Note: When instructed to add
BUILDKITE_ANALYTICS_TOKENto your CI environment, use the Test Suite API Token shown at the top of this page. You'll use it again in Automate the test runner with Buildkite Pipelines. -
Add and commit your test collector changes to your project to a new branch. For example:
git add .
git commit -m "Install and set up test collector for Buildkite Test Engine"
git push
Run your test runner from the command line, passing
BUILDKITE_ANALYTICS_TOKEN=<your-test-suites-api-token-value>as an environment variable. After it completes, check your test suite page to see the collected results.
Automate the test runner with Buildkite Pipelines
To populate the suite on every build, wire the Test Suite API Token into the pipeline you created in Create your own pipeline:
Copy your Test Suite API Token (later retrievable from Settings > Suite token) and configure it as a Buildkite secret with a name like
MY_PROJECT_TEST_SUITE_TOKEN.-
In your repository's
.buildkite/pipeline.yml, expose that secret to the step that runs your test command asBUILDKITE_ANALYTICS_TOKEN:steps: - label: "Run tests" command: - test-runner-execution-command # Assumes your agent is running the required resources for this. secrets: BUILDKITE_ANALYTICS_TOKEN: MY_PROJECT_TEST_SUITE_TOKEN Commit and push the change, then trigger a new build. Once the build completes, the test results appear in your test suite.
Learn more in Create a secret and Use a Buildkite secret in a job.
Next steps
You've created a pipeline from a Buildkite Example, written and uploaded your own pipeline definition, and added a Test Engine test suite that collects results from every build.
During sign-up, Buildkite Pipelines set up a few defaults:
- A Buildkite cluster named Default cluster—a security feature used to organize queues. See the Clusters overview.
- Five queues in it: linux-small (default), linux-medium, linux-large, macos-medium, and macos-large. For personal accounts, the default queue is a Buildkite hosted queue running Buildkite hosted agents. See the Queues overview and Buildkite hosted agents overview.
Buildkite also supports self-hosted agents you manage in your own infrastructure—see Buildkite Pipelines architecture for the differences.
From here:
-
Invite your team from your organization's user settings. Email invitations expire after 7 days and must be re-sent if unaccepted.
Note: To invite others, your email address must first be verified. Go to your personal email settings and select Resend Verification.
Learn to create more complex pipelines with dynamic definitions, conditionals, and concurrency.
Browse the pipeline templates for examples across different technology stacks and use cases.
Browse the Test Engine overview for the full set of test-suite features, including workflows for flaky test detection and bktec for test splitting.
Review the CI environment variables that collectors auto-detect.
If you've configured self-hosted queues with agents, customize your agent configuration.
Learn to use lifecycle hooks.
Tailor Buildkite to fit your workflows with plugins and the API.
Give AI coding agents the context they need in Getting started with coding agents.