Clusters overview
Clusters is a Buildkite Pipelines feature used to manage and organize agents and queues, and provides the following benefits:
- Allows teams to self-manage their Buildkite agent pools.
- Allows cluster maintainers and Buildkite organization administrators to create isolated sets of agents and pipelines within the one Buildkite organization.
- Helps make agents and queues more discoverable across your Buildkite organization.
- Provides easily accessible queue metrics and operational cluster insights such as queue wait times (available on Enterprise plans only).
- Allows easier agent management through queue pausing.
- Allows you to easily create queues for Buildkite hosted agents.
- Allows the management of Buildkite secrets.
Clusters create logical boundaries between different parts of your build infrastructure, enhancing security, discoverability, and manageability.
The following diagram shows the architecture of a Buildkite organization's clusters, along with their pipelines and queues.
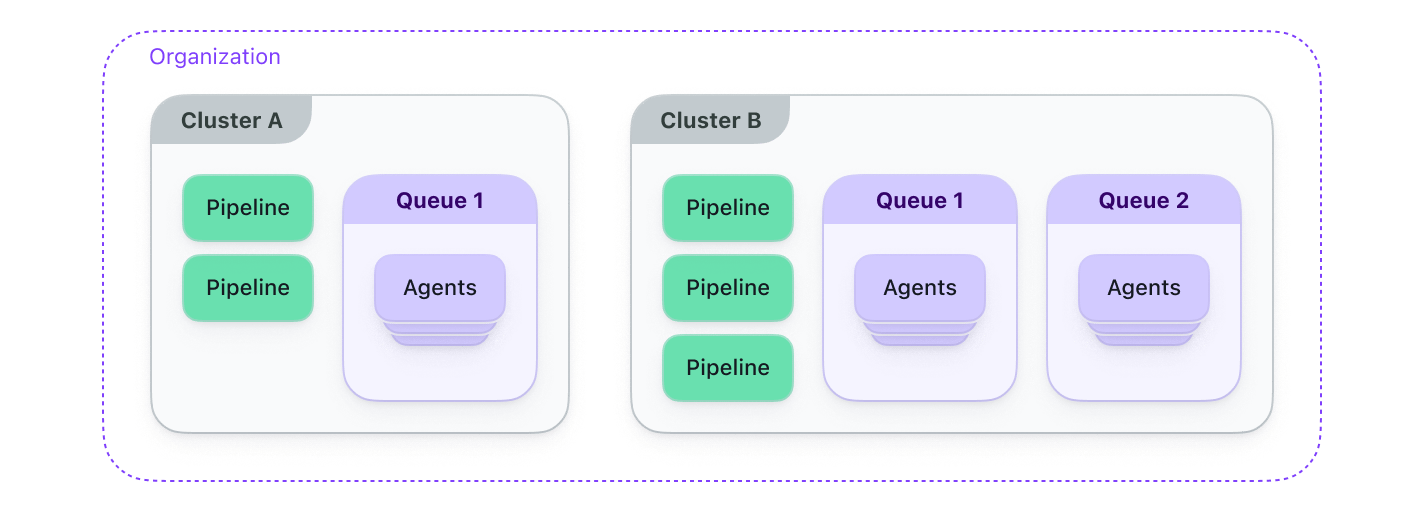
Clusters encapsulate groups of agents and pipelines, enabling the following:
- Clusters are viewable to your entire Buildkite organization, allowing engineers to better understand the agents and queues available for their pipelines.
- Individual users or teams can maintain their own clusters. Cluster maintainers can manage queues and agent tokens, and add and remove pipelines.
- Pipelines must be assigned to a cluster, ensuring their builds run only on the agents connected to this cluster. These pipelines can also trigger builds only on other pipelines in the same cluster.
Clusters and queues best practices
How should I structure my clusters
In a small to medium organization, a single default cluster will often suffice. There is no need to create extra clusters.
When your organization grows, the most common patterns seen for cluster configurations are based on team/department ownership:
- Product lines: companies with multiple products often have a cluster configured for each individual product.
- Type of work: open source, infrastructure, frontend, backend vs everything else.
You can create as many clusters as you require for your setup. However, keep in mind that different clusters generally do not share pipelines.
Learn more about working with clusters in Manage clusters.
Pipeline triggering and artifact access
Pipelines associated with one cluster cannot trigger or access artifacts from pipelines associated with another cluster, unless a rule has been created to explicitly allow triggering or artifact access between pipelines in different clusters.
Be aware that if you are using the the Agent Stack for Kubernetes to run your Buildkite agents in a Kubernetes environment (with Kubernetes clusters), a Kubernetes cluster is unrelated to a Buildkite cluster.
How should I structure my queues
The most common queue attributes are based on infrastructure set-ups, such as:
- Architecture (x86, arm64, Apple silicon, etc.)
- Size of agents (small, medium, large, extra large)
- Type of machine (macOS, Linux, Windows, GPU, etc.)
Therefore, an example queue would be small_mac_silicon.
Having individual queues according to these breakdowns allows you to scale a set of similar agents, which Buildkite can then report on.
Learn more about working with queues in Manage queues.
Queue metrics
Clusters provides additional, easy to access queue metrics that are available only for queues within a cluster. Learn more in Queue metrics in clusters.
Cluster insights
The cluster insights page provides an overview on the overall health of your cluster and agent set-up. Learn more in Cluster insights.
Accessing your agents and pipelines
If you only have one cluster with one queue, selecting Agents in the global navigation takes you directly to your single queue in this cluster. This is typically the case with newly created organizations.
If you have multiple clusters, selecting Agents in the global navigation takes you to the Clusters page, where you can access your individual clusters and within each one, the details and configurations of the cluster's individual queues, agents tokens, pipelines and other settings.
Any agents and pipelines which are not yet associated with a cluster are known as unclustered agents and unclustered pipelines, respectively.
From the Clusters page:
To access a specific cluster's agents, their associated agent tokens, as well as the cluster's queues and pipelines, select the relevant cluster (or its queue or pipelines link) from this page.
To access your unclustered agents, their associated agent tokens, as well as their pipelines, select Unclustered (or its pipelines link) from this page.