Single sign-on with Okta
To add Okta as an SSO provider for your Buildkite organization, you need admin privileges for both Okta and Buildkite.
Setting up SSO with SAML
To set up single sign-on, follow the SAML configuration guide.
Using SCIM to provision and manage users
Buildkite customers on the Enterprise plan can optionally enable automatic deprovisioning for their Buildkite users.
Supported SCIM features
- Create users
- Deactivate users (deprovisioning)
How provisioning and deprovisioning work
Buildkite uses a two-layer model for user management with SCIM:
- SCIM: When Okta assigns a user to the Buildkite app, it sends a request to Buildkite's SCIM endpoint. This creates a lightweight tracking record storing the user's name, email, and active status. It does not create a Buildkite account, add the user to your organization, or trigger billing.
- JIT provisioning: A real Buildkite account and organization membership are created the first time the user logs in using SSO. This is the only step that provisions an actual account.
Provisioning is handled by JIT on first login. Deprovisioning is handled by SCIM when a user is unassigned in Okta.
Buildkite does not bill you for users added to your Okta Buildkite app until they sign in for the first time. Billing is triggered by JIT provisioning at first login, not by the SCIM tracking record.
Configuration instructions
Using the SCIM provisioning settings in Okta, Buildkite customers on the Enterprise plan can automatically remove user accounts from your Buildkite organization. In Okta this feature is called 'Deactivating' a user. You need an enabled Okta SSO Provider before you can set up SCIM.
User deprovisioning is an Enterprise plan-only feature and automatically enabled. As an Enterprise plan customer, if you are using a custom provider, please contact support@buildkite.com to have the 'SCIM for Custom SAML' feature flag enabled.
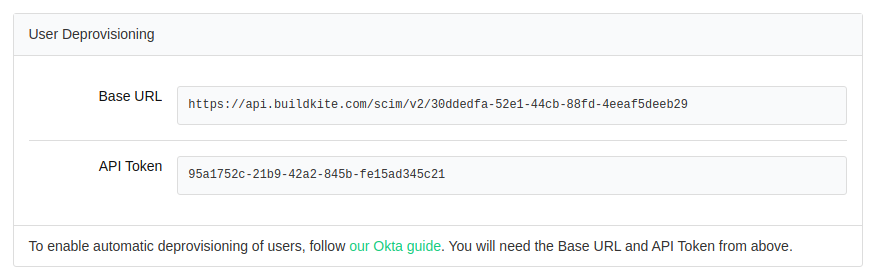
After creating your SSO Provider in Buildkite, you will need the Base URL and API Token from your Okta SSO Provider Settings:
Go to your Buildkite application in Okta to set up deprovisioning:
- On the Sign On tab in the Okta Buildkite application, edit the Credentials Details settings, select Email for the Application username format and click Save.
- On the Provisioning tab, select Integration from the left side menu.
- Click Configure API Integration.
- Select the Enable API integration option and enter the URL and API token copied from your Buildkite SSO Provider settings.
- Click Test API Credentials and then Save once successfully verified.
- Select To App from the left side menu.
- Edit the Provisioning to App settings, and enable Create Users and Deactivate Users. Enabling Create Users allows Okta to create a SCIM tracking record when a user is assigned. Deactivate Users requires this existing SCIM record, as Okta needs it to send a deactivation request.
- Save and test your settings.
Syncing existing users for deprovisioning
If users were already provisioned in Buildkite using JIT before SCIM was configured, Okta has no SCIM tracking record for them and cannot deactivate them. To enable deprovisioning for these users, you need to retroactively create SCIM tracking records by syncing them with Okta.
This can be done one of two ways:
- Removing and re-assigning the users and groups to the Okta Buildkite app, or
- If your Okta tenant has Lifecycle Management enabled, then you can use the Provision User function on the Assignments tab of the Okta Buildkite app.
SAML user attributes
Buildkite accepts a subset of the SAML attributes from identity providers. The accepted attributes are:
| Attribute | Description |
|---|---|
admin |
A boolean value that describes whether the user should be provisioned with admin permissions Example: true |
email |
A string of the user's email address Example: "person@company.com" |
name |
A string of the user's full name Example: "Han Solo" |
teams |
A comma separated list of team UUIDs. A team's UUID can be found on the Team Settings page in Buildkite. Example: a1aaaa1a-b2bb-cccc-d4dd-aa2aaa6aaaaa,b5bbbbbb-3aaa-dd1d-aaa1-eee4eee6eeee
|
When using the teams attribute, you can also specify roles. The maintainer or member role can be appended to the team UUID.
For example, the following code will specify the member role for the first team and the maintainer role for the second team:
teams="b5bbbbbb-3aaa-dd1d-aaa1-eee4eee6eeee/member, a1aaaa1a-b2bb-cccc-d4dd-aa2aaa6aaaaa/maintainer"
Troubleshooting
Resolve common issues with using Okta and Buildkite.
Unexplained permission changes for users
If you notice a user's permissions changing unexpectedly and have SSO set up with Okta, it's likely because permissions are overwritten at login. When a user logs in to their Buildkite account through Okta, Okta sends the user attributes, and Buildkite updates the user's permissions to match.
For example, consider a situation where you grant a user admin permission in Buildkite (for example, Buildkite organization administrator permissions) but not in Okta. When the user next logs in, they lose this admin permission because Buildkite updates the user's permissions to match the attributes sent from Okta.