
Collecting tests with OpenTelemetry
Buildkite Test Engine can ingest test results and instrumentation using OpenTelemetry. Using OpenTelemetry for ingestion permits the inclusion of trace instrumentation alongside the basic pass/fail information for each execution. This gives you a richer understanding of where your tests are spending their time.
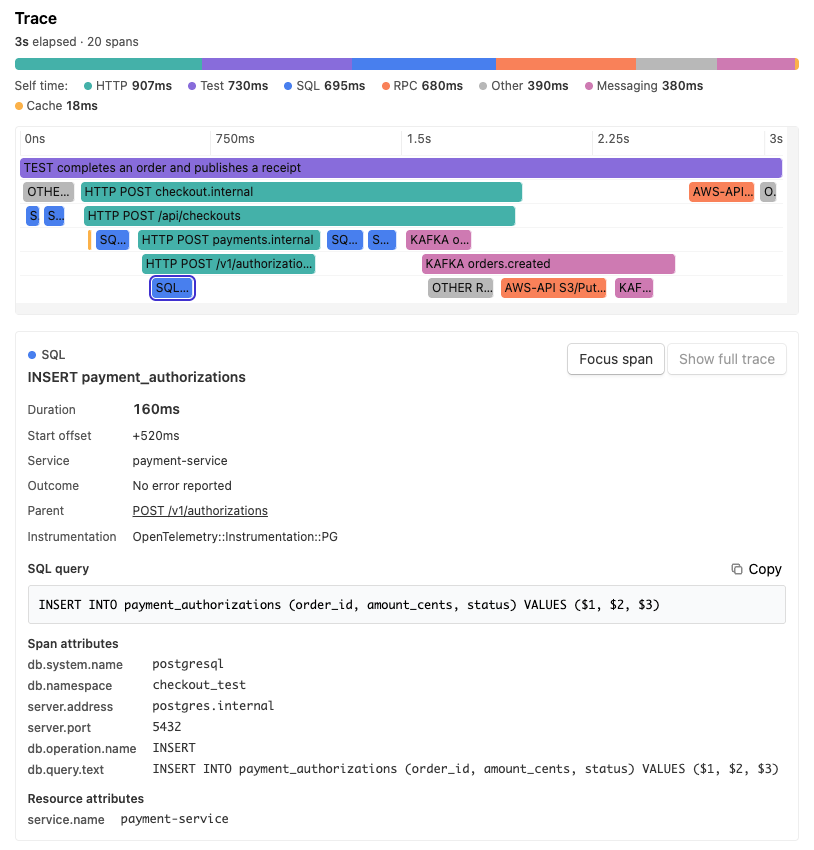
In addition to viewing trace detail on individual test executions, you can also assess aggregated trace information across builds and across an entire test suite. Use this information to identify hot paths that may not show up in isolation but have a cumulative cost across the whole suite.
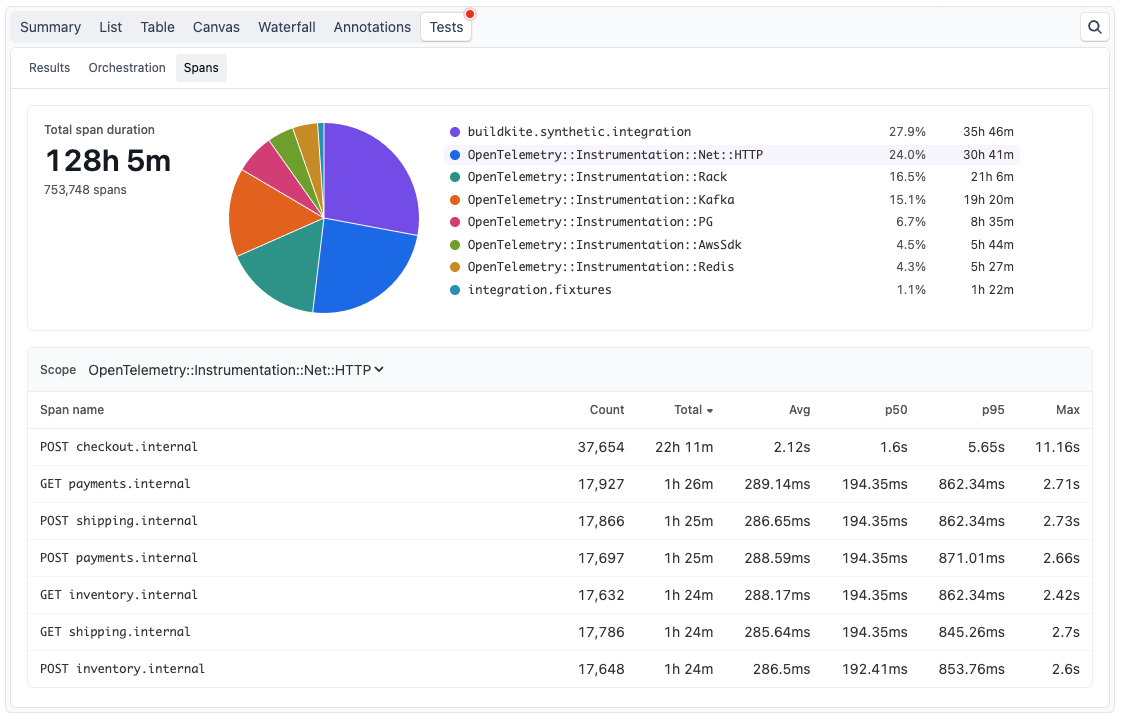
Some of the Test Engine test collection libraries support OpenTelemetry. You can also implement OpenTelemetry test ingestion without using a Buildkite collector, as described below.
For collector setup instructions, see Collecting Jest tests with OpenTelemetry, Collecting Playwright tests with OpenTelemetry, Collecting Vitest tests with OpenTelemetry, Collecting pytest tests with OpenTelemetry, or Collecting RSpec tests with OpenTelemetry.
Writing your own OpenTelemetry ingestion
Test Engine ingests test results as Traces. Two types of span can be sent.
- Test spans - A test span is mandatory for a test execution to be ingested by Test Engine, and must be the root span of the trace. There should be one test span per test execution.
- Child spans - Any other instrumentation may be attached to the test span as part of the trace hierarchy. Child spans are optional.
Test Engine creates the test result from the test span. You cannot send a separate JSON or JUnit XML upload for the same execution. If you are using OpenTelemetry for instrumentation, you must use OpenTelemetry for result upload.
Sending child spans to Buildkite Test Engine is available on the current Free, Pro, and Enterprise plans, subject to your plan's trace ingestion limits. Sending test spans is available on all plans.
Test span structure
In your test runner's hooks, start a new root span for each execution and end it after the test and its cleanup finish. Each execution must have its own trace, with no parent span. Create instrumented child spans while that root span is active so they share its trace ID.
Set these attributes on each root span:
| Attribute | Description |
|---|---|
buildkite.execution.via |
Set to otlp to create a test execution from this span. |
buildkite.run_key |
The identifier for the test run. Use the same value as the Buildkite-Tests-Run-Key request header. |
buildkite.test.name |
A nonempty, stable test name. |
test.case.result.status |
Set to pass, fail, skipped, or pending. The span's OpenTelemetry status alone does not determine the test result. |
The root span must have valid start and end timestamps. Its duration becomes the test execution duration. Spans without a name, a run key, or a recognized result do not create test executions.
Use buildkite.test.scope to group tests, and keep the combination of scope and name stable between runs. Add code.file.path and code.line.number for source locations. For failures, set the span status to error and record exception events with exception.message and exception.stacktrace to include failure details.
For CI metadata, set resource attributes such as cicd.pipeline.run.id, cicd.pipeline.run.url.full, vcs.ref.head.name, and vcs.ref.head.revision. On Buildkite Pipelines, populate these from BUILDKITE_BUILD_ID, BUILDKITE_BUILD_URL, BUILDKITE_BRANCH, and BUILDKITE_COMMIT, respectively. Set buildkite.job_id on each root span from BUILDKITE_JOB_ID to associate executions with their job. Add custom execution tags as buildkite.tag.<key> span attributes.
Example implementation
The following example uses the Python OpenTelemetry SDK to submit a passing test. For another language, use its OpenTelemetry SDK with the same endpoint, headers, and span attributes.
Create a test suite and configure its OIDC policy to allow your pipeline to authenticate with the
write_uploadsscope. OIDC is the recommended authentication method on Buildkite Pipelines because it uses short-lived tokens instead of a long-lived suite API token.-
Install the SDK and HTTP/protobuf exporter:
python -m pip install \ opentelemetry-sdk \ opentelemetry-exporter-otlp-proto-http -
Save the following as
otel_test.py:import os import uuid from opentelemetry.exporter.otlp.proto.http.trace_exporter import ( OTLPSpanExporter, ) from opentelemetry.sdk.trace import TracerProvider from opentelemetry.sdk.trace.export import BatchSpanProcessor from opentelemetry.trace import Status, StatusCode # Share this key across all executions and parallel jobs in a run. run_key = os.getenv("BUILDKITE_BUILD_ID") or str(uuid.uuid4()) token = os.environ["BUILDKITE_ANALYTICS_TOKEN"] provider = TracerProvider() provider.add_span_processor(BatchSpanProcessor(OTLPSpanExporter( endpoint="https://tests-otlp.buildkite.com/v1/traces", headers={ "Authorization": f'Token token="{token}"', "Buildkite-Tests-Run-Key": run_key, }, ))) tracer = provider.get_tracer("example-test-collector") try: with tracer.start_as_current_span("test.execution", attributes={ "buildkite.execution.via": "otlp", "buildkite.run_key": run_key, "buildkite.test.scope": "Arithmetic", "buildkite.test.name": "adds two numbers", }) as span: try: assert 2 + 3 == 5 except Exception as error: span.set_attribute("test.case.result.status", "fail") span.set_status(Status(StatusCode.ERROR, str(error))) raise else: span.set_attribute("test.case.result.status", "pass") finally: # Export buffered results even if the test fails. provider.shutdown() -
In a Buildkite Pipelines job, request an OIDC token and run the example. Replace the organization and suite slugs in
SUITE_URLwith your own:SUITE_URL="https://buildkite.com/organizations/your-organization/analytics/suites/your-suite" BUILDKITE_ANALYTICS_TOKEN=$(buildkite-agent oidc request-token \ --audience "$SUITE_URL" --lifetime 300) export BUILDKITE_ANALYTICS_TOKEN python otel_test.pySet the token lifetime to exceed the time needed to run the tests and export their spans.
Open your suite in Buildkite Test Engine and find the new run. Use the suite's Uploads page to investigate rejected or failed uploads.
Transport and authentication
Send traces to https://tests-otlp.buildkite.com/v1/traces using OTLP over HTTP with protobuf encoding (Content-Type: application/x-protobuf). The endpoint does not accept OTLP/JSON or gRPC. Uncompressed and gzip-compressed requests are supported. Request bodies must not exceed 900 KiB; reduce the exporter batch size if you receive HTTP 413 responses.
Every request must include:
Authorization: Token token="YOUR_TOKEN"Buildkite-Tests-Run-Key: YOUR_RUN_KEY
Run keys must contain between one and 255 printable ASCII characters, with no spaces. Use one key for all requests belonging to the same run, including child spans and parallel jobs, and a different key for each new run.
Prefer an agent OIDC token whose suite policy grants the write_uploads scope. If OIDC is unavailable in your environment, use a suite API token instead. Store the suite API token securely as BUILDKITE_ANALYTICS_TOKEN to run the example without the OIDC token request. Both token types use the same authorization header format. User API access tokens are not supported.
An HTTP 200 response confirms receipt, not that every span created a test execution. If results are missing, check the root span attributes and the suite's Uploads page. Do not upload the same executions through both OTLP and another upload method, as this creates duplicate results.