Custom agent images
Custom agent images let you control which packages, tools, and security patches run in your hosted agent environment. A custom agent image is recommended for production workloads.
Creating a custom agent image requires you to define a Dockerfile that installs the tools and utilities you require. You can create a custom agent image using the Buildkite interface, agent hooks, the internal container registry, or the agent images endpoints in the REST API.
Requirements within the image
Buildkite Linux hosted agents have the buildkite-agent and docker binaries layered dynamically into the job running environment. This means that any base image being used does not need to install or maintain these versions or their configurations. Several tools are required for the buildkite-agent to successfully acquire and run a job. These are:
gitca-certificatesbash
Install these tools in every custom agent image that the Buildkite Pipelines pipeline-level or command-step image attribute specifies. Make Bash available as an executable within the image.
There is also no requirement into which Linux flavor this image is based on. The default Buildkite Linux hosted agents image is based on Ubuntu, with other Linux flavors such as Alpine or CentOS being perfectly acceptable.
Buildkite Linux hosted agents do not support changing the USER within the Dockerfile, nor setting the GID and UID environment variables.
Create an agent image
Creating an agent image requires you to define a Dockerfile that installs the tools and utilities you require. This Dockerfile should be based on the Buildkite hosted agent base image.
Also available on Amazon ECR Public Gallery
The Buildkite hosted agent base image is also available on the Amazon ECR Public Gallery.
An example Dockerfile that installs the awscli and kubectl:
# Set the environment variable to avoid interactive prompts during awscli installation
ENV DEBIAN_FRONTEND=noninteractive

# Install AWS CLI
RUN apt-get update && apt-get install -y awscli

# Install kubectl using pkgs.k8s.io
RUN curl -LO https://storage.googleapis.com/kubernetes-release/release/$(curl -s https://storage.googleapis.com/kubernetes-release/release/stable.txt)/bin/linux/amd64/kubectl \
    && chmod +x kubectl \
    && mv kubectl /usr/local/bin/
Using the Buildkite interface
To create an agent image using the Buildkite interface:
- Select Agents in the global navigation to access the Clusters page.
-
Select the cluster in which to create the new agent image.
Note: Before continuing, ensure you have created a Buildkite hosted queue (based on Linux architecture) within this cluster. Learn more about how to do this in Create a Buildkite hosted queue.
Select Agent Images to open the Agent Images page.
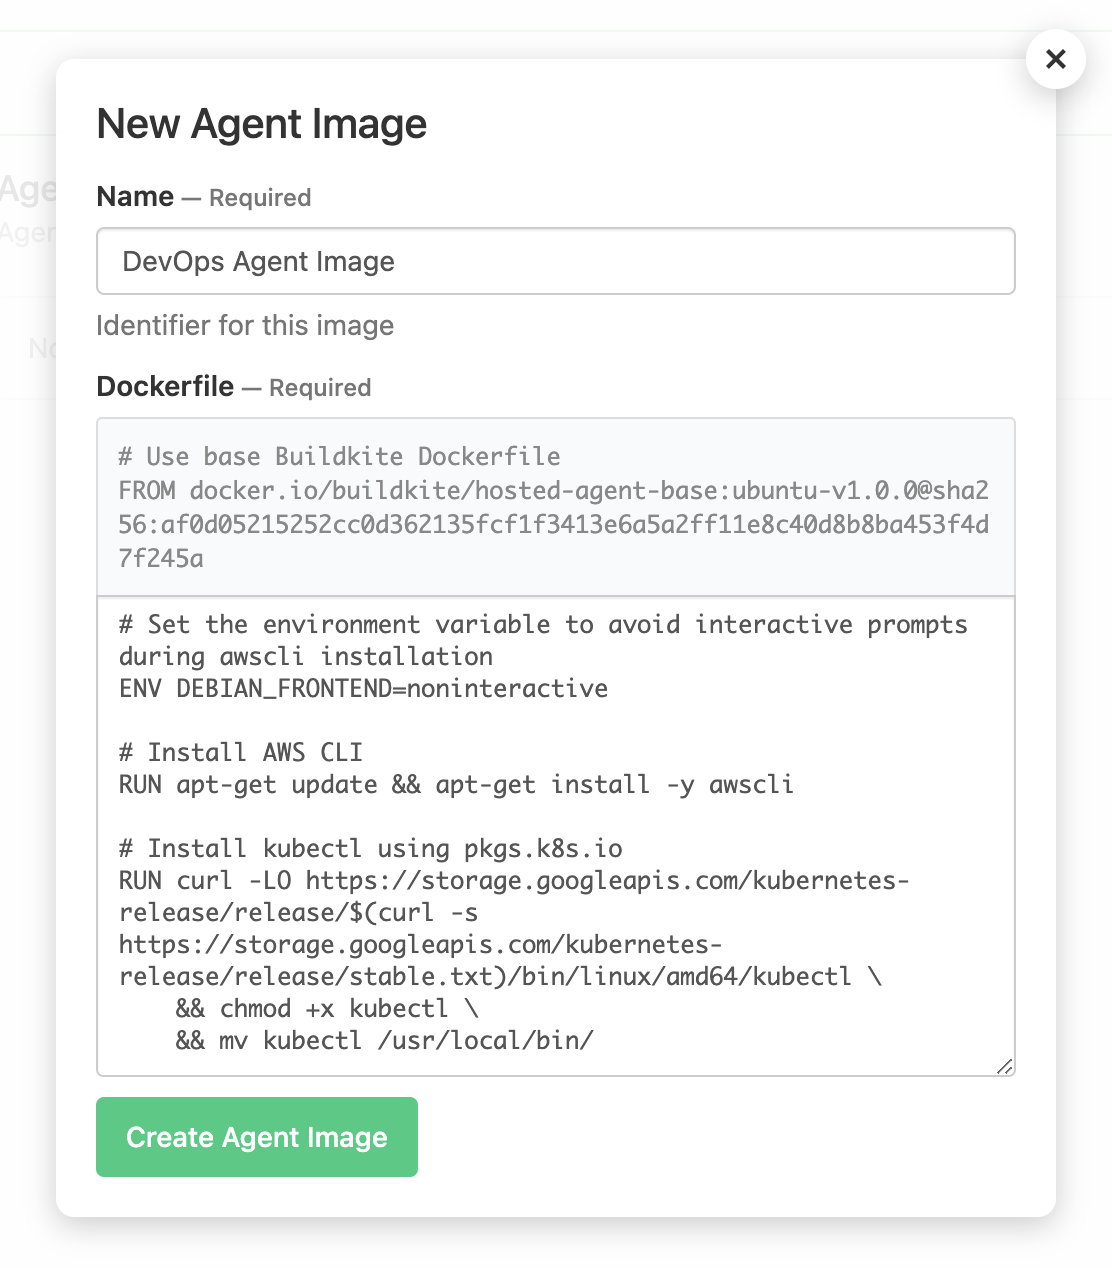
Select New Image to open the New Agent Image dialog.
Enter the Name for your agent image.
-
In the Dockerfile field, enter the contents of your Dockerfile.
Notes:
- The top of the Dockerfile contains the required
FROMinstruction, which cannot be changed. This instruction obtains the required Buildkite hosted agent base image. - Ensure any modifications you make to the existing Dockerfile content are correct before creating the agent image, since mistakes cannot be edited or corrected once the agent image is created.
- The top of the Dockerfile contains the required
Select Create Agent Image to create your new agent image.
Using agent hooks
You can create a custom agent image and modify its Dockerfile to embed the following types of job lifecycle hooks as agent hooks:
environment, pre-checkout, checkout, post-checkout, pre-command, command, post-command, pre-artifact, post-artifact, and pre-exit.
Be aware that the pre-bootstrap job lifecycle hook and agent lifecycle hooks operate outside of a job's execution itself, and are therefore not supported within a Buildkite hosted agent context.
To embed hooks in your agent image's Dockerfile:
-
Follow the Create an agent image instructions to begin creating your hosted agent within its Linux architecture-based Buildkite hosted queue.
As part of this process, modify the agent image's Dockerfile to:
- Add the
BUILDKITE_ADDITIONAL_HOOKS_PATHSenvironment variable whose value is the path to where the hooks will be located. - Add any specific hooks to the path defined by this variable.
An example excerpt from a
Dockerfilethat would include your own hooks:ENV BUILDKITE_ADDITIONAL_HOOKS_PATHS=/custom/hooks COPY ./hooks/*.sh /custom/hooks/This results in an agent image with the directory
/custom/hooksthat includes any.shfiles located at./hooks/from where the image is created. - Add the
Follow the Use an agent image instructions to apply this new agent image to your Buildkite hosted queue.
Buildkite hosted agents run with the BUILDKITE_HOOKS_PATH value of /buildkite/agent/hooks, which is the global agent hooks location. This path is fixed and is read-only when a job starts. Therefore, avoid setting the value of BUILDKITE_ADDITIONAL_HOOKS_PATHS to this path in your agent image's Dockerfile, as any files you copy across to this location will be overwritten when the job commences.
Use an agent image
You can use an agent image in the following ways:
- Set an image as the default for a queue using the Buildkite interface.
- Specify a custom image for a queue using the Buildkite interface or API.
- Specify the image in your pipeline YAML, which allows different steps to use different images within the same queue.
When more than one of these is set, a job uses the first image available in the following order:
- The
imageattribute on the job's command step. - The
imageattribute at the pipeline root. - The queue's Image URL (
agentImageRef). - The queue's Agent image dropdown selection.
- The default Buildkite hosted agent image.
Set the default image for a queue
Once you have created an agent image, you can set it as the default for a Buildkite hosted queue based on Linux architecture. Any agents in the queue will use this image in new jobs, unless overridden in the pipeline YAML.
To set a Buildkite hosted queue to use a custom Linux agent image:
- Select Agents in the global navigation to access the Clusters page.
- Select the cluster with the Linux architecture-based Buildkite hosted queue whose agent image requires configuring.
- On the Queues page, select the Buildkite hosted queue based on Linux architecture.
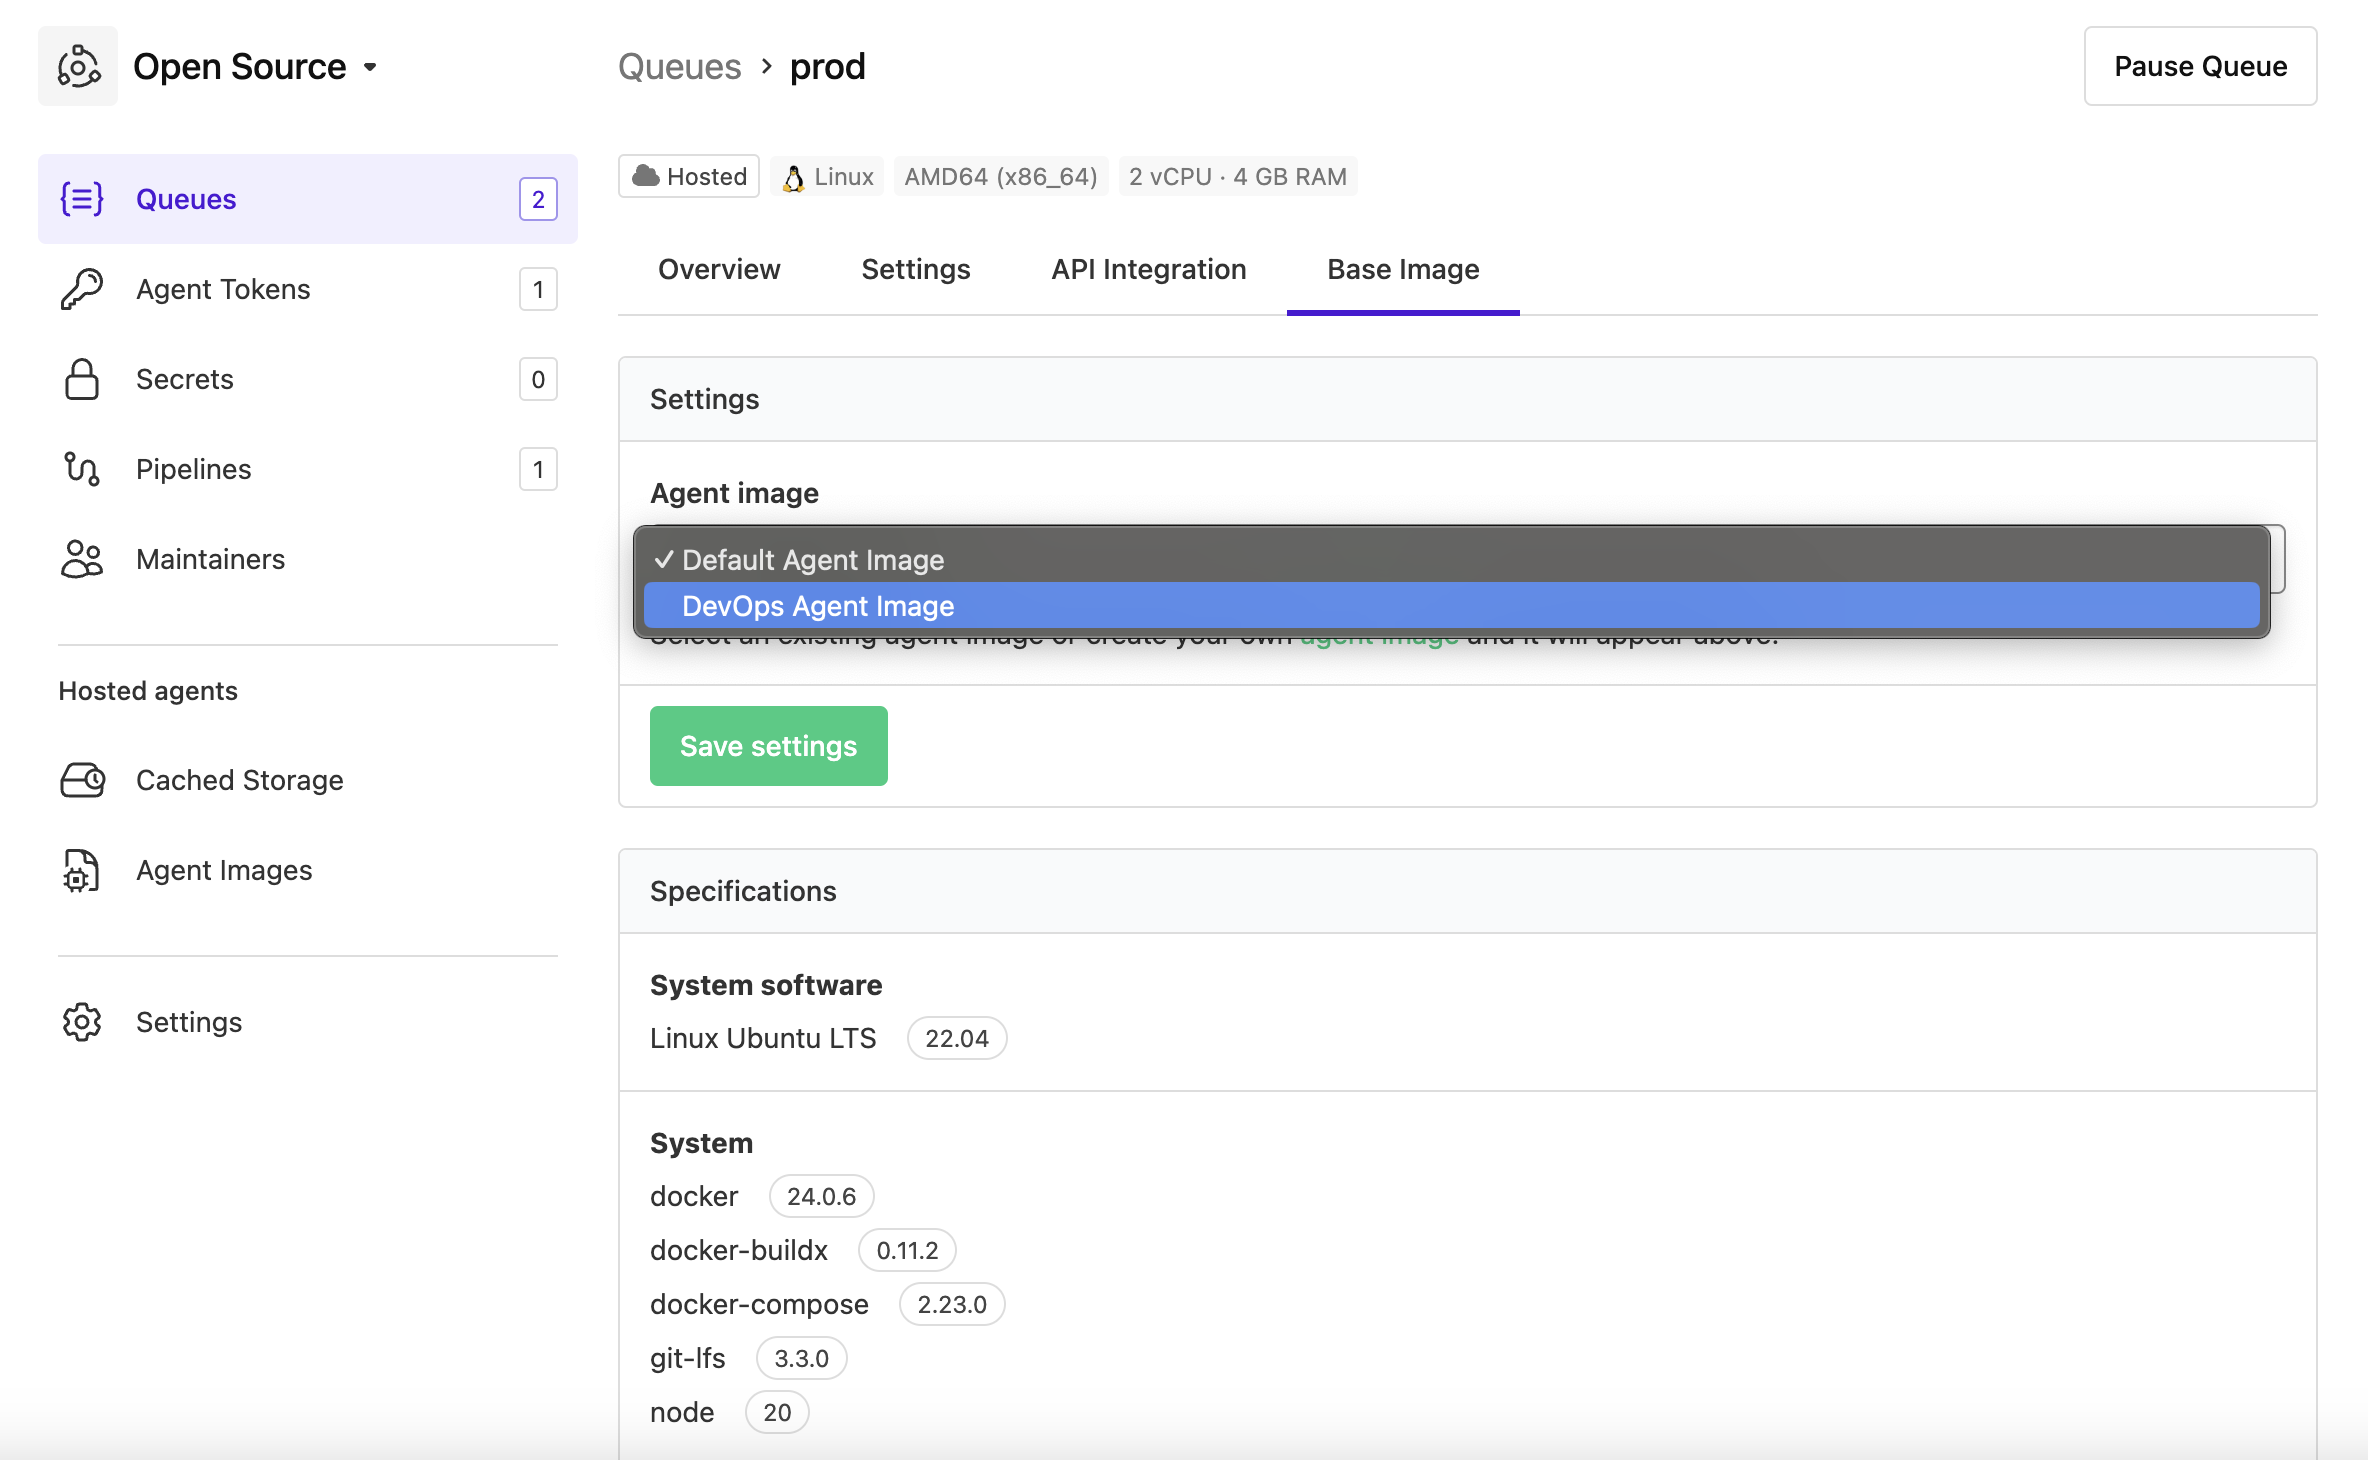
- Select the Base image tab to open its settings.
-
In the Agent image dropdown, select your agent image.
Note: If the Image URL field contains a value, that URL takes precedence and the queue does not use the image selected in this dropdown. To use the dropdown selection, clear the Image URL field. Learn more in Specify a custom image for a queue.
Select Save settings to save this update.
Specify a custom image for a queue
You can specify the URL of a custom image for a Buildkite hosted queue. This image must be publicly available or have been pushed to the internal container registry. Specifying a custom image requires access to the custom agent images feature.
Image URL takes precedence over the Agent image dropdown
A queue can have both an Image URL and an Agent image dropdown selection saved at the same time. Setting one does not clear the other. When both are set, the queue uses the Image URL, and ignores the dropdown selection. To use the dropdown selection instead, clear the Image URL field, or set agentImageRef to null through the API. An image attribute in your pipeline YAML overrides both queue settings.
To set a custom image URL through the Buildkite interface:
- Select Agents in the global navigation to access the Clusters page.
- Select the cluster with the Buildkite hosted queue.
- On the Queues page, select the Buildkite hosted queue.
- Select the Base image tab to open its settings.
-
In the Image URL field, enter the custom image URL.
The format for this URL follows the standard container image reference syntax of
registry.url/image-name:tag. For example:-
Docker Hub:
docker.io/node:latest. -
Standard public container image reference: Any publicly accessible container image URL, such as
my-registry.example.com/my-org/my-image:tag. - Internal container registry: See internal container registry for more information.
-
Docker Hub:
Select Save settings to save this update.
You can also set a custom image URL through the Buildkite API or Terraform:
-
REST API: Use the
agentImageRefproperty in thehostedAgentsobject when updating a queue. -
GraphQL API: Use the
agentImageReffield in theplatformSettings.linuxinput when calling theclusterQueueUpdatemutation. This field requires access to the custom agent images feature. -
Terraform: Use the
agent_image_refattribute in thehosted_agents.linuxblock of thebuildkite_cluster_queueresource.
To point a queue at an image that Buildkite builds for you, pass that image's image_ref value from the agent images endpoints as the agentImageRef value, rather than selecting the image from the Agent image dropdown.
You cannot set a custom image URL when you create a queue. That call succeeds with the image unset, so create the queue first, then update it. You must also send instanceShape alongside agentImageRef. Omitting instanceShape fails with a validation error stating that the instance shape cannot be changed, so specify the queue's current instance shape unless you also intend to resize it.
curl -H "Authorization: Bearer $TOKEN" \
  -X PUT "https://api.buildkite.com/v2/organizations/{org.slug}/clusters/{cluster.id}/queues/{id}" \
  -H "Content-Type: application/json" \
  -d '{ "hostedAgents": { "instanceShape": "LINUX_AMD64_2X4", "agentImageRef": "my-registry.example.com/my-org/my-image:tag" } }'
Specify an image in your pipeline YAML
In Buildkite Pipelines, use the image attribute at the pipeline root or directly on a command step, alongside the command attribute. Do not put the image attribute under the agents attribute, which configures agent query rules such as the queue to use.
The value must be a container image reference, such as registry.example.com/image-name:tag, not the display name shown on the Agent Images page. Host the image publicly or store it in your cluster's internal container registry. For an image created through the Buildkite interface, wait until its status reaches READY and the agent images endpoints return a non-null image_ref value. Then, use that value for the image attribute.
The following examples assume you have already pushed the referenced images to your internal container registry and installed the required tools in them. Buildkite hosted agents set the predefined BUILDKITE_HOSTED_REGISTRY_URL environment variable to the URL of the current cluster's internal container registry.
To set a default image for all steps in a pipeline, add the image attribute at the pipeline root, alongside the agents and steps attributes. This overrides the queue's default image:
image: "${BUILDKITE_HOSTED_REGISTRY_URL}/build:latest"

agents:
  queue: "hosted-linux"

steps:
  - label: "Build"
    command: "make build"
To override the pipeline's default image for an individual step, add the image attribute directly to that step. Steps without an image attribute use the pipeline's default image, or the queue's default image if the pipeline does not define a default:
image: "${BUILDKITE_HOSTED_REGISTRY_URL}/build:latest"

agents:
  queue: "hosted-linux"

steps:
  # Uses the pipeline's default image
  - label: "Build"
    command: "make build"

  # Overrides the pipeline's default image for this step
  - label: "Run integration tests"
    command: "make integration-test"
    image: "${BUILDKITE_HOSTED_REGISTRY_URL}/integration-test:latest"

  # Uses the pipeline's default image
  - label: "Deploy"
    command: "make deploy"
Issues with starting a job
There are several scenarios where a job may not start successfully, and various reasons why this might happen. The following is a non-exhaustive list of common reasons why jobs may not be starting:
- The specified base image configured on the Buildkite hosted queue cannot be found. This could be due to the full URL or a specific tag for that image not being available - in particular, note that images are bound to a single cluster, and can't be used by agents in other clusters. It's also possible that this could be a timing issue, where the tag being requested is not available yet and waiting may be sufficient.
- When the image is a publicly available one, especially when using a registry other than Docker Hub, Buildkite may be rate-limited when attempting to retrieve it. It is highly recommended using the internal container registry to mirror the image and avoid this issue.
- The required packages have not been installed within the image. This is especially the case for
ca-certificates, as this package will prevent thebuildkite-agentfrom being able to communicate with the Buildkite platform.
Delete an agent image
To delete a previously created agent image, it must not be used by any Buildkite hosted queues.
To delete an agent image:
- Select Agents in the global navigation to access the Clusters page.
- Select the cluster in which to delete the agent image.
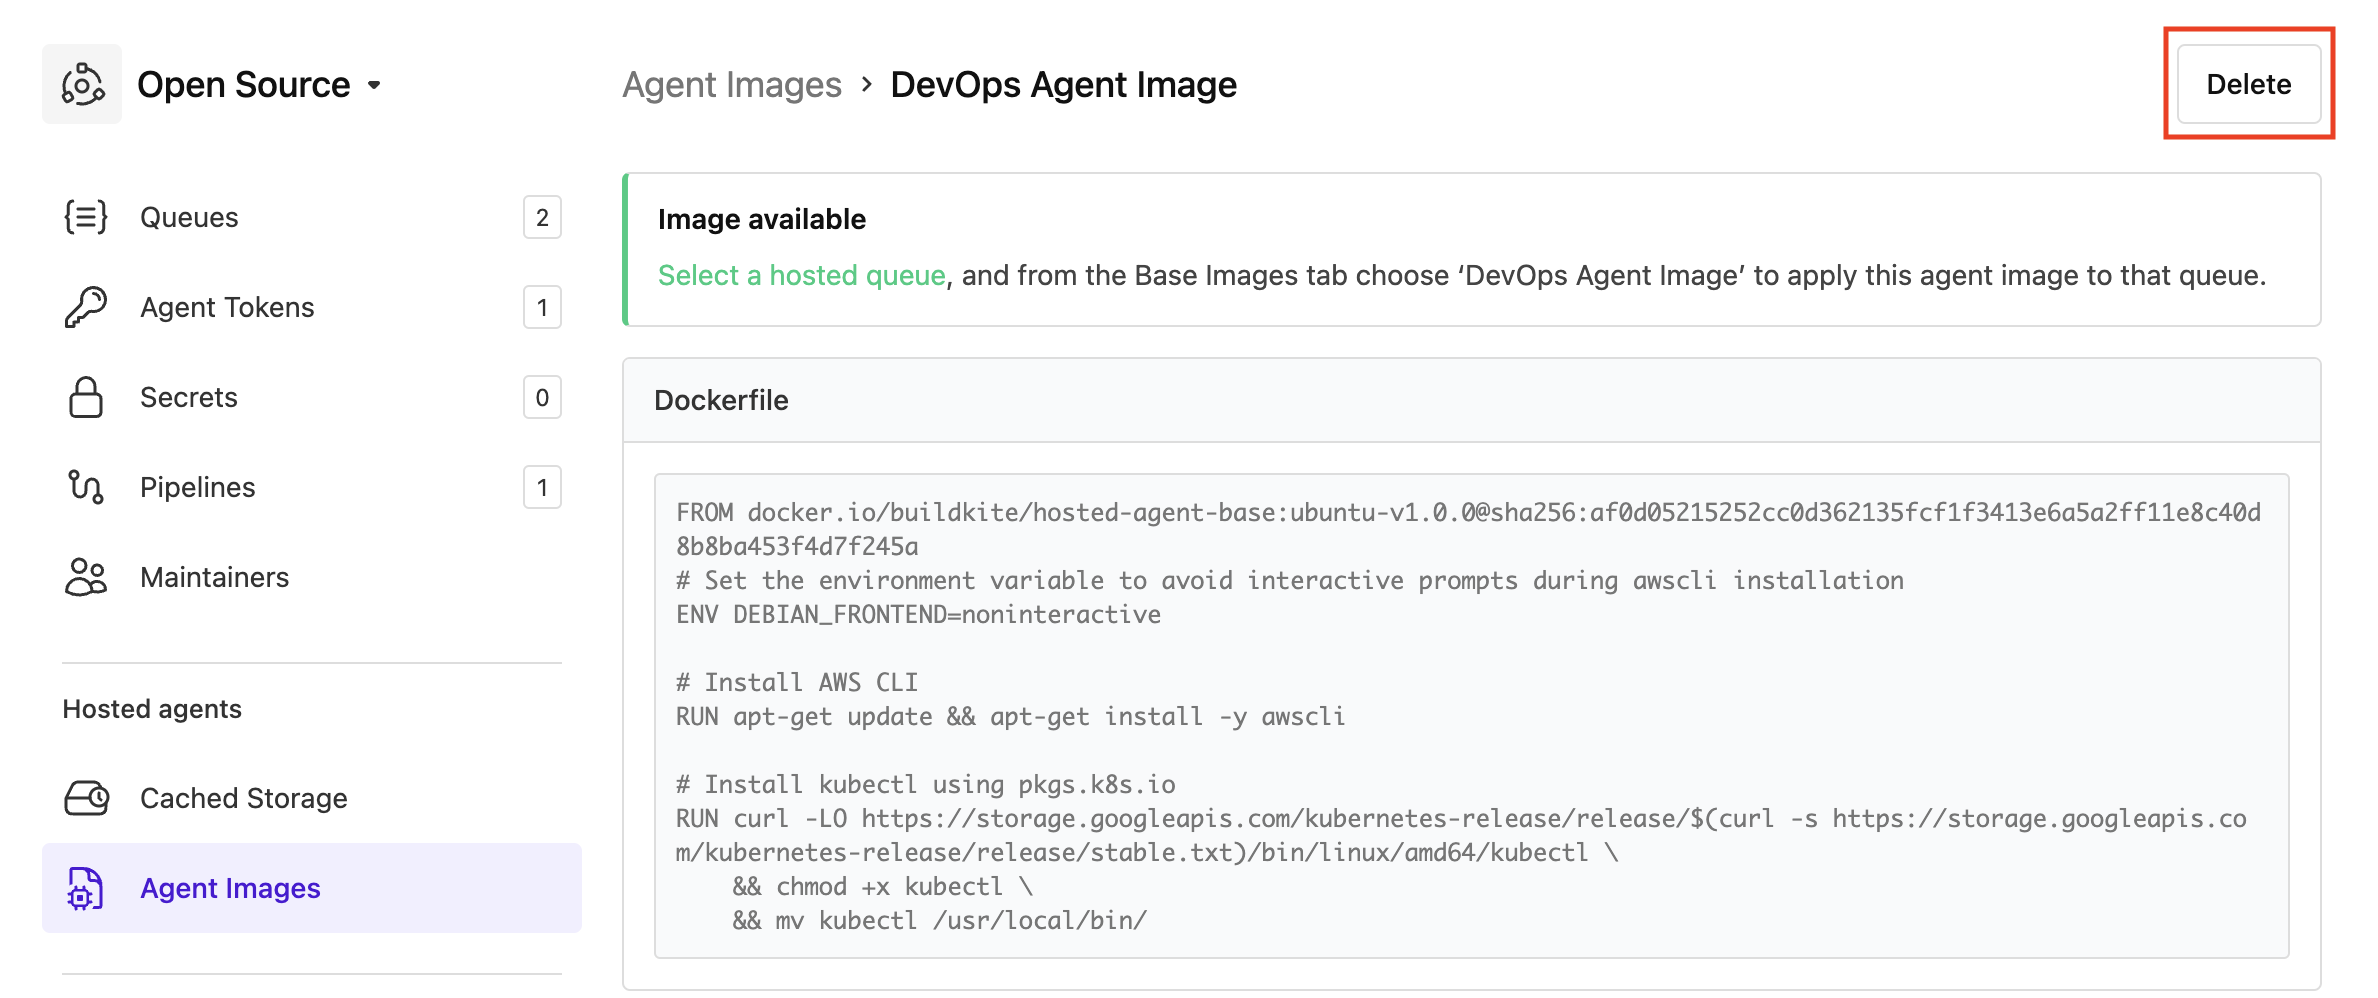
- Select Agent Images to open the Agent Images page.
-
Select the agent image to delete > Delete.
Note: If you are prompted that the agent image is currently in use, follow the link/s to each Buildkite hosted queue on the Delete Image message to change the queue's Agent image (from the Base Image tab) to another agent image.
On the Delete Image message, select Delete Image and the agent image is deleted.