If you read our previous post about how AI is reshaping CI, then you're aware of the new building blocks we recently added to the Buildkite platform. We're calling these building blocks our agentic workflow components — composable primitives designed to give platform teams the tools they need to bring AI-assisted processes into their CI/CD workflows.
In this post, we'll show you how to use those components, with three simple-but-practical examples that use AI agents to solve common real-world problems, including:
- Reviewing GitHub pull requests
- Automatically fixing broken PR builds
- Generating first-draft PRs based on Linear issues
Each example is backed by a fully functioning GitHub repository containing a Buildkite pipeline template that you can fork, set up, run, and easily adapt to the needs of your team.
Recapping the components
Before diving into the examples themselves, let's quickly recap the workflow components we introduced in our previous post, as you'll be using them in the examples that follow:
- The Buildkite MCP server, which gives your agents fine-grained access to the Buildkite REST API through our specialized MCP server tools
- Buildkite model providers, which let you connect to popular frontier models like Anthropic's Claude Code and others directly through Buildkite, either by using your own API credentials or with a hosted, Buildkite-managed key
- Buildkite pipeline triggers, inbound webhooks that you can use to invoke a Buildkite pipeline in response to any external event with an HTTP request, with first-class support for popular services like GitHub and Linear
- The Buildkite SDK, which lets you compose and generate pipeline definitions dynamically at runtime using general-purpose programming languages like JavaScript, TypeScript, Python, Go, and Ruby
- A collection of plugins powered by Claude, Codex, Amazon Bedrock, and others that make it easy to use LLMs to annotate your CI jobs with rich build summaries
Together, these building blocks, in combination with the broader Buildkite platform, let you build flexible and adaptive workflows that bring AI agents into your CI/CD process on your own terms. Let's see how.
Example 1: GitHub code-review bot
We all know how important code review is to the delivery process — but it also takes time, and with AI agents producing more code than ever for us humans to review, well, let's just say we need all the help we can get to keep up with it. Having a capable AI agent at hand to help out with the occasional first-pass code review (whether for yourself or someone else) can be a significant time-saver — not to mention a way to surface the kinds of non-obvious bugs that can easily sneak past human reviewers.
Get the code
The code for this example is available on GitHub at buildkite-agentic-examples/github-code-review-bot.
How it works
This first example configures a Buildkite pipeline to listen for GitHub PR events (specifically labeled events) using a Buildkite pipeline trigger. Triggers are essentially inbound webhooks — unique URLs tied to a specific pipeline — which means you can add them to any GitHub repository to have GitHub run the pipeline in response to certain events. This particular pipeline runs an AI agent (Claude Code by default) that evaluates a PR and submits a code review as a GitHub comment.
All three of the examples we're covering in this post follow the same general pattern:
- A label gets applied, triggering a Buildkite pipeline.
- The pipeline runs a script that parses and validates the webhook payload.
- The script appends a step to the running Buildkite pipeline to spawn an AI agent.
- The agent completes the task.
The most interesting work happens in the handler script, scripts/handler.ts, a Node.js program written in TypeScript that uses the Buildkite and GitHub SDKs to run Claude Code with a task-specific prompt:
import { execSync } from "child_process";
import { Pipeline } from "@buildkite/buildkite-sdk";
import { Octokit } from "octokit";

// ...
// Generate the pipeline with the Buildkite SDK.
function generateCodeReviewPipeline(webhookPullRequestUrl: string, agentBuildUrl: string): string {
    const pipeline = new Pipeline();
    const tokenArgs = [`PullRequestURL=${webhookPullRequestUrl}`, `AgentBuildURL=${agentBuildUrl}`];

    pipeline.addStep({
        label: ":buildkite: Reviewing the code",
        commands: [...runAgent(tokenArgs)],
        plugins: {
            docker: {
                "image": "buildkite-agentic-example-tools:latest",
                "mount-checkout": false,
                "mount-buildkite-agent": true,
                "environment": [
                    //...
                    "TRIGGER_ON_LABEL",
                    "MODEL_PROVIDER",
                ],
            },
        },
        //...
    });

    return pipeline.toYAML();
}

async function main() {

    // Fetch the incoming payload from Buildkite.
    const event = buildkiteAgent("meta-data", "get", "buildkite:webhook").trim();
    const payload = JSON.parse(event);

    // ...
    // Exit unless the payload has a label matching the one we're listening for.
    const labelName = payload.label.name;
    if (labelName !== process.env.TRIGGER_ON_LABEL) {
        console.log(`Label is not '${process.env.TRIGGER_ON_LABEL}', exiting`);
        process.exit(0);
    }

    // ...
    // Generate and upload a new pipeline step to run the AI agent.
    const pipelineYaml = generateCodeReviewPipeline(pullRequestUrl);
    const uploadProcess = execSync("buildkite-agent pipeline upload", {
        input: pipelineYaml,
        encoding: "utf-8",
    });
}

main().catch(error => {
    console.error("Error:", error.message);
    process.exit(1);
});
The step runs Claude in a Docker container (using the Buildkite docker plugin) that includes only the tools Claude needs for this particular task: Node.js, the GitHub CLI, the local version of the Buildkite MCP server, the Claude Code CLI, and the necessary scripts, prompts, and environment variables. Running the agent in a container like this isn't technically necessary — it just adds some additional isolation and safety over running Claude Code directly on your filesystem. (The container itself is built and tagged locally at runtime using an agent lifecycle hook. See .buildkite/hooks/post-checkout for details.)
Inside the container, Claude clones the PR's GitHub repository, checks out the PR branch, analyzes the change, and posts a review back to the PR as a comment, annotating the Buildkite build (using the MCP server's annotation tooling) as it goes.
All settings — including the model provider and label — are configurable in .buildkite/pipeline.yml:
secrets:
  GITHUB_TOKEN: GITHUB_TOKEN
  BUILDKITE_API_TOKEN: API_TOKEN_BUILDKITE

env:
  GITHUB_CLI_VERSION: "2.83.0"
  BUILDKITE_MCP_SERVER_VERSION: "0.7.3"
  TRIGGER_ON_LABEL: "buildkite-review"
  MODEL_PROVIDER: "anthropic"

steps:
  - label: ":node: Generate the pipeline"
    command: |

      # Generate and upload the pipeline to handle the webhook.
      echo "--- :webhook: Run the webhook handler"
      npm install && npm run build
      node dist/handler
One last thing to point out (as it's easy to miss) is that the claude CLI isn't running in the usual way, communicating with the Anthropic API as it normally would. Instead, it's using a Buildkite-managed model-provider endpoint that proxies the Anthropic API for you. Open up scripts/claude.sh and you'll see that the two environment variables Claude uses to configure its backend are being set using Buildkite environment variables:
#!/bin/bash

# ...
# Set up Buildkite Hosted Models
export ANTHROPIC_BASE_URL="$BUILDKITE_AGENT_ENDPOINT/ai/anthropic"
export ANTHROPIC_API_KEY="$BUILDKITE_AGENT_ACCESS_TOKEN"

# ...
echo "--- :robot_face: Starting Claude Code"
echo "$prompt" | claude -p --mcp-config mcp.json
These two values are being set with pipeline environment variables applied automatically by Buildkite at runtime. Together, they give you a seamless way to use Claude — or any supported model provider — in your pipelines without having to provide (and then expose, and manage) your own Anthropic credentials. See the model providers documentation for details.
The following diagram shows the operative components and how they come together:
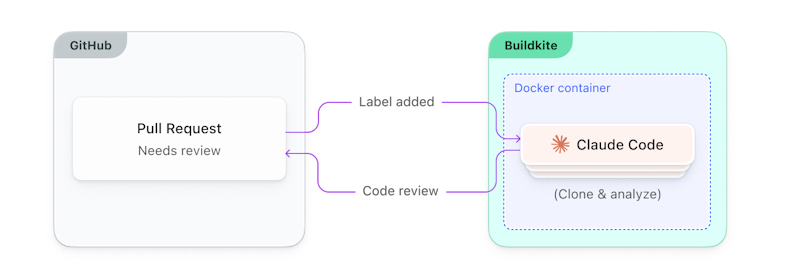
See the example's README for complete setup instructions and configuration details.
Once you're up and running (which takes only a few minutes — the README walks you through it), you'll have a fully functioning code-review bot that you can call up by adding a buildkite-review label to any pull request — and a reusable Buildkite pipeline and workflow that you can adapt as you like to the needs of your team.
Now let's have a look at the next example.
Example 2: GitHub PR build fixer
I don't know about you, but every now and then, I'll have a PR build fail, and I'll have no idea why. Often the failure has something to do with a linter — although the logs may or may not make this clear, as linters are famous for failing in totally obscure ways that make no sense at all.

☝️ Me, when this happens.
In situations like these (and in other, more complex ones), it can be nice to be able to reach for an AI agent for a hand in diagnosing and fixing the issue.
Get the code
The code for this example is available on GitHub at buildkite-agentic-examples/github-pr-build-fixer.
How it works
This example follows the same high-level pattern as before:
- You create a new Buildkite pipeline and trigger with the example, adding the trigger as a GitHub webhook to whichever repositories you'd like Claude to fix for you.
- When a PR build fails, you add the appropriate label to it — in this case,
buildkite-fix(although as before, this is configurable in./buildkite/pipeline.yml). - GitHub invokes the webhook, triggering the pipeline, which evaluates the webhook payload and adds a step that runs Claude in a Docker container.
- Claude uses the Buildkite MCP server to query the logs, finds the root cause, clones the repo, implements a fix, and pushes a new branch containing the fix to GitHub.
- Claude makes a new PR (on the original, still-broken PR), waits for the Buildkite build to pass (iterating if necessary), and posts a summary comment on the original PR explaining the fix.
If the PR looks good, you click the merge button, pull in the fix, and get on with your day.
Here's how this looks architecturally:
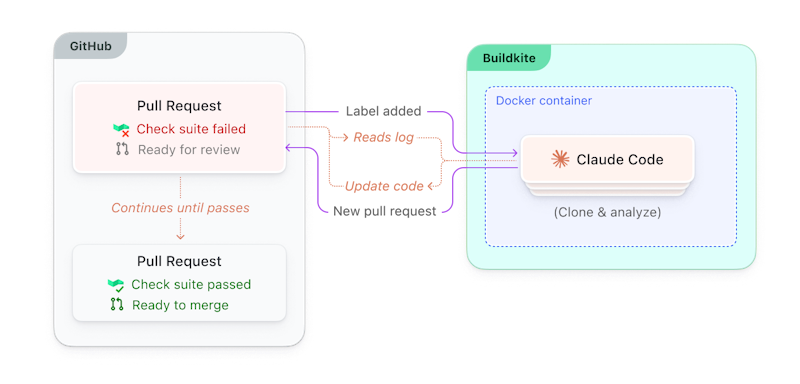
Full setup and configuration details are in the README.
I'd also encourage you to have a look at the prompt for this example, which you'll find at prompts/user.md. You may want to make some adjustments to it to align with whatever standards or guidelines you use on your team.
Now let's turn to our last example.
Example 3: Linear issue handler
Linear has become an incredibly popular tool for managing software projects. (We even use it ourselves here at Buildkite.) If you've used Linear, you know how it works, but if you haven't, it's essentially an issue tracker — much like Jira, Trello, GitHub Issues, or others you've likely used before.
Issue trackers are at the center of how most of us organize our work, and at any given moment, I might have dozens or hundreds of issues assigned to me personally. Some are simple and well-defined — dependency bumps, framework upgrades. Others are much more complex, requiring deeper analysis to come up with more substantive estimates.
Fortunately, both types can often be handled (in whole or in part) with a good LLM, given a good-enough issue description and prompt as a starting point.
Get the code
The code for this example is available on GitHub at buildkite-agentic-examples/linear-issue-handler.
How it works
Hopefully by now, the pattern is clear: You set up a pipeline, give it a trigger, wire up the trigger to be invoked in response to some external event, and your agent of choice takes care of the rest. Here, the goal is to have Linear kick off a Buildkite pipeline in response to an issue-label event.
Once the trigger is set up in your Linear project — see the README for how to do that — whenever you add the buildkite-analyze label to an issue, the pipeline runs scripts/handler.ts, extracts the issue details, discerns from the issue description which GitHub organization and repository the issue refers to, and generates a pipeline step that runs Claude as it does in the other examples.
In this one, Claude analyzes the codebase as well, and makes a judgment call (much as a human would) on the level of complexity involved. For simpler issues, Claude will go ahead and implement a fix, opening a PR and commenting back on the Linear issue with a summary and link to it. For more complex issues, it'll render its findings, suggest possible approaches, etc., and post an analysis back to the Linear issue instead.
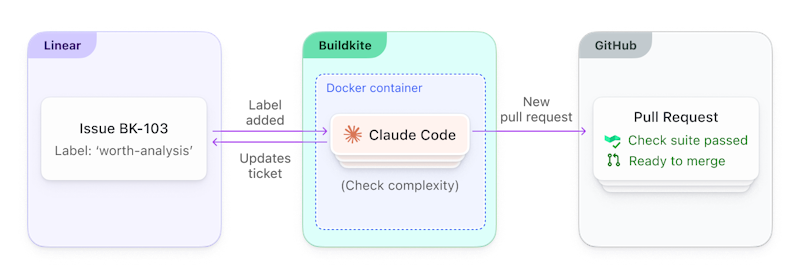
As with the other examples, all of the work performed by the LLM is done within a Docker container, which includes the Linear CLI here to give Claude more controlled access to Linear functionality.
What makes these work
Stepping back, these simple yet practical examples all reflect the core principles and foundational tools we think teams need in order to bring agentic processes into their CI workflows:
- Composable primitives that enable flexible, adaptive CI workflows
- Built-in access to frontier models with minimal configuration
- Pipeline triggers that let you extend your Buildkite pipelines to external services more easily
- A highly configurable, performance-focused MCP server that gives your agents fine-grained access to Buildkite resources
- A multi-language SDK that lets you build pipelines intelligently and dynamically at runtime
... and more. Each component is individually useful, but taken together they enable agentic workflows that can branch, adapt, fan out, etc., based on what the agent discovers at runtime — something statically written YAML-based pipelines can't really do.
Next steps
The best way to get a feel for these components is to try them yourself. All you need are a Buildkite account, a GitHub personal access token, a Buildkite API access token, and a Linear API key for the Linear example, and each one takes only a few minutes to set up.
Follow the instructions in their respective READMEs to get started:
To learn more about the each of these components, see their documentation:
Have fun! We can't wait to see what you build. 🙌