Jenkins plugins function as libraries that extend its functionality in all sorts of ways. For example, the Git Checkout plugin allows Jenkins to interface with Git repositories, and authentication plugins enable Jenkins to connect with various external authentication services.
Jenkins' core functionality is relatively limited, so plugins do a lot of the heavy lifting. This is one reason Jenkins has remained dominant for nearly 20 years—as new technologies emerge, community members develop plugins to support them. While plugins enhance Jenkins' capabilities, they can cause numerous issues in Jenkins environments, including version incompatibilities, unexpected pipeline failures, security vulnerabilities, and even complete system failures that prevent Jenkins from starting.
This article provides strategies across plugin management, Infrastructure as Code (IaC), and coding best practices to tame the plugin chaos and maintain a stable Jenkins environment.
We'll cover:
- Minimizing your plugin usage
- Choosing high-quality plugins
- Using caution when adding or updating new plugins
- Backing up your Jenkins environment
- Testing plugin changes in pre-prod environments
- Using infrastructure-as-code
- Using version pinning
- Keeping security top-of-mind
The trouble with Jenkins plugins
While essential, plugins are frequently the source of problems when running a Jenkins pipeline. They load when Jenkins starts, so if there’s a problem with a plugin, it can cause issues as soon as Jenkins starts up. In the worst cases, plugin issues can prevent Jenkins from starting altogether.
Compatibility issues can arise during upgrades when running pipelines with multiple steps involving different plugins. It’s a two-sided problem: newer versions of plugins can be incompatible with older versions of Jenkins, and older versions of plugins can be incompatible with newer versions. Even well-maintained plugins can fail when Jenkins core components change unexpectedly.
Most plugins are created by the community, creating inconsistencies and various potential problems. Abandoned plugins often go unmaintained, creating security vulnerabilities and compatibility issues with newer versions of Jenkins. Proprietary or custom plugins frequently lack community support when issues arise. And because there’s no guaranteed QA process for community plugins, quality varies dramatically.
Transitive and circular dependencies also create additional complexity that's difficult to manage. A single plugin might pull in numerous additional plugins, each with their own dependencies (and those dependencies’ dependencies). When one plugin in this chain has issues, tracking down which plugin is causing the problem can be challenging.
Some additional problems include:
- Plugin API changes can occur without clear warnings or migration paths
- Some plugins require large memory allocations, contributing to performance degradation
- Plugin upgrades might silently alter pipeline behavior in unexpected ways
These issues can be difficult to solve after they occur, but there are ways to prevent and mitigate many of them.
Tips for managing Jenkins plugins
Let’s look at some best practices that can help limit problems that Jenkins plugins can cause.
Minimize your plugin usage
The fewer plugins you have, the fewer opportunities there are for them to cause problems. Orphaned plugins can linger due to legacy projects no one maintains, unclear ownership after team changes, "just in case" installations, or fear of breaking existing functionality. Only use the plugins you truly need and remove unused ones regularly. The Plugin Usage tool (which itself is a plugin!) can help you identify which plugins are actually being used in your environment.
Without oversight, teams might add plugins for one-off use cases that later become abandoned, yet continue to impact system stability. For example, a team might add a deployment plugin for a specific need, but a year later, when the community no longer maintains that plugin and its purpose has been forgotten, it could cause the entire CI system to crash.
To reduce plugin usage, you can replicate the plugin's functionality into your job scripts instead of relying on plugins when possible. Ideally, you should be able to run any job locally by checking out the script code without requiring Jenkins, with Jenkins functioning primarily as a lightweight wrapper for scheduling, access control, and administration.
Choose high-quality plugins
Most Jenkins plugins are open-source, so their maintenance and quality vary significantly. Prioritize plugins that are actively maintained and widely used in the community, because well-established plugins are less likely to introduce problems and more likely to receive timely updates.
There are several ways to check the status of various plugins. The Jenkins plugins index provides information for over 2,000 community-contributed plugins, including an overall health score for each one. Before installing any plugin, check its update history and community support in the registry. Look for regular updates, active maintainers, and a substantial user base.
The index also contains links to GitHub repositories, where you can review open issues, pull requests, and commit frequency to see if the plugin is being actively maintained. If it is, it’s more likely that the plugin will be compatible with future Jenkins versions and not cause you problems anytime soon.
Some consistently reliable plugins to consider for your environment include:
Use caution when adding or updating plugins
Plugin updates may introduce new features and security fixes, but they can also be risky, bringing compatibility issues and unexpected behavior changes. To avoid breaking your CI/CD pipeline, research any plugins you want to install or update, and plan thoughtfully.
Before updating any plugin, always check the plugin's release notes for breaking changes or new dependencies, then check compatibility between your Jenkins version and the updated plugin. You can do this in several ways:
- Use the Plugin Manager in Jenkins itself. While it lists available updates, be cautious—some updates may not be fully compatible with your Jenkins version, especially if your installation is older.
- Use the Plugin Compatibility Tester tool to check for known issues with your specific Jenkins version.
- Review the plugin's information page in the registry, which often lists version requirements and known limitations.
If a plugin update isn't compatible with your Jenkins version, consider using version pinning to keep your system stable until you can coordinate a better upgrade path.
These steps only work if the entire organization follows them, so consider implementing a formal change management process for plugin updates as well. This might include creating an approval workflow for adding new plugins, documenting the justification for each plugin, and assigning ownership for maintaining specific plugins. Even for smaller teams, implementing a lightweight review process can prevent uncontrolled plugin proliferation.
Back up your Jenkins environment
If you upgrade a plugin and it causes a problem, downgrades don’t always work smoothly. Newer plugin versions often change their configuration formats or database schemas, and downgrading doesn't automatically reverse these changes, leaving you with corrupted job configurations, inaccessible build histories, or plugin initialization failures. Additionally, dependency conflicts can create a cascade effect where the downgraded plugin is incompatible with other updated plugins or the current Jenkins core version, requiring multiple simultaneous downgrades that may not be possible.
In these cases, you need a complete backup for recovery. Before you change plugins or Jenkins itself, back up the entire JENKINS_HOME directory, which houses all configurations for the Jenkins installation. Manage backups externally from Jenkins by taking a backup or snapshot of the complete JENKINS_HOME directory to get an archive of everything, including all build history. File-system snapshots in particular are a convenient way to capture everything at a point in time instead of trying to tar or zip the whole JENKINS_HOME, which may cause issues if files are being written at the same time as they’re being backed up.
If you have to restore Jenkins from a backup:
- Stop the Jenkins service.
- Replace the contents of the corrupted
JENKINS_HOMEdirectory with the backup copy, or roll back the volume to the saved snapshot. - Verify file permissions—all files should be owned by the Jenkins user.
When Jenkins starts up again, it will load with the replaced configuration.
You can also use plugins to back up your Jenkins environment. The ThinBackup plugin offers a convenient way to back up the essential configurations of jobs and services and restore them within the Jenkins UI if something goes wrong. (Note, however, that it doesn’t support full backups and may not suit larger or modern Jenkins instances.)
The Job Config History plugin is another good option—it provides additional protection by saving snapshots of configuration changes to jobs and services, so you can audit changes and undo them if something breaks.
Test changes in pre-prod environments
When you want to add or update a plugin, always test the change in a pre-production environment before attempting to deploy to production. This helps catch:
- Integration issues
- Pipeline syntax errors
- Plugin initialization problems
- Conflicts between plugins or with the Jenkins controller
Testing plugins in a Docker-based environment (e.g., locally with Docker or Docker Compose) can help surface these kinds of issues before they make it into production.
Ideally, you'd test against your backed-up copy of Jenkins to more closely mimic production. However, a simpler alternative might be to start with the official Jenkins Docker image, taking care to choose the version of Jenkins you're running in production. In the documentation you’ll find a one-liner to start a single Jenkins container running locally on port 8080:
docker run -p 8080:8080 -p 50000:50000 --restart=on-failure jenkins/jenkins:lts-jdk17Browse to http://localhost:8080, sign in with the generated admin password, and complete the setup in the Jenkins UI. From there, you can attempt to install the plugins you're thinking of installing in production.
This is of course very manual, but can be automated using Jenkins Configuration as Code. More on this below.
Use infrastructure-as-code
Infrastructure as Code (IaC) for Jenkins has become a best practice for teams focused on consistency, automation, and scale. With IaC, plugin versions are documented and tracked in Git history, with changes automatically recorded with commit messages. Though it may not be the right choice for every team, it creates a clear audit trail of modifications and enables reproducible environments across development, testing, and production.
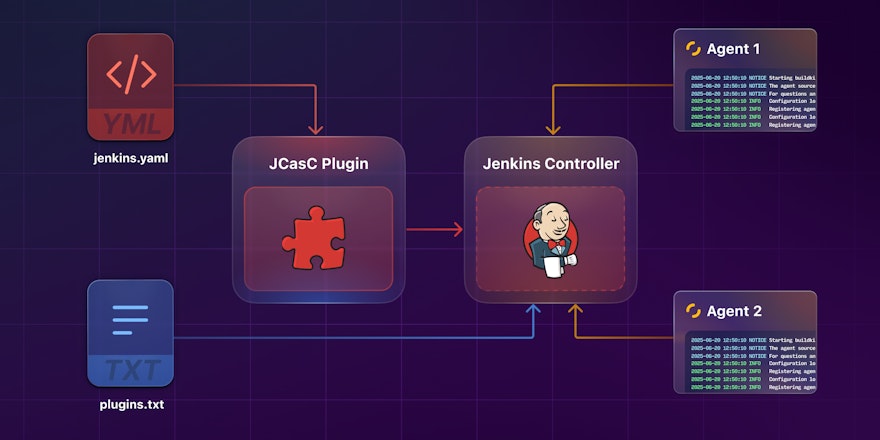
The Jenkins Configuration as Code (JCasC) plugin allows you to declaratively specify the plugins you want installed and configured, using YAML. It integrates with Jenkins's startup lifecycle and uses internal mechanisms to ensure plugins are installed and their configurations applied consistently. The Plugin Manager tells you which plugins work with your current Jenkins environment, so it works well with JCasC to make sure you're installing safe plugins. However, for many Jenkins setups, particularly for smaller teams or complex, established Jenkins configurations, it might not be worth setting up and using JCasC. It can have a steep learning curve, and some Jenkins functionality (like credentials or some plugin configurations) requires workarounds.
We mentioned using Docker earlier for testing, but it’s worth pointing out that you can also use Docker in production to faciliate IaC for Jenkins—to manage the core Jenkins version, all plugins, and system dependencies—by using a version-controlled Dockerfile. We'll cover this topic in more detail in an upcoming post.
Use version pinning
Jenkins supports pinning specific plugin versions to prevent automatic or accidental updates that might break functionality. With version pinning, teams can control exactly when and how plugin updates happen and thoroughly test plugins before upgrading. Paired with IaC, version pinning can also support rollbacks to a known-good Jenkins environment by restoring previously working plugin versions with a few lines of code.
There are a few ways to manage version pinning. JCasC alone doesn’t handle plugin versions directly, but with the Plugin Installation Manager CLI, you can define a plugins.yaml or plugins.txt file with exact versions and install them during controller startup. If you're running Jenkins via Docker, you can pin plugin versions in a plugins.txt file.
If you don't have an IaC setup, you can manually install a plugin by placing its .hpi file into the $JENKINS_HOME/plugins directory. To prevent automatic updates of this plugin, you can manually create an empty $PLUGIN_NAME.jpi.pinned file in the same directory. (Note however that using .jpi.pinned is deprecated and may not be effective in newer Jenkins versions. Prefer version pinning via IaC or the Plugin Installation Manager CLI.)
Even with version pinning, however, clean downgrades of Jenkins itself can be problematic. The upgrade process typically performs migrations on configuration files that can break, and there's no built-in path to revert those changes. Always back up JENKINS_HOME before upgrades to ensure you can restore to a previous state if needed.
Keep security top of mind
Security should always be a priority when managing plugins. Update both Jenkins and plugins regularly for security patches and install only from the official Jenkins Plugin Manager — ideally automatically with JCasC. While we mentioned it in the first best-practice, it’s worth repeating here that you should remove unnecessary plugins to reduce potential security risks. Remember that plugins can have extensive permissions, including network access and code-execution capabilities.
Most commercial security scanning tools can identify known Common Vulnerabilities and Exposures (CVEs) in Jenkins, providing additional protection. Regular security audits of your plugin ecosystem should be part of your maintenance routine.
Reduce plugin headaches with best practices — or try something new
Jenkins plugins can be challenging; finding ways to manage them effectively is essential. By following the best practices outlined here — minimizing plugin usage, testing changes thoroughly, choosing well-maintained plugins, using IaC, and using proper version control — you'll be well on your way to a more stable, secure, and maintainable Jenkins environment that supports your development workflow instead of hindering it.
That said, many of the issues we've covered stem from Jenkins's tightly-coupled, monolithic architecture, where plugins run on the same server as the Jenkins control plane. If you're constantly dealing with plugin conflicts or stability issues, it might be worth exploring a more modern alternative. Buildkite, for example, decouples plugins from the control plane entirely, allowing every pipeline to define its own plugin environment independently, eliminating the possibility of conflicts entirely.
- Learn more about Buildkite's approach to plugins in the docs
- Browse the Buildkite plugin directory
- Give Buildkite a try for yourself to see how it compares