Can you use DevOps techniques to produce machine learning models? In this article, adapted from the Andy MacKinlay’s Unblock 2023 talk, “Reproducible Machine Learning with Buildkite,” we’ll review how Culture Amp uses Buildkite to test hundreds of potential changes to their machine learning models in a reproducible, traceable, and scalable manner.
What is machine learning?
Culture Amp is an employee experience platform that aims to make life better for your employees. I work in data intelligence - specifically, the Natural Language Processing (NLP) team, which specializes in extracting insights from data and feeding them back to our customers. We’re a complex subsystems team whose APIs power natural-language queries from our end-users over textual data. In other words, we specialize in machine learning.
So what is machine learning? I think a lot of people have a better idea now than they did a few years ago. But let’s illustrate it with a classic example: the “hotdog or not hot hotdog” identifier from the TV show Silicon Valley.
First, we start with unstructured input, such as images from Bing. This is how machine learning often works: we get some unstructured input and we produce a structured label for it. Here, the labels are hotdog or not hotdog. So the input is the image, and the output is a hotdog or not hotdog label.
We use machine learning for this because it’s usually quite hard to code this using traditional procedural programming techniques. We could, in some of these examples, count the number of red pixels and make a guess about whether it's a hotdog. But that isn’t a robust approach and won’t scale to the breadth and variety of images we’ll encounter in the real world.
So that's where machine learning comes in. But how?
Machine learning works off of models. Models are essentially a collection of weights, or floating point values. Machine learning inference uses a learning algorithm that combines the unstructured input with the model weights to produce a label.
Let’s look at an example from the NLP world, which is my wheelhouse.

Models in NLP
Here, we have unstructured text input. Our inference algorithm is a sentiment classifier: it combines those weights with this unstructured input and produces a label. Here, it's a positive sentiment label. We're asserting this text is talking about something positively and it says this place is awesome. That's a good assessment, right?
Supervised machine learning
There are lots of classifications we could do here in what we call supervised machine learning. Another thing we could look at is the topic of the text.
How do machines learn anyway?
The text reads: “they pay me way more than I'm worth.” That’s straightforward and uncontroversial. You’d probably conclude this text is about salary, in the context of a comment on an employee engagement survey.
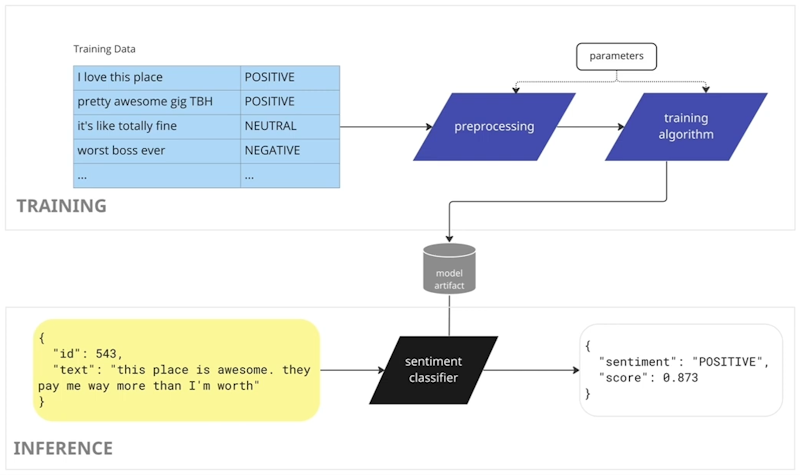
The model artifact is a collection of weights. How do we get them? Where do they come from? How does supervised machine learning work?
We have a collection of training data that's kind of the secret source of machine learning. We need to have some data to learn from. Here, we have textual data for training and sentiment classification. We got the text and we have perhaps some human-annotated label for the sentiment associated with that text. I've got five rows here, but in real examples, we'll have anywhere from hundreds to millions of rows.
We feed this data into a pre-processing algorithm. After we've done whatever pre-processing we need, we feed the modified data into a training algorithm that learns the weights and dumps them into some kind of model artifact.
We can use this model at inference time to do the process I described previously - i.e, take the unstructured input, combine it with the weights, and produce a label.
We’ll come back to this in a bit. For now, know that lots of different parameters are important to this pre-processing and training process. This is how we produce models.
Creating a DevOps pipeline for machine learning
If you’re reading this, you probably come from more of a DevOps background. If I asked, “can we automate the training?”, you'd probably say, “Yeah, sure - just run the training code.”
While that's largely true, there are additional complexities to this compared to a conventional CI/CD pipeline.
One key difference is that the training process relies a lot on data. That adds an extra dimension of things that can change and go wrong.
Our preprocessing code puts data into our training pipeline. We filter it in some way to create the training data. Our training code then pre-processes it and outputs a model.
Automating the model training is a part of MLOps - DevOps applied to machine learning. There are other facets of MLOps-like model monitoring, which I won’t cover in detail here. But automating things like model training is somewhat beyond where we are in the regular software world. Partly, that’s because of the complexity (and partly for some other reasons). Even in MLOps, there are a lot of training pipelines that get run in an ad hoc fashion on individual developer machines or cloud computing instances, rather than in a repeatable and automated way.
Why is model training not just a build? One key reason is the data, which is critical input to model building. It changes over time. We get new information coming in from users, or from manual annotation of that training data - like our sentiment labels that I showed before, for example.
Even if the data doesn't change, we might need our model to change. So we might have no extra training data - but, suddenly, say, COVID has happened. Our topic classifier would produce the same outputs if we haven't retrained it. But the things that people are talking about in employee engagement surveys pre- and post-COVID are going to be different. For example, concerns about remote work are probably much higher post-COVID.
Another minor difference is that the training process tends to take more time than a classic CI/CD pipeline. Training runs can take hours or more. It's not just a matter of finishing a half-hour test run and performing a Docker build.
There are also many additional dimensions of variation in the data. When we're training a model, it's not usually just a Boolean decision of “yes” or “no”; it’s not “the model works or it doesn't.” When we train a model, we generate an accuracy metric by running a model over an unseen data set where we have a notion of what the true labels should be. We see whether the model outputs match those true labels. In this way, we get a measure of the model’s accuracy.
Now, when we get a number for accuracy, it won't be 100% percent. Hopefully it’s not 0%! It'll be somewhere in between. But we don't really know when we are “done.” And often, “done” is just “good enough” from a product perspective.
But what we really don't know is: can we do better? We may try and do better by changing the parameters. The problem is, we have lots of parameters.
Model Training: not just running code
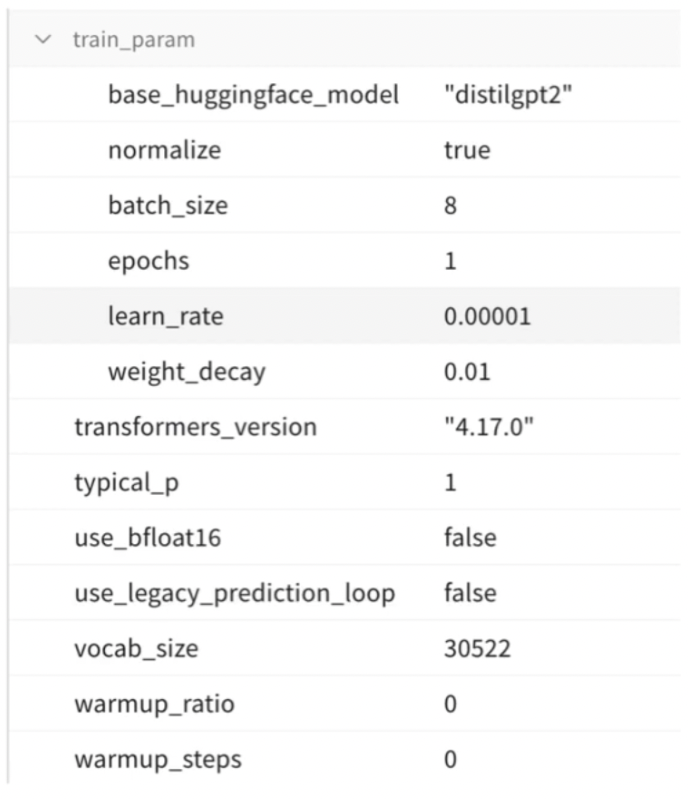
Our parameters here include the number of trainings, the batch size, and the learning rate. All of these are parameters to the learning algorithm. But we also have parameters to the pre-processing algorithm. All of these factors can have an impact, in a positive or negative way, on the final model. And we don't really know in advance, until we try it, which ones are going to work.
Additionally, these parameters can interact with each other when you change the model. This creates a combinatorial explosion of possible ways to train it.
This is one reason why we want to automate the training process as much as possible in a predictable manner. When we know that a particular set of parameters are likely to be better, we need to re-run our model easily with a different set of parameters - either for experimentation or for a production model training run. This will often happen at the of an experimentation process or within some kind of hyper-parameter search.
The key is that we want to know which parameters produced a given model training run and track that over time.
Culture Amp’s Buildkite-Powered Architecture
Let me take a step back and explain why Culture Amp is doing machine learning, in particular NLP.
First, Culture Amp operates in the engagement survey space, where we build a sentiment model that produces an aggregate double-chart view of which text comments are negative, neutral or or positive in nature. We also have a topic classifier that drives that, and so also operate in the collaboration and work life spaces.
But we have lots of other textual data as well. We have development plans for how you want to grow your career, as well as performance management - detailed performance reviews that managers leave for the direct reports. These are ripe areas where we may wish to apply natural language processing in the future. So we want to make sure we're good at automatically training our models.
This brings us to Culture Amp's tech stack.
DevOps Architecture
DevOps at Culture Amp
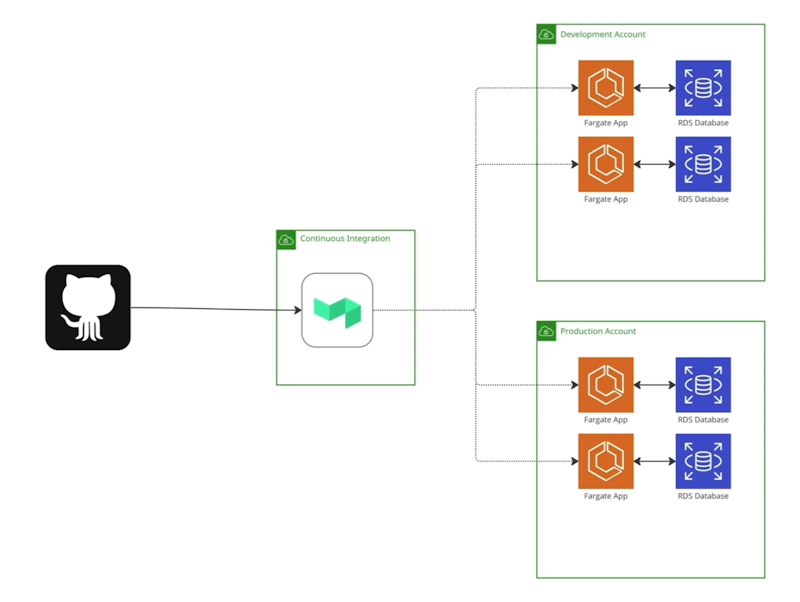
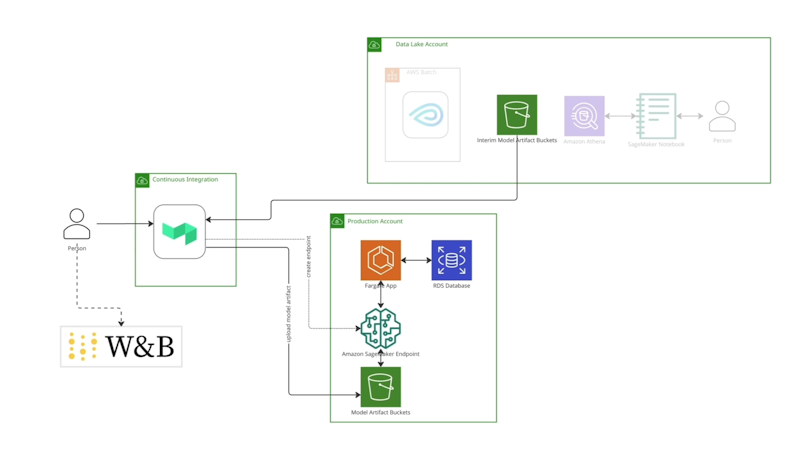
We use Buildkite heavily in our stack. We have hundreds of build pipelines, all with a reasonably standard setup. Buildkite detects changes coming in from GitHub in our continuous integration account. We run our Buildkite agents, which then run the appropriate CI/ CD code and, ultimately, deploy apps.
We have AWS Fargate applications for our user-facing services in production. We also have instances for development accounts for internal use that mirror the production accounts. These web applications all connect to a database of some kind.
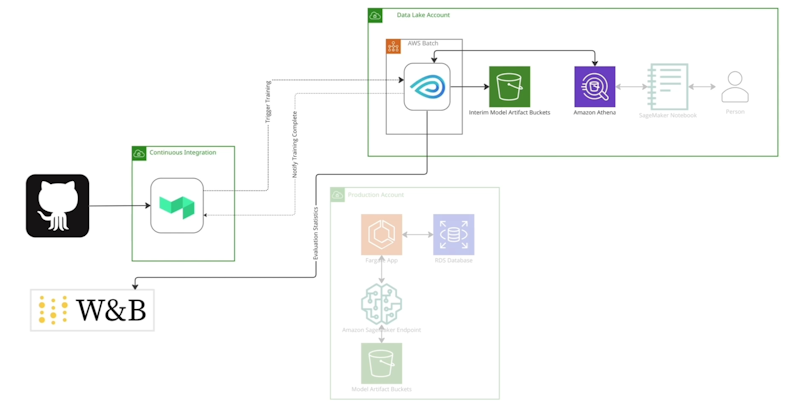
Next, we have a data lake in Culture Amp which aggregates and combines the data from the production databases. This assembles our data into a form that's usable for data science, various forms of experimentation, and of course, machine learning model building.
We use the open source tool dbt, which takes the data from these production databases, applies transformations to it, and outputs that transformed data into Amazon S3 buckets.
From there, we use Amazon Athena, which takes the data from the S3 buckets and overlays a query engine. This lets data scientists add automated training scripts, querying the data using SQL to put it into a format that's usable for whatever task we need.
A lot of this interaction is in AWS SageMaker cloud notebooks, where we can do ad hoc experimentation with a human directly interacting with Athena. Now, we want to move away from this approach when we have a model that we depend on in production.
So rather than having code in a Jupyter notebook, we have reproducible training pipelines using the existing CI/CD tooling that we're using in Culture Amp as the first pass. If that does the job, then we're gonna have less friction than building something else from scratch.
We’re trying to use Buildkite as much as possible in this work. What we want here is versioned training code. We know exactly which parameters and which code we'll use to produce a given model. We want to have tracking of the ID of the model.
Additionally, we want to have a training run execute when new code is committed. We also want “train on demand”, and the ability to include humans in the loop to inspect the accuracy of the model before we decide whether to deploy it after the training phase.
We use GitHub and Buildkite to kick off and manage this process. We also use AWS Batch, which is a tool for running arbitrary containers as one-off jobs in AWS.
Next, we use Metaflow, an orchestration tool commonly used for Python workflows. (This is a standard use case for Metaflow in the machine learning world.) Finally, we use Weights & Biases (WandB), which tracks machine learning training (basically, machine learning experiments).
Training Architecture
So onto our training architecture.
Culture Amp's Training Architecture
Here, we have Buildkite agents that trigger the training, not in a production account, but into the data lake account to start. The training runs inside AWS Batch; specifically, it runs on Metaflow. Metaflow orchestrates the training by querying Athena and then learning the weight space and the data that's pulled from Athena. It then pushes the output to that training process, the model artifacts, into an S3 bucket where it's available to use later at deployment time.
We also run some evaluation of the data of the kind I mentioned earlier, where we compare it against some human annotated data set, and then convert those statistics into Weights & Biases data.
DevOps workflow
Here's the step diagram for our training.
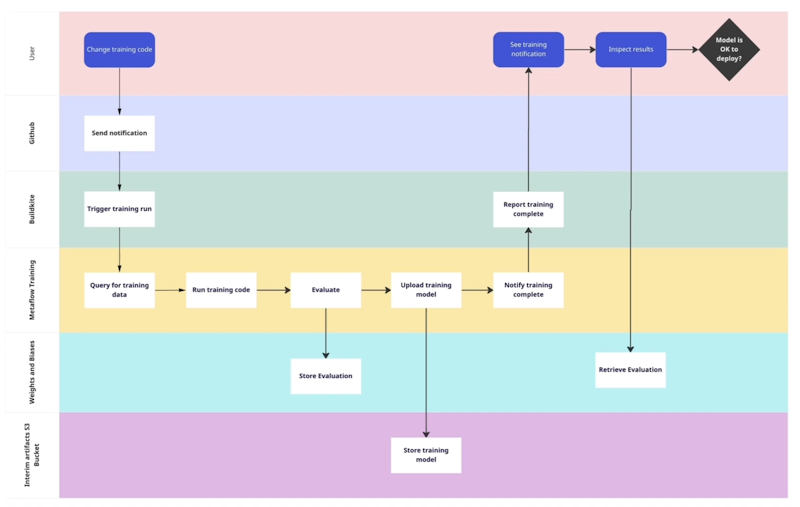
Training Architecture: step-by-step
A user makes a change to the training code. GitHub sends a notification to Buildkite, which triggers a training run inside Metaflow in the data lake. We query for the training data, and run the code and the evaluation. We store those results in Weights & Biases, upload the model to S3, and send a notification back to Buildkite.
The training is complete. So how do we communicate back to Buildkite? We use Buildkite’s API.. I’d never used the API before this project, but our helpful Buildkite support channel pointed me in its direction. The Buildkite API has some interesting capabilities to enable this.
Once we've pinged back to Buildkite, we can inspect the results in Weights & Biases and make a decision about whether to deploy it or not. Here’s how some of our interaction points with Buildkite work.
Interaction points with Buildkite
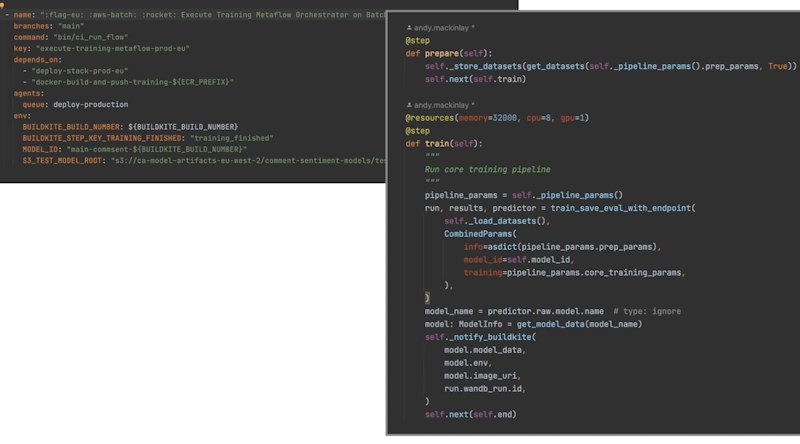
On the left, we trigger our training Metaflow job on Batch. The most interesting parts here are the environment variables—particularly, the model ID (MODEL_ID). We use Buildkite’s unique build number as a unique identifier for the model ID. We can then use that to work backwards and work out which training code version was used, and also which parameters we used for a given training run.
We're passing an S3 path for the interim model artifacts that we store. And we're passing the name of another Buildkite step, which is the one that we want to unblock when our training is finished.
On the right hand side is our Metaflow code. This is just Python code for the most part. In the prepare step, we fetch our data based on the parameters that are serialized inside the code base for the current run. We kick off our training step based on these parameters after we've fetched the data.
Then, we run our training. After the training is finished, we say to Buildkite, “training is done - you can do something with that information.” This is the notify_buildkite step at the bottom. That passes through various metadata that's useful both for manual inspection and for subsequent deployment.
Here’s the implementation of notify_buildkite:
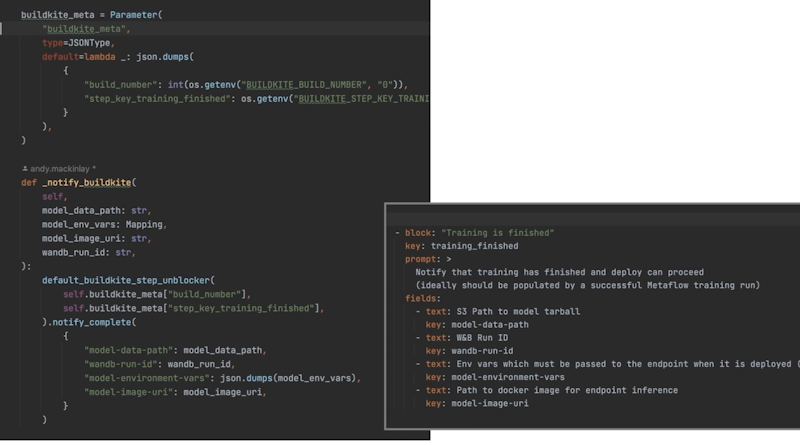
notify_buildkite implementation
We pull in the environment variables that I talked about previously: the name of the step, the key of the step that we want to unblock, and a build number we can use for querying. We create our Buildkite unblocker and then we notify it and pass through this metadata:
- The path where the model artifact is stored
- The Weights & Biases run ID, which we can use for inspecting the statistics we've created
- The environment variables - parameters we need for the model at deployment time; and
- A docker image that we need to use for deploying the model
You'll notice that these keys here match the keys in the Buildkite unblock step on the right-hand side, such as model/data/path and Weights & Biases run ID. And that’s the training step that we've unblocked in the training - training_finished, as you can see there. This implementation calls into the Buildkite API to unblock this step.
Deployment flow
So how does the deployment work?
Deployment architecture
Deployment is somewhat simpler. If we've chosen to actually do the deployment, we pull in the model artifacts from S3 into Buildkite, pushing them to where they’re needed in the production accounts.
Once that’s available in S3, we can create a SageMaker endpoint - essentially, an HTTP wrapper that knows how to run the model artifacts with a specific Docker image that's designed for that purpose. We can then serve this HTTP wrapper behind a Fargate web application hosted in production.
Here's the deployment flow:
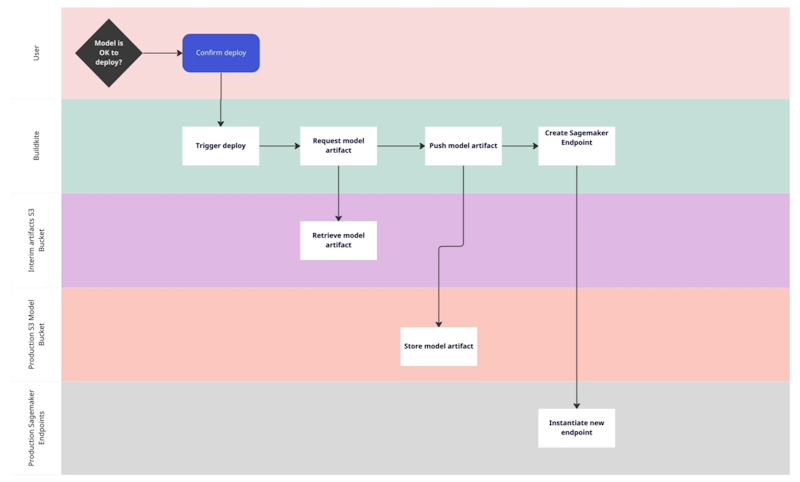
Deployment flow
We make a decision about deployment and trigger the deployment via Buildkite. Then, we request the model artifact from S3, push it to a different S3 so we can use it in production, and then create the SageMaker endpoint that references that S3 bucket. We also fetch the Docker image that we receive from the callback to the Buildkite step using the Buildkite API.
Here’s the directed acyclic graph (DAG) of the full training and deploy flow. (You can see this by appending /dag to your build URL in Buildkite.)

Directed acyclic graph (DAG) of the full training and deploy flow
There’s some bookkeeping involved here. We have to build two different kinds of Docker images, including one that has GPU drivers built-in. This makes our training nice and fast, as it enables additional GPU for our training. We also have a default image that's much smaller that we can use for other steps.
We deploy the stack using AWS CloudFormation. Then, we run our Metaflow orchestrator. Inside there, as we already saw, we make an API call to unlock our training_finished step. We then examine the results and decide whether to deploy.
Here's how this looks inside the regular Buildkite interface:
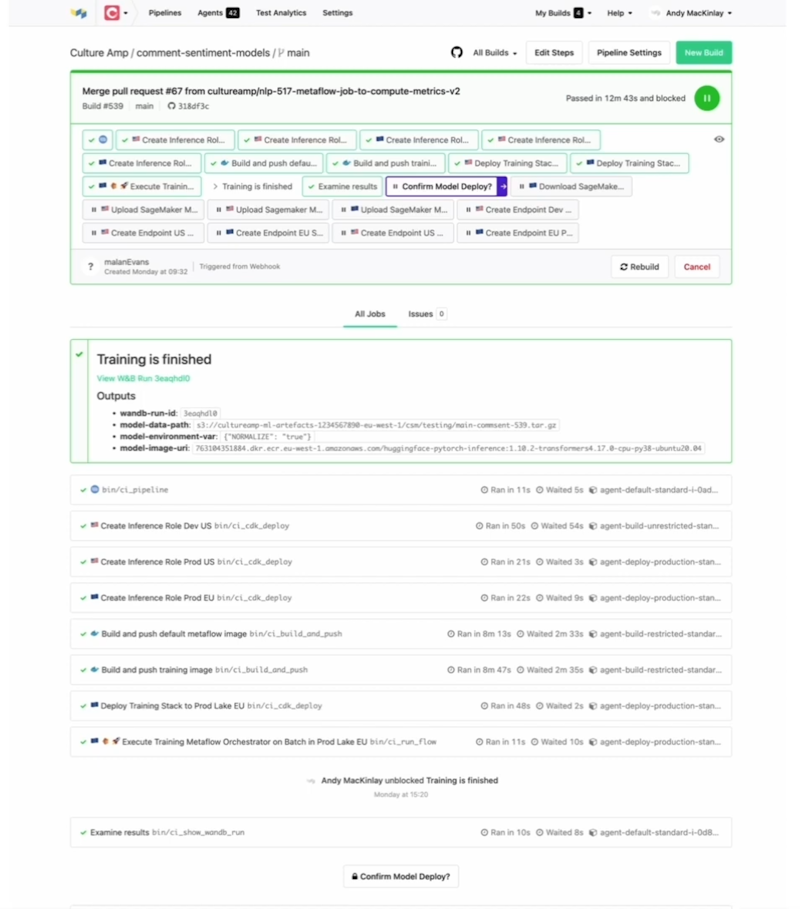
Buildkite interface
Training is finished. We've created an annotation to put the link to Weights & Biases front and center. It's very easy for a human to see. Some of this information isn’t really needed, but we output it for debugging. But we have a nice link to Weights & Biases where we can go and click through and inspect the accuracy statistics before we make a decision about deployment.
There's a lot to Weights & Biases. But when we click through one of these links, we can see the accuracy statistics over a particular data set. (These aren’t necessarily real numbers, by the way - we’ve added them for illustration purposes.)
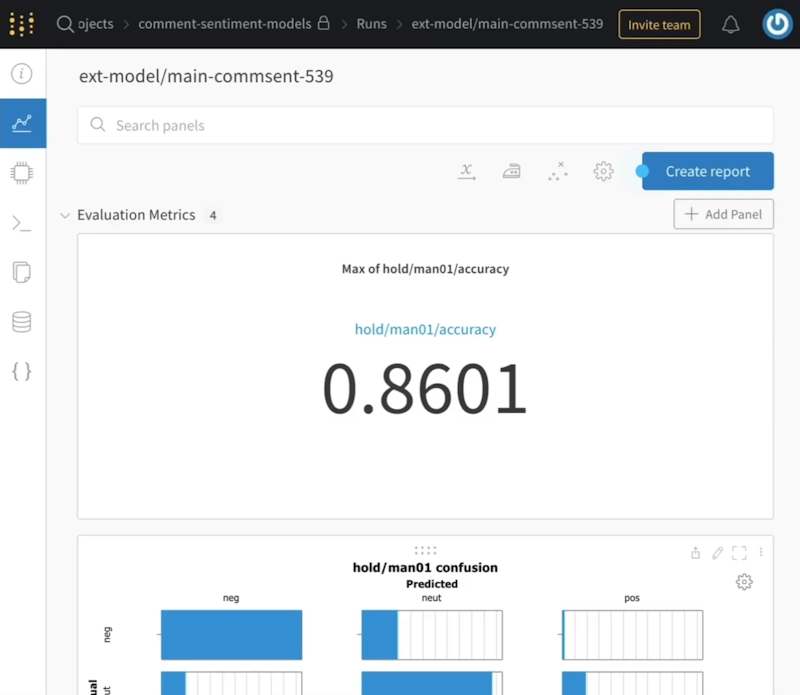
Weights & Biases
We can look at those numbers. We can compare them with other runs. And we can even compare them against experimental runs that weren’t run using the Buildkite pipeline as well. (We can run the same code inside the pipeline directly from inside a SageMaker notebook.) We can then compare this against our best experimental run with the same parameters and make sure that the accuracy is what we expect.
If we're happy with that, we can deploy the model, which goes through the steps I outlined previously. Once we upload them to the right place and create the SageMaker endpoint, then it's available in production. It's tagged with the model ID that Buildkite generated.
Again, this enables tracking over time of which model was run. Every prediction gets tagged with that model ID. We can always link a given prediction back to the Buildkite run that produced the model. That’s especially helpful when tracking down issues when things don't go as expected.
Conclusion
This is our first pass at creating a reproducible training pipeline at Culture Amp using Buildkite. So far, it's working reasonably well. We're using this to actively deploy our most recent sentiment model.
I doubt we got everything right the first time. In a year or two, we'll likely have made a number of optimizations and improvements. I hope to tell you more about that in the near future!