So you've heard Kubernetes (k8s) can help you improve your CI/CD setup, but you need somewhere to start? Well, then, this blog is for you. We'll discuss what you need to know about Kubernetes and Helm in the context of CI/CD. Then, show you how to set up your own autoscaling CI/CD agents with Kubernetes on any cloud using agent-stack-k8s in Buildkite Pipelines.
What is Kubernetes?
Kubernetes is an open source container orchestration engine. People use it to automate the deployment, scaling, and management of their containerized applications. While the project began at Google, it's now hosted by the Cloud Native Computing Foundation (CNCF). You'll also see Kubernetes called "k8s," an abbreviation that results from counting the eight letters between the "K" and the "s."
A container is a software component that bundles an application and its dependencies into a single image file. Containers are portable between different platforms, leading to faster application startup and easy scaling. With your application packaged in a container, you don't have to worry about which version of the dependencies you have installed on your machine. It just works™.
Using containers to bundle and run applications has become popular as an evolution of deploying virtual machines. Like virtual machines, containers have their own filesystem and share CPU, memory, and processing space. But unlike virtual machines, containers have relaxed isolation properties to share the Operating System (OS) among the applications, making them more lightweight but still isolated and self-contained.

A typical Kubernetes container architecture
Multiple containers run inside a pod, multiple pods run on nodes, and a set of nodes make up a cluster. That's a lot of terms, but don't worry. For now, just think about setting up a cluster with nodes to do the work.
Kubernetes helps you run a resilient distributed system and avoid downtime by ensuring containerized applications run where and when you want with the necessary resources. It takes care of scaling, failover, deployment patterns, and more. So when a container goes down, Kubernetes can start another without manual intervention. When the load increases, Kubernetes can distribute network traffic to keep your deployment stable.
Whether you're deploying microservices, monolithic applications, CI/CD agents, or anything in between, Kubernetes offers a unified platform to manage your containerized workloads efficiently. It brings scalability, resilience, and automation to your fingertips, transforming how you design, deploy, and scale applications.
What is Helm?
Helm is a package manager for Kubernetes. It automates the creation, packaging, configuration, and deployment of Kubernetes applications by combining your configuration files into a single reusable package. This helps you keep deployments consistent, repeatable, and reliable in complex Kubernetes applications.
Helm manages the complexity of Kubernetes configuration files using a packaging format called a Helm chart. A Helm chart is a package that contains all the necessary resources to deploy an application to a Kubernetes cluster. It's a set of YAML manifests and templates describing the resources a Kubernetes application needs, including deployments, services, secrets, and additional configuration (even down to details like how much CPU and memory your app requests). With Helm, you can simply download your preferred Helm chart, deploy it in the cluster, and update or delete it with low effort.
Additionally, each Helm chart can be versioned and managed independently, making it easy to maintain multiple versions of an application with different configurations.
While there are other ways to deploy your CI/CD agents to Kubernetes, Helm is our recommended approach.
How to use Kubernetes in CI/CD
Now that we've talked about Kubernetes and Helm, it's time to consider how they fit into CI/CD. Well, it can happen in a few ways:
- Your CI/CD pipeline can build and deploy applications to be run in containers managed by Kubernetes.
- Kubernetes can manage the rollback mechanism.
- Your CI/CD build agents can run in containers managed by Kubernetes.
And probably a bunch of other interesting ways in different teams. This blog will focus on the last way: running your build agents in a Kubernetes cluster. This is useful for CI/CD tools where you stay in control of the build environment rather than running on another company's servers.
In this blog, we'll use Buildkite Pipelines as the CI/CD tool, but the process will be similar to other tools. If you don't have one already, sign up for a Buildkite account to follow along.
To set up a CI/CD pipeline with Kubernetes, we'll follow these steps:
- Start a Kubernetes cluster.
- Store your secrets.
- Install the Helm chart.
- Run a CI/CD pipeline.
Before you begin, install kubectl. You'll use this command-line tool to run commands against your Kubernetes cluster.
1. Start a Kubernetes cluster
First up, you'll set up a Kubernetes cluster. You can do this in any cloud. Here are instructions for the main ones:
- kind: Run the cluster on your local machine.
- AKS: Run the cluster on Microsoft Azure.
- EKS: Run the cluster on AWS.
- GKE: Run the cluster on Google Cloud Platform.
If you're not sure where to start, we recommend using kind to run your cluster locally.
Already have a cluster running?
If you've already got a Kubernetes cluster, feel free to skip this section and move on to storing your secrets.
Start a Kubernetes cluster in kind
Setting up a Kubernetes cluster running on kind gives you a simple introduction to Kubernetes. The cluster runs right on your machine.
Before you begin, install kind.
Then, open your favorite command-line tool and create a new directory.
In the new directory, create a configuration file for the cluster called cluster-config.yml with the following content:
# Three node (two workers) cluster config
kind: Cluster
apiVersion: kind.x-k8s.io/v1alpha4
nodes:
  - role: control-plane
  - role: worker
  - role: worker
This file defines three nodes:
- One controller
- Two workers
Next, create a cluster called my-cluster by running:
kind create cluster --name my-cluster --config ./cluster-config.ymlSet your context to kind-my-cluster so subsequent kubectl commands target the cluster you just created by running:
kubectl config use-context kind-my-clusterTo confirm your cluster has started, run:
kubectl cluster-infoAnd, check that it has nodes by running:
kubectl get nodesThat’s it, you have a Kubernetes cluster running locally in kind.
If you need to debug or diagnose any cluster problems, run kubectl cluster-info dump.
Start a Kubernetes cluster in AKS
Azure Kubernetes Service (AKS) is where you run Kubernetes clusters on Microsoft Azure. If it’s your first time using AKS, I recommend following their tutorial to get a cluster running and install the az command line tool.
You need the OperationsManagement, OperationalInsights, and Microsoft.Insights permissions to spin up an AKS cluster. To check if you have these permissions, run the following on the command line:
az provider show -n Microsoft.OperationsManagement -o tableaz provider show -n Microsoft.OperationalInsights -o tableaz provider show -n Microsoft.Insights -o tableIf you see you’re NotRegistered for these permissions, run the following:
az provider register --namespace Microsoft.OperationsManagementaz provider register --namespace Microsoft.OperationalInsightsaz provider register --namespace Microsoft.InsightsThe commands may return that “registration is in progress,” but it shouldn’t take more than a few minutes.
The next step is to create the resource group in which to place your cluster by running:
az group create --name my-resource-group --location eastusAnd now it’s time for the big one—the command that creates your actual AKS cluster:
az aks create --resource-group my-resource-group --name my-aks-cluster --enable-managed-identity --node-count 2 --enable-addons monitoring --generate-ssh-keysWhy did I choose two nodes? Well, I was previously bitten by a situation when I think I hit a weird resource limit where a single node cluster just would not schedule my buildkite-agent pods. So now I'm in the habit of trying more nodes than I need to start with.
The time to create the cluster will vary depending on region, time of day, cluster resource, and so on, but for me, it only took about six minutes. Not too shabby.
Finally, you can set the current Kubernetes context so the subsequent kubectl commands know you’re talking to the cluster you just created by running:
az aks get-credentials --admin --name my-cluster --resource-group my-resource-groupStart a Kubernetes cluster in EKS
AWS Elastic Kubernetes Service (EKS) is where you run Kubernetes clusters on AWS. You might notice there are fewer commands to run here compared to AKS and GKE. Part of that is my familiarity with AWS, and part of it is their permission model (including a shortcut they take, detailed below). These instructions presuppose you have AWS credentials in place for your IAM user, and the awscli and eksctl commands installed.
AWS docs will tell you to run eksctl create cluster --name my-cluster --region us-east-2 --fargate, but that will give you a cluster where you can't schedule pods on your nodes. So don't do that. Their docs also talk at length about required IAM permissions and service-linked roles, all of which are important but not right now. I attached the built-in AdministratorAccess permission policy to my IAM user (in a sandbox AWS account, of course). Another shortcut I learned—the IAM principle that creates an EKS cluster will have system:masters permissions but won't appear in any visible configuration (🙃). Just make sure to keep track of it!
Create a cluster by running:
eksctl create cluster --name my-eks-cluster --region us-east-2 --nodegroup-name my-nodes --nodes-min 3 --nodes-max 6 --max-pods-per-node 5 -N 4Note that this eksctl command includes setting your current Kubernetes context so the subsequent kubectl commands know you’re talking to the cluster you just created.
Again, your times will vary but it took about 20 minutes to see the nodes running in my cluster. You can check by running:
kubectl get nodesStart a Kubernetes cluster in GKE
Google Kubernetes Engine (GKE) is where to run your Kubernetes cluster on Google Cloud Platform (GCP).
Some advice: Don't use autopilot—I tried it, couldn't schedule pods, then hit quota limits. It was no good. I'll just save you a bunch of time and give you an actual working cluster if you follow the commands I suggest. For those of us keeping an eye on the clock, cluster spin-up took about 9 minutes on GKE.
First, set your gcloud project:
gcloud config set project main-blog-396813Then, log in:
gcloud auth loginNext, install the components you need to authenticate to Kubernetes within GKE:
gcloud components install gke-gcloud-auth-pluginAnd source the path inclusions for your shell:
source "$(brew --prefix)/share/google-cloud-sdk/path.bash.inc"I had some trouble in GCP when my per-region quota IN_USE_ADDRESSES was exceeded. From the console, after switching to a paid account, you can request that to be increased to 32 (instead of the default 8). Then, you’ll be able to spin up a 4 node cluster with sufficient memory allowing you to schedule pods for your CI agent fleet.
Create the cluster by running:
gcloud container clusters create my-gke-cluster --location=us-central1 --machine-type=e2-micro --disk-size=32 --cluster-ipv4-cidr=10.0.0.0/21 --num-nodes=4 --max-memory=64 --max-cpu=8 --enable-autoprovisioning --min-memory=32 --default-max-pods-per-node=16 --enable-ip-aliasSet your Kubernetes context so subsequent kubectl commands know you’re talking to the cluster you just created:
kubectl config use-context gke_main-blog-396813_us-central1_my-cluster2. Store your secrets
There are a couple of common ways to specify secrets in clusters:
- Arguments in the Helm command.
- Fields in the configuration YAML.
To make this example closer to how you'd normally handle it in a real setup, we'll do the latter. A file containing secrets is more practical for production and automation usage.
First, create a namespace called buildkite where we can apply the secrets by running:
kubectl create namespace buildkiteThen, create a file called my-secrets.yml containing secrets to authenticate the build environment (agent stack) with Buildkite:
apiVersion: v1
kind: Secret
metadata:
  name: bk-agent
  namespace: buildkite
type: Opaque
data:
  BUILDKITE_AGENT_TOKEN: <base64_encoded_agent_token>
  BUILDKITE_TOKEN: <base64_encoded_graphql_token>
Replace the tokens with your Base64-encoded agent token and API access token with GraphQL scope.
Apply the secrets file in your cluster by running:
kubectl apply -f my-secrets.ymlNext, create a file called git-secrets.yml containing secrets to authenticate the build environment (agent stack) with code repositories:
apiVersion: v1
kind: Secret
immutable: false
metadata:
  name: my-private-git-ssh-key
  namespace: buildkite
type: Opaque
data:
  SSH_PRIVATE_RSA_KEY: <base64_encoded_private_ssh_key>
  SSH_PUBLIC_RSA_KEY: <base64_encoded_public_ssh_key>
Replace the SSH values with your Base64-encoded public and private SSH keys.
Apply the secrets file by running:
kubectl apply -f git-secrets.ymlThat’s it. Your Kubernetes cluster can now access the secrets it needs to run the pipeline.
Strictly speaking, it wasn't necessary to store your Git credentials to access the public repository used in this blog. But, outside this example, you'll likely want to run pipelines that access private repositories.
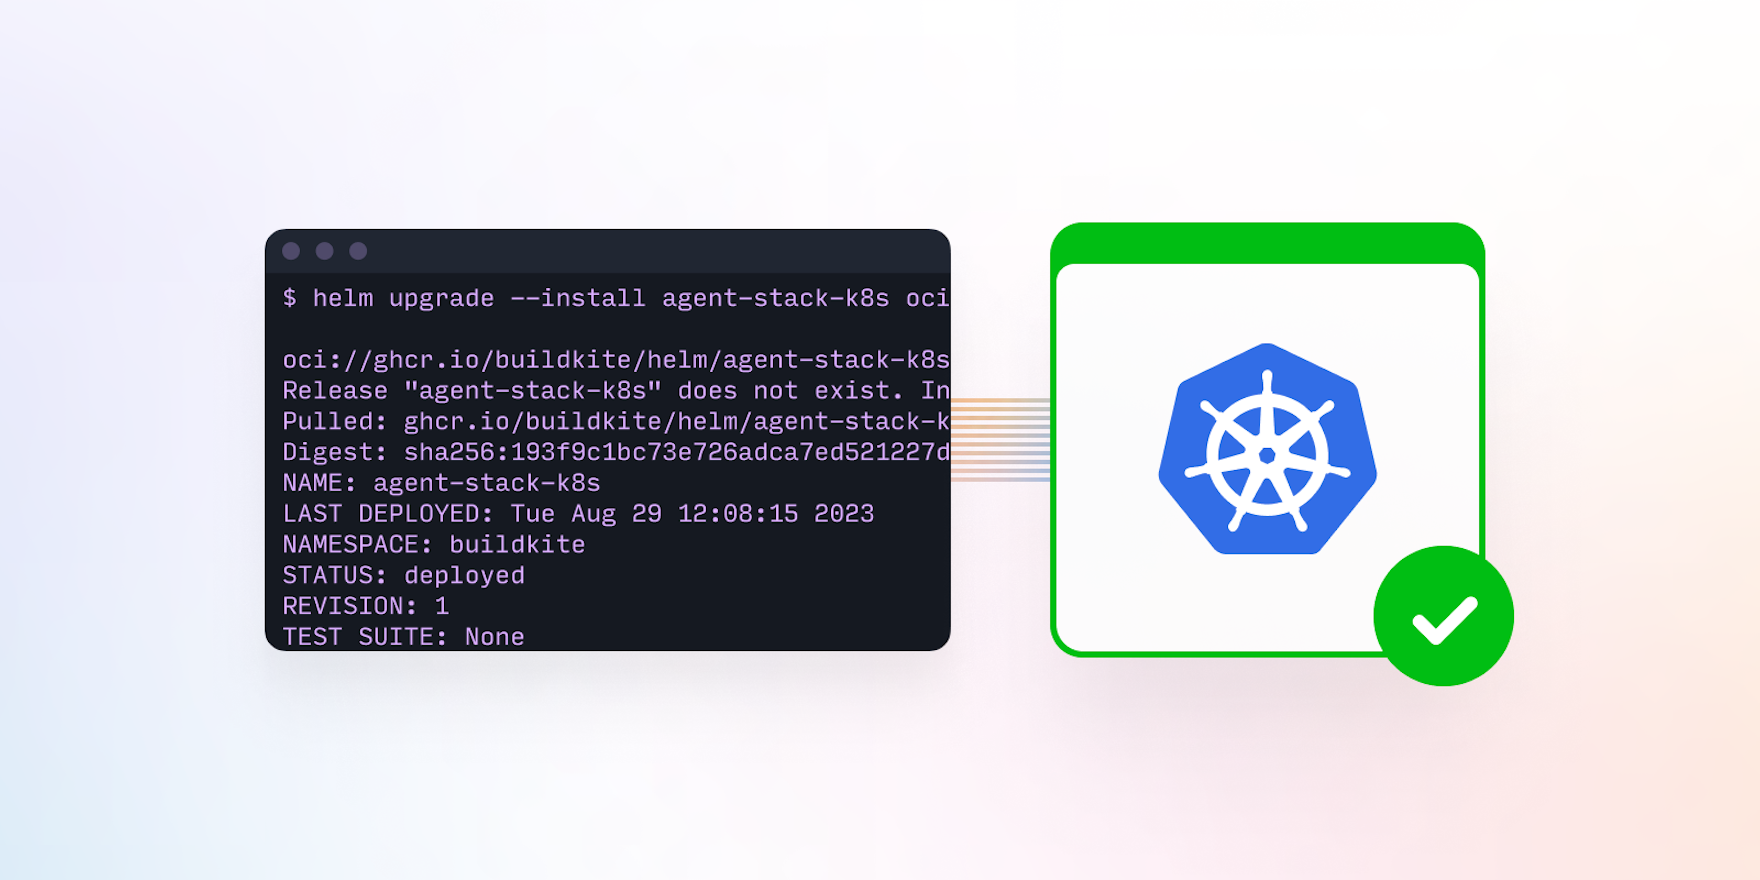
3. Install the Helm chart
Buildkite's agent-stack-k8s gives you a ready-made Helm chart that you can simply deploy to any Kubernetes cluster on any cloud. You can then run a fully autoscaling fleet of CI/CD agents on your Kubernetes cluster and, therefore, on your cloud of choice.
When installing the chart, replace <YOUR_ORG_SLUG> with your Buildkite organization slug. Keep the queue name as kubernetes so the example pipeline will work automatically.
After installing Helm, install the Helm chart by running:
helm upgrade --install agent-stack-k8s oci://ghcr.io/buildkite/helm/agent-stack-k8s --namespace buildkite --set config.org=<YOUR_ORG_SLUG> --set config.tags='{queue=kubernetes}' --set agentStackSecret=bk-agent --version 0.7.0I’d like to draw special attention to the --version and --set config.tags arguments passed into the command.
First, the --version 0.7.0 argument. You can leave off the version and it should get you latest, but pinning your stack to a version is a best practice. If you’re using the agent-stack-k8s in production, I expect you'll want to use infrastructure-as-code (IaC) for these commands so you can source control the --version number that you use and then carefully test moving to newer versions as you go. You can get the list of versions for the agent-stack-k8s on its releases page.
Second, the --set config.tags='{queue=kubernetes}' argument. The queue for agent-stack-k8s defaults to kubernetes but is easily overridden with a custom queue name. When running the stack at scale, it’s very likely you’ll find uses for multiple stacks that are isolated from each other. Maybe you’ll have one stack with --set config.tags='{queue=terraform}' to run your IaC, and a --set config.tags='{queue=buildymcbuildface}' to build the rest of your projects. Or perhaps you’d want a --set config.tags='{queue=terraform-prod}' and --set config.tags='{queue=terraform-dev}' to segment out different IaC for different classes of cloud accounts, each with the appropriate credential and network access to their corresponding resources.
4. Run a CI/CD pipeline
You’ve got your cluster up and running, secrets in place, and Helm chart with agent-stack-k8s ready to go. But how can we tell it’s all working? Why, by running a pipeline in Buildkite!
To run the example pipeline:
- Open the k8s-blog-example repository.
- Select Add to Buildkite.
- Select Create Pipeline.
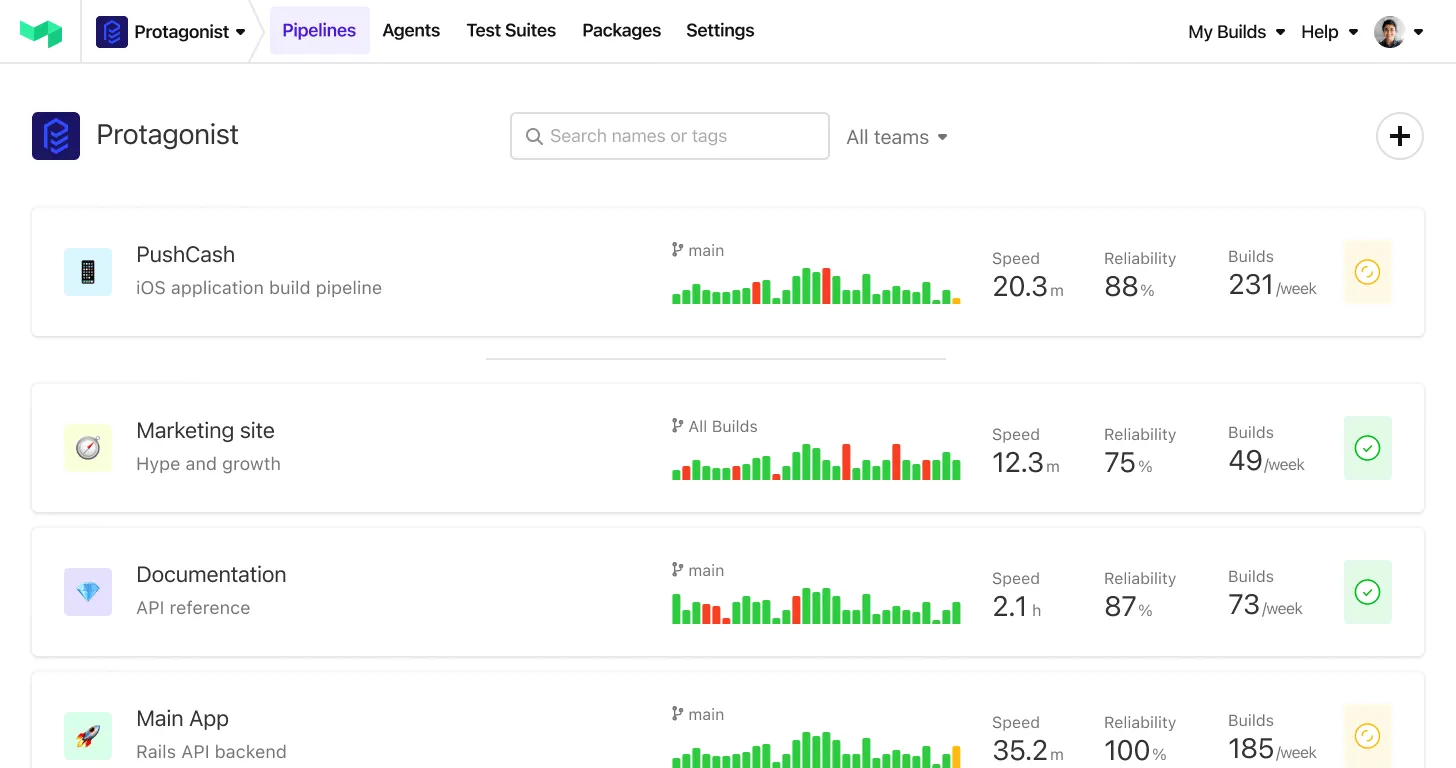
- Run the pipeline by selecting New Build. In the modal that opens, create a build using the pre-filled details and an optional message.
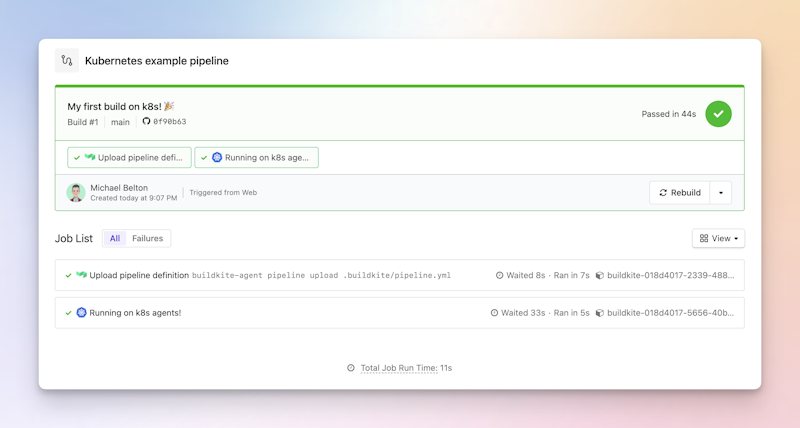
A successful run of the example pipeline in Buildkite
Uploading pipeline definitions
You’ll notice that Buildkite doesn’t store the pipeline definition for this example pipeline. Instead, it uploads the definition from .buildkite/pipeline.yml in the repository. This may seem simple, but the implications are exciting.
In Buildkite, you can dynamically generate and upload pipeline steps at runtime. You can even run code to introspect the change and tailor the pipeline to only run what's needed. To learn more, see The power of Dynamic Pipelines.
Clean up
Before you finish, don’t forget to clean up. You don’t want to get an unexpected bill from your cloud provider for leaving your cluster up and running.
For kind, run:
kind delete cluster --name my-clusterFor AKS, run:
az group delete --name my-resource-group --yes --no-waitaz aks delete --name my-aks-cluster --resource-group my-resource-groupFor EKS, run:
eksctl delete cluster --region=us-east-2 --name=my-eks-clusterFor GKE, run:
gcloud container clusters delete my-gke-cluster --location us-central1Conclusion
That's it, you did it! You can use these instructions to set up your own autoscaling CI/CD agents on Kubernetes on your chosen cloud. Go forth and set up your own dream CI/CD system using Kubernetes and Buildkite.
Buildkite Pipelines is a CI/CD tool designed for developer happiness. Easily follow and decipher logs, get observability into key build metrics, and tune for enterprise-grade speed, scale, and security. Every new signup gets a free 30-day trial to test out the key features. See Buildkite Pipelines to learn more.