So you've heard of this CI/CD tool called Buildkite. You might even know that it has a fantastic story on AWS where you BYOC (bring your own compute) by running your own EC2 instances in an Auto Scaling Group. It's dead simple. You can literally click a button, and blammo, you've got a CFN stack of autoscaling agents and AWAY. YOU. GO.
But honestly, Buildkite has a bit of a problem when it comes to other clouds. Not necessarily cumulus or stratus—not exactly sure why your mind went there first—but I mean other clouds like GCP and Azure. If you're already using another cloud provider, it's a bit like you're in a flying canoe up a cloud creek without a cloud paddle (but on the bright side, YOU'RE STILL IN A FLYING CANOE!). You're essentially on your own to bring that compute for CI/CD agents to the table. You might even think you have to write your own auto scaler (and you might be right, there, but it ain't so bad—ask me how I know sometime).
Yet, dear reader, I bring you hope of a third way. And just in case I wasn't crystal clear, the first and second ways are:
- Using the elastic-ci-stack-for-aws.
- Writing your own autoscaling logic based on buildkite-agent-metrics.
The third way is the agent-stack-k8s, a way to BYOC in a nice little container package that I like to call Kubernetes (k8s). Surely you've heard tell in the days of yore of that tool Kubernetes, the developer-friendly container orchestration platform? Somehow the juxtaposition of "developer-friendly" next to Kubernetes feels like stabbing a glowing hot spoon in my eye, but that's a whole ‘nother blog post for another day.
In this post, I'll show you that third way—how to stand up your own autoscaling CI/CD agents on k8s, on any cloud. This post is geared toward kube newbs (myself included there) and experts alike. Whether you’ve stood up dozens of clusters or you’ll be spinning up the dear-reader-inaugural-k8s-cluster-number-0, I’ve got you covered.
How to use a Kubernetes cluster for your CI/CD agents
Once you have one or more working k8s clusters, what can we do to bring the beautiful flowing pipelines of CI/CD together in harmony with the vast container ships of k8s? I'm glad I asked because I have some ideas to share with you!
Buildkite's agent-stack-k8s gives you a ready-made Helm chart that you can simply deploy to any k8s cluster on any cloud (or even your friendly neighborhood local datacenter's k8s cluster). And by the power of grayskull agent-stack-k8s, you can run a fully autoscaling fleet of CI/CD agents on your k8s cluster and, therefore, on your cloud of choice. That cloud being Azure or GCP, not cumulus or stratus, why does my mind keep going there? You, too?
Does this sound too good to be true? I also thought so at first (and honestly, still a bit at second), but I'll tell you how:
- Get a k8s cluster. You could even get more than one—I've got clusters in kind, AKS, EKS, and GKE.
- Register some secrets.
- Install the Helm chart that describes the
agent-stack-k8s. - Create a bunch of Buildkite pipelines. They can be static YAML or dynamic pipelines—you get to choose.
- Run the pipelines to your heart's (or wallet's) content.
- ...
- Profit!
And worry not—I’ll explain all of that in the rest of this post.
Set up a Kubernetes cluster
So, I lied. The first step sounds so simple and self-contained, but it is actually much like the plot of Hamlet (spoiler alert on a 400-year-old work of art!) in that it contains a play WITHIN A PLAY. Steps within steps… should be par for the course for any of you computer professionals out there.
I'll take you through the steps needed to get yourself a k8s cluster in four different clouds. If you already have a k8s cluster, and you don’t appreciate my style of humor, feel free to skip this part and jump right to the part where you add some secrets to use in the pipeline.
Can I be real a second, for just a millisecond? Take off my author hat and tell you how I feel? There are loads of other blogs and docs out there that tell you how to spin up a working k8s cluster and install a web service or some tiny thing. But I want you to have a working cluster for a fleet (well, a svelte fleet, at least) of autoscaling CI agents. And the other articles I’ve seen don’t give us a working cluster for those purposes.
Start a k8s cluster in kind
These commands work to get a cluster up and running on kind (local k8s). This is a super simple way to start if you’re new to k8s, clouds, etc.
First, create a k8s cluster and name it demisec. That’s the name that came to me for our dual purpose of demoing the cluster and handling secrets. And rest assured that this cluster will neither be too sweet nor too dry. It’s simply demisec. 🍾
On the command line, navigate to a new project directory, then create the cluster by running:
kind create cluster --name demisec-cluster --config ./two-workers.ymlOutput:
Creating cluster "demisec-cluster" ...
 ✓ Ensuring node image (kindest/node:v1.27.3) 🖼
 ✓ Preparing nodes 📦 📦 📦
 ✓ Writing configuration 📜
 ✓ Starting control-plane 🕹️
 ✓ Installing CNI 🔌
 ✓ Installing StorageClass 💾
 ✓ Joining worker nodes 🚜
Set kubectl context to "kind-demisec-cluster"
You can now use your cluster with:

kubectl cluster-info --context kind-demisec-cluster

Not sure what to do next? 😅  Check out https://kind.sigs.k8s.io/docs/user/quick-start/
What about that file, two-workers.yml? Why two workers, you may ask? Wouldn’t one have worked for this not-too-bitter, not-too-sweet, demo avec secrets? Yes, mayhaps, but one is the loneliest number. This is what I put in that file:
# three node (two workers) cluster config
kind: Cluster
apiVersion: kind.x-k8s.io/v1alpha4
nodes:
  - role: control-plane
  - role: worker
  - role: worker
Next, set your context to kind-demisec-cluster so subsequent kubectl commands target the cluster you just created:
kubectl config use-context kind-demisec-clusterTo confirm your cluster is up and running, you can query it for info:
kubectl cluster-infoOutput:
Kubernetes control plane is running at https://127.0.0.1:59790
CoreDNS is running at https://127.0.0.1:59790/api/v1/namespaces/kube-system/services/kube-dns:dns/proxy

To further debug and diagnose cluster problems, use 'kubectl cluster-info dump'.
And, check that it has nodes:
kubectl get nodesOutput:
NAME                            STATUS   ROLES           AGE     VERSION
demisec-cluster-control-plane   Ready    control-plane   3h14m   v1.27.3
demisec-cluster-worker          Ready    <none>          3h14m   v1.27.3
demisec-cluster-worker2         Ready    <none>          3h14m   v1.27.3
That’s it, you have a Kubernetes cluster running locally in kind. Congratulations! Uncork some champagne! Or better yet, saber the top right off with the blade of your choice!
Start a k8s cluster in AKS
These commands work to get a cluster up and running in Azure Kubernetes Service (AKS). I’m brandy new to Microsoft Azure, so I followed their basic tutorial to get my AKS cluster up and running. I’m a man of many words, if you haven’t noticed already, so the CLI suits me. I’ll use the az command I installed from the Microsoft tutorial.
You need the OperationsManagement and OperationalInsights permissions to spin up an AKS cluster. To check if you have these permissions, run the following on the command line:
az provider show -n Microsoft.OperationsManagement -o tableaz provider show -n Microsoft.OperationalInsights -o tableCan confirm, when I first did it, my account/user was NotRegistered for these permissions. To register the permissions, you run the following:
az provider register --namespace Microsoft.OperationsManagementaz provider register --namespace Microsoft.OperationalInsightsThe commands returned that “registration is in progress,” but in practice, it didn’t take more than a minute or two for the registration to complete, and I could proceed forthwith.
The next step is to create the resource group in which to place your cluster. Much like the bag of holding, a resource group holds related resources.
az group create --name bubbly-group --location eastusOutput:
{
  "id": "/subscriptions/76e2d6c2-6f12-4128-b666-e2bceb29be77/resourceGroups/bubbly-group",
  "location": "eastus",
  "managedBy": null,
  "name": "bubbly-group",
  "properties": {
    "provisioningState": "Succeeded"
  },
  "tags": null,
  "type": "Microsoft.Resources/resourceGroups"
}
And now it’s time for the big one—the command that creates your actual AKS cluster:
az aks create --resource-group bubbly-group --name demisec-cluster --enable-managed-identity --node-count 2 --enable-addons monitoring --generate-ssh-keysSo, why did I choose two nodes? Well, early on in my (admittedly limited) experience trying to spin up k8s clusters, I hit what I thought was a weird resource limit where a single node cluster just would not schedule my buildkite-agent pods. At the time, I frantically tried various combinations of node numbers and workers and cluster sizes, and most of it didn’t work. Thus, I am in the habit of trying more nodes than I need to start with. It helped that I was in the free-$200-credit phase of my brandy new Azure account, so I could make it rain k8s nodes with those free coupla hundies.
Output (failure, on the first attempt):
Conflict(
  {
    "error": {
      "code": "MissingSubscriptionRegistration",
      "message": "The subscription is not registered to use namespace 'microsoft.insights'. See https://aka.ms/rps-not-found for how to register subscriptions.",
      "details": [
        {
          "code": "MissingSubscriptionRegistration",
          "target": "microsoft.insights",
          "message": "The subscription is not registered to use namespace 'microsoft.insights'. See https://aka.ms/rps-not-found for how to register subscriptions."
        }
      ]
    }
  }
)
I looked up this error for a bit and got mostly nowhere. The link Microsoft provides to https://aka.ms/rps-not-found took me to a lovely page with a whole bunch of other errors that didn’t match mine. I got this inkling that maybe the person who wrote a blog post about AKS requiring Microsoft.OperationalInsights might not have been on the same page as the person who created an error message about microsoft.insights. And as it turns out, there actually is another required provider named Microsoft.Insights. Don’t worry about the case mismatch. It’s a long-standing inconsistency that Microsoft continues propagating. So I registered and showed another provider.
az provider register --namespace Microsoft.Insightsaz provider show -n Microsoft.Insights -o tableNow… finally, my AKS create is working. It only took six minutes, which is not too shabby by my watch. YMMV depending on region, time of day, cluster resources, etc. And honestly, if you’re trying to get a cluster spun up and you don’t have time to multi-task and do something else… well, give me a call because I have some work you can help me with. I’m always looking for people who are real go-getters and want to optimize processes.
az aks create --resource-group bubbly-group --name demisec-cluster --enable-managed-identity --node-count 2 --enable-addons monitoring --generate-ssh-keysOutput:
Resource provider 'Microsoft.ContainerService' used by this operation is not registered. We are registering for you.
Registration succeeded.
\ Running ..
Something I realized here was that if Microsoft can register resource providers for me depending on the command I’m running… why couldn't they just register all three resource providers that are depended on by the command I’m running? They need a TPM. Herding cats. All I’m saying.
Next up, I got my credentials. I don’t know for certain that I needed –admin, but I was in a hurry. I had already waited an entire six minutes for the cluster to come up. What am I, made of minutes?
az aks get-credentials --admin --name demisec-cluster --resource-group bubbly-groupOutput:
Merged "demisec-cluster-admin" as current context in /Users/peter/.kube/configThe above az command sets your current k8s context so the subsequent kubectl commands know you’re talking to the cluster you just created.
Start a k8s cluster in EKS
These commands work to get a cluster up and running in AWS Elastic Kubernetes Service (EKS). You might notice there are fewer commands to run here compared to AKS and GKE. Part of that is my familiarity with AWS, and part of it is their permission model (including a shortcut they take, detailed below). These instructions presuppose you have AWS credentials in place for your IAM user, and the awscli and eksctl commands installed.
AWS docs will tell you to run eksctl create cluster --name demisec-cluster --region us-east-2 --fargate but that will give you a cluster where you can’t schedule pods on your nodes. So don’t do that. Their docs also talk at length about required IAM permissions and service linked roles, all of which are important and security job number zero, but ain’t nobody got time for that. I attached the built-in AdministratorAccess permission policy to my IAM user (in a sandbox AWS account, of course). Another shortcut I learned—the IAM principal that creates an EKS cluster will have system:masters permissions BUT WILL NOT APPEAR IN ANY VISIBLE CONFIGURATION, NO-WHERE, NO-HOW. Just make sure to keep track of it! Like, in a paper notebook you keep on your desk (yes, I checked, it’s actually 2023 and this is real cloud computing advice, vive le papier eternel!)
eksctl create cluster --name demisec-cluster --region us-east-2 --nodegroup-name bubbly-nodes --nodes-min 3 --nodes-max 6 --max-pods-per-node 5 -N 4Output:
09:45:54 [ℹ]  eksctl version 0.147.0
09:45:54 [ℹ]  using region us-east-2
09:45:54 [ℹ]  setting availability zones to [us-east-2b us-east-2a us-east-2c]
…
10:09:06 [ℹ]  node "ip-192-168-67-142.us-east-2.compute.internal" is ready
10:09:06 [ℹ]  node "ip-192-168-69-135.us-east-2.compute.internal" is ready
10:09:06 [ℹ]  kubectl command should work with "~/.kube/config", try 'kubectl get nodes'
10:09:06 [✔]  EKS cluster "demisec-cluster" in "us-east-2" region is ready
The above eksctl create cluster command helpfully includes setting your current k8s context so the subsequent kubectl commands know you’re talking to the cluster you just created.
Can confirm, just about 20 minutes later for me, I do have nodes:
kubectl get nodesOutput:
NAME                                           STATUS   ROLES    AGE     VERSION
ip-192-168-26-160.us-east-2.compute.internal   Ready    <none>   3m45s   v1.25.9-eks-0a21954
ip-192-168-34-234.us-east-2.compute.internal   Ready    <none>   3m44s   v1.25.9-eks-0a21954
ip-192-168-35-1.us-east-2.compute.internal     Ready    <none>   3m44s   v1.25.9-eks-0a21954
ip-192-168-65-243.us-east-2.compute.internal   Ready    <none>   3m44s   v1.25.9-eks-0a21954
Start a k8s cluster in GKE
Now let’s do the same thing, but this time in Google Kubernetes Engine (GKE). Some advice: don’t use autopilot—I tried it, couldn’t schedule pods, then hit quota limits, no good. I’ll just save you a bunch of time and give you an actual working cluster if you follow the below commands. For those of us keeping an eye on the clock, cluster spin up took ~9 min on GKE.
First, set your gcloud project:
gcloud config set project main-bubbly-396813Then log in:
gcloud auth loginNext, install the components you need to authenticate to k8s within GKE:
gcloud components install gke-gcloud-auth-pluginAnd source the path inclusions for your shell:
source "$(brew --prefix)/share/google-cloud-sdk/path.bash.inc"I had some trouble in GCP with my per-region Quota 'IN_USE_ADDRESSES' exceeded. From the console, after switching to a paid account, you can request that to be up’d to 32 (instead of the default 8). Then, you’ll be able to spin up a 4 node cluster with sufficient memory allowing you to schedule pods for your CI agent fleet.
gcloud container clusters create demisec-cluster --location=us-central1 --machine-type=e2-micro --disk-size=32 --cluster-ipv4-cidr=10.0.0.0/21 --num-nodes=4 --max-memory=64 --max-cpu=8 --enable-autoprovisioning --min-memory=32 --default-max-pods-per-node=16 --enable-ip-aliasSet your k8s context so subsequent kubectl commands know you’re talking to the cluster you just created:
kubectl config use-context gke_main-bubbly-396813_us-central1_demisec-clusterAdd some secrets
I wanted to make this part of the tutorial closer to how you’d handle secrets when automating cluster setup, so I decided to use secrets in k8s config YAML files rather than specify them as arguments to the helm upgrade –install.
We create the namespace first so we have a place to apply our secrets. Our example commands in documentation for helm upgrade –install… use a flag called –create-namespace but it seems like a chicken&egg problem if you want to use your own sequence. Maybe k8s would handle this with ease, packing the chicken in separate plastic bags and making sure your eggs are on top of your pile of groceries… but personally, I like to keep my chickens&eggs in sorted order, if for nothing else than for my own sanity.
Our readme says that you can pass the arguments on the command line to the helm upgrade install, but for production and automation usage, a file containing secrets is more practical.
kubectl create namespace buildkiteOutput:
namespace/buildkite createdIf you had deep dark secrets, wouldn’t you store them in a truthful mirror? I know I would, if I did. That’s why I named this named secret truthful-mirror. Perfect for storing deep dark secrets. And I was listening to Elvis Costello at the time, pure coincidence, I’m sure.
apiVersion: v1
kind: Secret
metadata:
  name: truthful-mirror
  namespace: buildkite
type: Opaque
data:
  BUILDKITE_AGENT_TOKEN: <base64_encoded_agent_token>
  BUILDKITE_TOKEN: <base64_encoded_graphql_token>
We apply the config file containing two secrets needed for the agent stack:
- Buildkite agent token
- Buildkite GraphQL token
kubectl apply -f mr-costello.ymlOutput:
secret/truthful-mirror createdNext, we apply the config file containing the ssh private key needed for our agent stack to clone our very own private GitHub repos. If you are using a public repo or cloning via https instead of ssh, you don’t need this step:
kubectl apply -f git-secrets.ymlOutput:
secret/yer-private-git-ssh-key createdThe git-secrets.yml file:
apiVersion: v1
data:
  SSH_PRIVATE_RSA_KEY: <base64_encoded_private_ssh_key>
  SSH_PUBLIC_RSA_KEY: <base64_encoded_public_ssh_key>
immutable: false
kind: Secret
metadata:
  name: yer-private-git-ssh-key
  namespace: buildkite
type: Opaque
Install the Helm chart
A Helm chart is like a manifest for apps that run in k8s. There are other ways to get your app deployed to k8s, but this is our recommended option, and it comes pre-packaged in patented frustration-free packaging, so no cuts, scrapes, or scissors are required. The chart specifies everything you need for the agent stack containers to run like a well-oiled machine. Helm uses the chart to deploy your resources in place.
When installing the chart, make sure to replace <YOUR_ORG_SLUG> with your Buildkite organization slug, and replace <YOUR_CLUSTER_UUID> with the UUID of the cluster you'd like to house this k8s-based queue within. For more details on retrieving your cluster UUID, take more than a gander (maybe an intense stare, for a suitable duration?) at this section of the agent-stack-k8s readme. You can keep the queue name as montagne-de-reims so the Add to Buildkite button of our demo pipeline should just work™.
helm upgrade --install agent-stack-k8s oci://ghcr.io/buildkite/helm/agent-stack-k8s --namespace buildkite --set config.org=<YOUR_ORG_SLUG> --set config.cluster-uuid=<YOUR_CLUSTER_UUID> --set config.tags='{queue=montagne-de-reims}' --set agentStackSecret=truthful-mirror --version 0.24.1Output:
oci://ghcr.io/buildkite/helm/agent-stack-k8s --namespace buildkite --set config.org=demo --set config.cluster-uuid=<YOUR_CLUSTER_UUID> --set config.tags='{queue=montagne-de-reims}' --set agentStackSecret=truthful-mirror --version 0.24.1
Release "agent-stack-k8s" does not exist. Installing it now.
Pulled: ghcr.io/buildkite/helm/agent-stack-k8s:0.24.1
Digest: sha256:1f888b75050232efa0f173692ba37c018e1d3ed2b83f93876887b202d9d9ae5a
NAME: agent-stack-k8s
LAST DEPLOYED: Thu Feb 27 12:08:15 2024
NAMESPACE: buildkite
STATUS: deployed
REVISION: 1
TEST SUITE: None
I want to call especial attention to two passed arguments here:
- First, the
--version 0.24.1argument, because pinning your stack to a version is a best practice. You can leave off the version and it should get you latest, but if you’ve ever been bitten by the Docker latest tag considered harmful, you know how long it takes for that bite to heal. There’s serious venom in that whale’s teeth! If you’re using theagent-stack-k8sin production, I expect you’re going to IaC this set of commands right up and you can source control the--versionnumber that you use and then carefully test moving to newer versions as you go. You can get the list of versions for theagent-stack-k8son its releases page. - Second, the
--set config.tags='{queue=montagne-de-reims}'. The queue foragent-stack-k8sdefaults tokubernetesbut is easily overridden, for example, if you wanted to name your queue after one of the five champagne-producing regions. When running the stack at scale, it’s very likely you’ll find uses for multiple stacks that are isolated from each other. Maybe you’ll have one stack with--set config.tags='{queue=terraform}'to run your IaC, and a--set config.tags='{queue=buildymcbuildface}'to build the rest of your projects. Or perhaps you’d want a--set config.tags='{queue=terraform-prod}'and--set config.tags='{queue=terraform-dev}'to segment out different IaC for different classes of cloud accounts, each with the appropriate credential and network access to their corresponding resources.
Run a pipeline
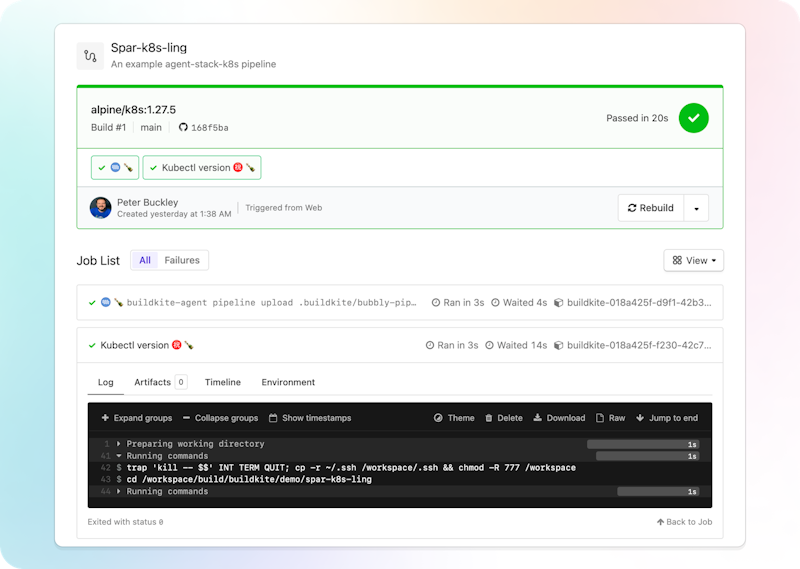
You’ve got your cluster up and running, secrets in place, and Helm chart with agent-stack-k8s ready to go. But how can we tell it’s all working? Why, by running a pipeline in Buildkite!
https://github.com/pbuckley/spar-k8s-ling is a public GitHub repo with an example pipeline based on this blog post. You can click Add to Buildkite to test it out with your agent-stack-k8s!
Clean up
Before you go, don’t forget to clean up when you’re done! If you learn nothing else from my example, I hope you learn that you don’t want to leave this thing on and run up an AWS bill from a blog post (like I did). Maybe not the world’s most expensive blog post, but definitely a contender for The Top 100 Most Expensive Blog Posts.
For kind, run:
kind delete cluster --name demisec-clusterFor AKS, run:
az group delete --name bubbly-group --yes --no-waitaz aks delete --name demisec-cluster --resource-group bubbly-groupFor EKS, run:
eksctl delete cluster --region=us-east-2 --name=demisec-clusterFor GKE, run:
gcloud container clusters delete demisec-cluster --location us-central1Conclusions and Oh Reservoirs
Our tale has come to its inevitable conclusion, dear reader, and with the closing of the page, comes my time to exit, stage right, even. I hope this blog post has been in some way informative and you’ve learned something along the way. Maybe you’ll take this newfound knowledge and by the power of grayskull agent-stack-k8s and Buildkite go forth and autoscale across the clouds. But not the cumulus nor stratus, in no way should you ever attempt to autoscale across those multi-clouds, that would be dangerous. You’d fall right through! Without a parachute! Yikes!