When you've spent as much time as I have in the world of infrastructure-as-code (IaC), you develop a bit of an allergy to anything that looks like click-ops.
There's nothing inherently wrong with click-ops, of course; sometimes it's just what you need. But in general, if I'm standing up infrastructure, especially on a team, I'm going to reach for something like Pulumi, Terraform, or Ansible to help. To me, that's just how it's done — there's no better way to get the reliable, repeatable results I need without being able to run an automated, code-driven process to produce them.
Which is why I was surprised to learn that in the Jenkins world, clicking around in the UI to configure the controller, plugins, agents, etc., isn't just common — it's still largely the norm.
Fortunately for IaC-heads like me, there's an answer. Jenkins Configuration as Code (JCasC) is a Jenkins plugin that lets you define your Jenkins configuration entirely in code, specifically YAML, that can be version-controlled, tested, and applied just as you would with any other IaC tool. And it's actually quite simple to use — once you understand the basics.
So in this hands-on post, we'll dive into JCasC with an example that sets up a Jenkins controller from scratch, complete with global settings, plugins, inbound agents, and a working pipeline wired up to a GitHub repository, all configured in code. To make it easy to spin up and work on, we'll also use Docker and Docker Compose, but the concepts apply no matter what you're deploying to — whether that's a Kubernetes cluster, a fleet of cloud-hosted VMs, or a stack of Raspberry Pis on your desktop.
What is JCasC and how does it work?
Like all things Jenkins, JCasC is a plugin. But it's a special one — it's a plugin for managing Jenkins itself, meant to allow you to spin up and configure a Jenkins cluster without having to sign into the Jenkins UI. Chances are, if you can configure it in the UI, you can accomplish the same thing with JCasC in YAML.
To make it work, you'll need a few things:
- An instance of Jenkins. Specifically, you'll need to be able to start an instance of Jenkins somehow, as JCasC configuration is applied on startup. (Containers, system services, and CLI commands are all fine.)
- A JCasC configuration file — a YAML file. You can name this file anything you like, but the convention is to name it
jenkins.yaml. We'll walk through what goes into this file in this post. - To tell Jenkins where this file is located when you start it up. This is generally done with an environment variable. You'll see some examples of this later as well.
Technically that's all there is to it — but if you'd like to install plugins automatically as well (which you almost surely will), you'll also need:
- A file containing a list of plugins to install on the Jenkins controller. You can name this file anything as well, but it's usually called
plugins.txt. Installing plugins this way is immensely valuable in that it not only lets you specify the plugin versions you'd like to install (one of many Jenkins plugin best practices), but also track changes to your plugin versions over time, test them before you deploy, and keep them all configured consistently across your organization. - The Jenkins plugin CLI, which is how you'll install the plugins on that list. There are other ways to do this, but the CLI is the standard.
The beauty of this approach is that it lets you configure not just one instance of Jenkins, but as many as you like, and to keep your production Jenkins clusters stable until you're ready to upgrade them with well-tested replacements.
All right, enough talk. Let's take a look at the actual files to see how this works.
Diving into a JCasC example
Start by cloning the example repository, which you'll find on GitHub at cnunciato/jenkins-jcasc-example:
gh repo clone cnunciato/jenkins-jcasc-example
cd jenkins-jcasc-example
Once you've done that, you should see the following layout:
.
├── app # A simple Node.js app that we're using for testing.
│ ├── index.js
│ ├── index.test.js
│ ├── package-lock.json
│ └── Jenkinsfile # The Jenkinsfile that builds and tests the app.
├── Dockerfile.controller # The Dockerfile for the Jenkins controller.
├── Dockerfile.agent # The Dockerfile for the Jenkins agents.
├── docker-compose.yml # The service definitions for the controller and agents.
├── agent.sh # The setup script for the agents.
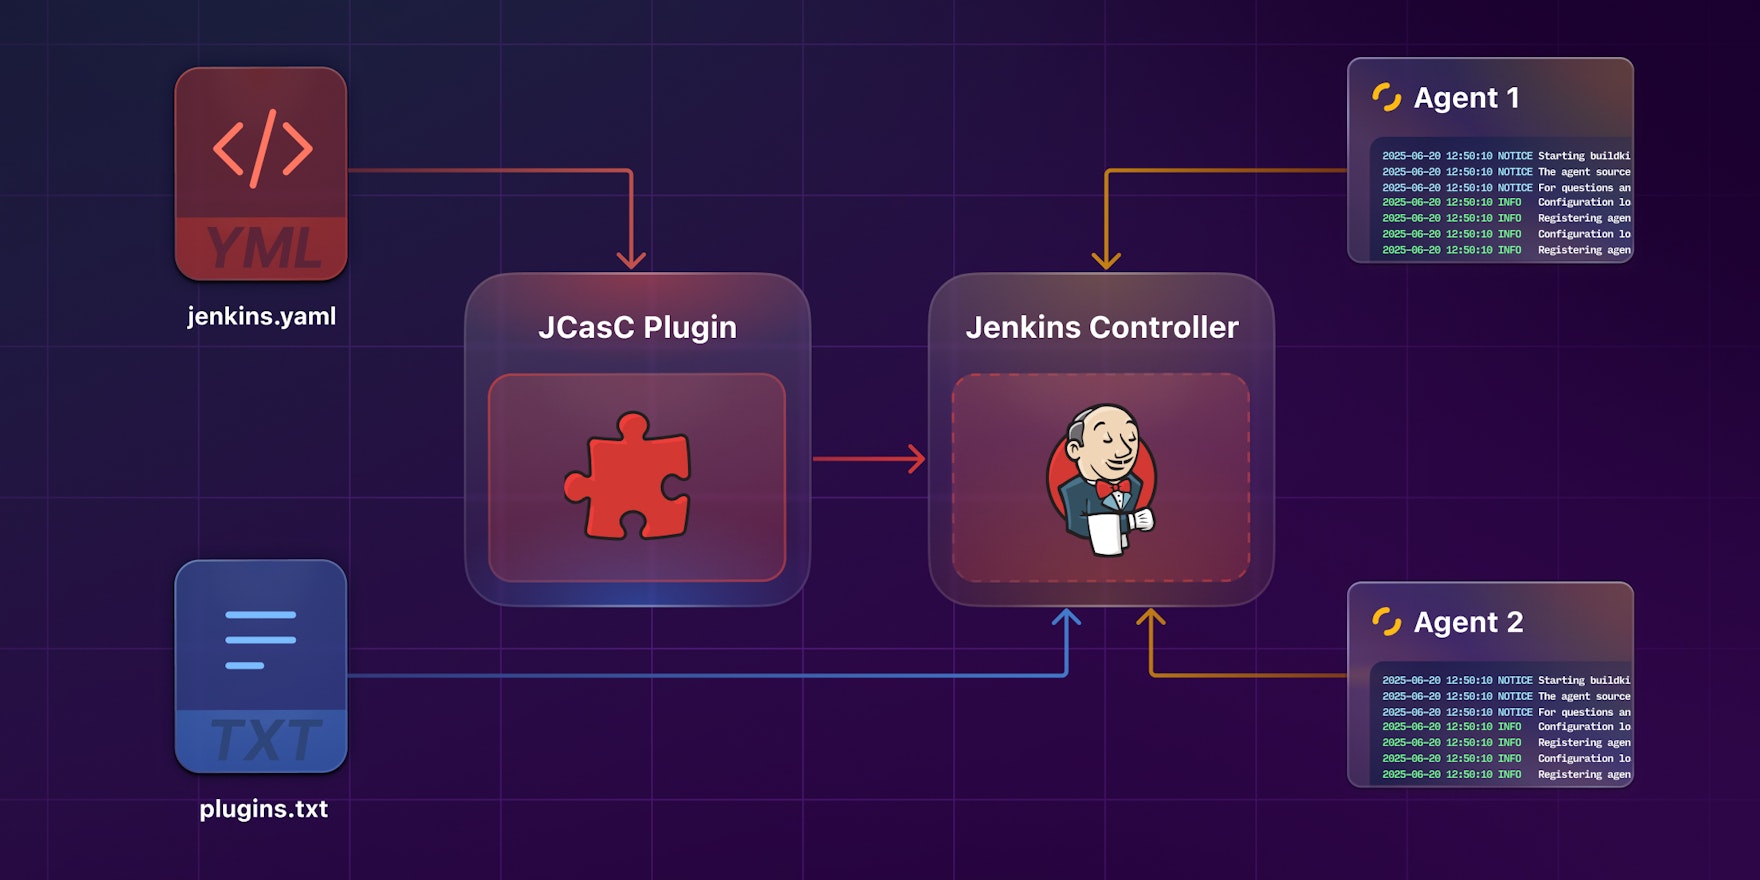
├── jenkins.yaml # 👈 The JCasC configuration file.
└── plugins.txt # 👈 The list of plugins to be installed on the controller.There are several files here, but the two most important ones are jenkins.yaml and plugins.txt.
Configuring the controller with jenkins.yaml
The jenkins.yaml file is what'll define most of your Jenkins controller's configuration, so where you'll spend most of your time. Open that file in your editor of choice, and let's walk through each section to get a sense of what it does.
Basic build settings
jenkins:
  mode: NORMAL
  numExecutors: 0
These settings — mode: NORMAL and numExecutors: 0 — tell Jenkins to accept any build job assigned to it and to delegate those jobs to connected agents instead — i.e., to run zero jobs on the controller itself. It's a common best practice for several reasons:
- Running jobs in on agents, as opposed to on the controller, reduces the risk of those jobs affecting the performance stability of the controller (and of exposing sensitive data).
- Pushing work off to agents keeps the controller's CPU and memory focused on managing the build queue, handling front-end requests, and coordinating workloads rather than competing with them.
- Agent-only execution makes horizontal scaling more straightforward. To handle more load, you can add more agents without having to upgrade the controller.
The default mode is NORMAL, so this particular setting is optional, but in the spirit of configuration as documentation, it's a good idea to be explicit about it so that others understand it's intentional.
Provisioning users
jenkins:
  # ...
  securityRealm:
    local:
      allowsSignup: false
      users:
        - id: ${JENKINS_ADMIN_USERNAME}
          password: ${JENKINS_ADMIN_PASSWORD}
        - id: ${JENKINS_AGENT_USERNAME}
          password: ${JENKINS_AGENT_PASSWORD}
Here, the securityRealm block tells Jenkins to configure two users on the controller:
- An
adminuser, so you can sign into the Jenkins UI without having to copy and paste the generated password from the startup logs - An
agentuser to allow build agents to self-register (which you'll see later)
The allowsSignup: false setting keeps users from being able to create accounts on the controller by visiting ${JENKINS_URL}/signup. Like mode: NORMAL, it's also the default, so technically optional — but again, a good one to be explicit about as well.
Setting roles and permissions
jenkins:
  # ...
  authorizationStrategy:
    roleBased:
      roles:
        global:
          - name: admin
            permissions:
              - Overall/Administer
            entries:
              - user: ${JENKINS_ADMIN_USERNAME}
          - name: agent
            permissions:
              - Overall/Read
              - Agent/Connect
              - Agent/Disconnect
              - Agent/Build
            entries:
              - user: ${JENKINS_AGENT_USERNAME}
Surprisingly, Jenkins has no support for authorization out of the box; the authorizationStrategy block has just two modes: unsecured, meaning anyone with access to the controller can use it without restriction (i.e., everyone's a fully anonymous administrator), and loggedInUsersCanDoAnything, meaning anyone with an account can act as an administrator. Both are far too permissive to be useful in production, so to secure your controllers properly, you'll need to look to a plugin.
The role-strategy plugin is a popular choice — and of course, it's configurable with JCasC. Here, we're using that plugin to:
- Define an
adminrole with full privileges and apply it to theadminuser - Define an
agentrole with narrower privileges (allowing it to connect, self-register, and run builds) and apply it to theagentuser
To learn more about the role-strategy plugin, see its documentation.
Configuring agents
jenkins:
  # ...
  nodes:
    - permanent:
        name: agent1
        launcher: inbound
        remoteFS: /home/jenkins/agent
    - permanent:
        name: agent2
        launcher: inbound
        remoteFS: /home/jenkins/agent
The nodes block configures the controller to support two permanently connected Jenkins agents using the inbound connection type. Here, agents connect to the controller, rather than the other way around, as they would with the ssh or command types. It's a flexible pattern that allows agents to spin up, connect, run builds, and terminate without Jenkins needing to be able to reach them directly.
Installing build tools
tool:
  nodejs:
    installations:
      - name: Node 22.x
        properties:
          - installSource:
              installers:
                - nodeJSInstaller:
                    id: 22.16.0
The tool block lets you configure the build tools that you use in your pipelines. This particular block — nodejs — automates the provisioning of Node.js on all build agents that need it. It tells Jenkins that when an agent connects, the agent should download and install Node version 22.16.0 from npm if it hasn't already.
Configuring a pipeline job and GitHub repo
jobs:
  - script: |
      multibranchPipelineJob('jenkins-jcasc-example') {
          branchSources {
              github {
                  id('jenkins-jcasc-example')
                  repoOwner('cnunciato')
                  repository('jenkins-jcasc-example')
                  scanCredentialsId('github-pat')
              }
          }
          factory {
              workflowBranchProjectFactory {
                  scriptPath('app/Jenkinsfile')
              }
          }

          configure { node ->
              def traits = node / sources / data / 'jenkins.branch.BranchSource' / source / traits
              traits << 'org.jenkinsci.plugins.github__branch__source.BranchDiscoveryTrait' {
                  strategyId(3)
              }
          }
      }
The jobs block uses the Job DSL, a Groovy-based API for creating Jenkins jobs declaratively. Here, we're defining a single multibranch pipeline job that:
- Fetches this blog post's example repository from GitHub (using credentials we'll define in a moment)
- Locates the
Jenkinsfileof the app to be built in the repository (in theappfolder) - Configures a branch-discovery trait that builds all branches of the repository — namely strategy
3, a magic number that means "regular and PR branches", where strategies1and2mean "exclude PR branches" and "only PR branches," respectively
Configuring shared GitHub credentials
credentials:
  system:
    domainCredentials:
      - credentials:
          - usernamePassword:
              id: github-pat
              username: "${GITHUB_USERNAME}"
              password: "${GITHUB_TOKEN}"
              description: "${GITHUB_USERNAME}'s personal access token"
Finally, while we don't necessarily have to configure GitHub credentials for this example, since the job we've configured pulls from a public repository (and we're only running it locally), in most cases, you'll want to do so, both to be able to access private repositories and to avoid running up against GitHub's fairly restrictive API limits.
The credentials block defines a shared, reusable Jenkins credential named github-pat (for personal access token) using environment variables that you specify at startup time. As you likely noticed above, the jenkins-jcasc-example job uses this credential to fetch the associated repository from GitHub.
Discovering more configuration settings
It's important to note that there are many more settings that you can configure with JCasC and jenkins.yaml than the few we've covered here — and figuring out what they are can be rather challenging (and require a good deal of trial and error). Two suggestions I'll offer to help you save time:
- Consult the configuration-as-code-plugin repository. Most of the settings you'll be interested in are covered in the
demosfolder of that repository, including those of commonly used plugins like the ones we've used here. If you're stuck, have a look around, and there's a good chance you'll find what you're looking for there. - Cheat — with the Jenkins UI. In addition to letting you write the configuration of a Jenkins controller, the JCasC plugin also allows you to read it — an incredibly handy way to discover settings you didn't know existed. In Manage Jenkins > Configuration as Code, there's a View Configuration button that surfaces everything as one big YAML blob, plugin settings and all, that you can paste right into
jenkins.yamland apply. If you're not sure how to configure something, try setting it up first with the UI, then click that button to see what changed, and copy out what you need. Having a Docker-based setup like this one makes this approach especially easy.
Configuring plugins with plugins.txt
I won't spend too much time on this topic, since it's technically independent of JCasC (and there's not all that much to it anyway) — but automating the installation of plugins along with the configuration of the server itself is such a common practice alongside JCasC that it's worth covering here as well.
The plugins.txt file simply contains the names of the plugins you'd like to install on the controller:
ansicolor                 # Support for colorized build logs
configuration-as-code     # 👈 The core JCasC functionality
github-branch-source      # Support for multibranch GitHub
job-dsl                   # Declarative job definitions
nodejs                    # Support for Node.js
workflow-aggregator       # Core pipelines functionality
workflow-multibranch      # Multibranch pipeline features
The snippet above uses unpinned versions, which implicitly tells Jenkins to fetch and install the latest version of each plugin. This is a fairly risky approach, given how easy it'd be for one or more of these plugins to fall out of compatibility with the Jenkins controller (or with one another) and break your pipeline, so most of the time, you'll want to pin each plugin to a specific version for stability and repeatability.
You can do this easily by adding the version after the plugin name (which you can get from the Jenkins Plugins Index):
ansicolor:1.0.6
configuration-as-code:1971.vf9280461ea_89
github-branch-source:1822.v9eec8e5e69e3
job-dsl:1.93
nodejs:1.6.4
role-strategy:777.v4fe2599cb_f48
workflow-aggregator:608.v67378e9d3db_1
workflow-multibranch:806.vb_b_688f609ee9
Maintaining this list can be tedious, and there doesn't seem to be a way to specify an acceptable range (only concrete versions), but it's much safer than simply relying on the latest.
That covers the two files — jenkins.yaml and plugins.txt — that govern most of your ability to configure a Jenkins server from scratch.
You might still be wondering, though: How exactly do you instruct Jenkins to use these two files?
Spinning up the cluster with Docker Compose
The best way to see how this works is to spin it up and have a look under the hood.
Now open a terminal, and assuming you have Docker installed (and the Docker daemon running), you should be able to bring everything up with a single command:
docker-compose upNow browse to http://localhost:8080 and sign in with the configured username and password — both of which are admin, as specified in docker-compose.yml:
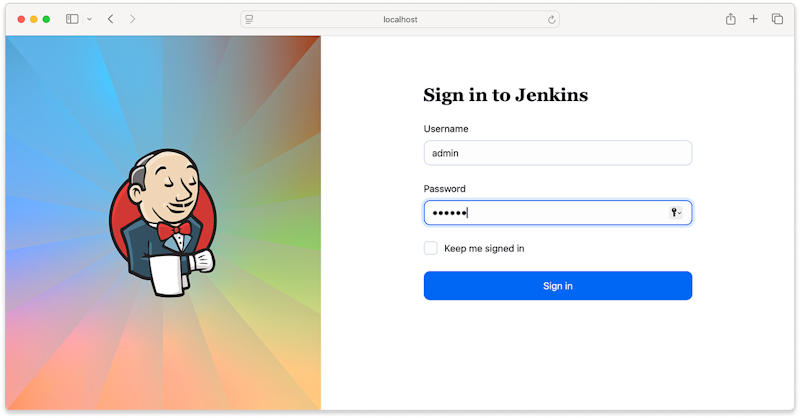
The Jenkins sign-in screen
You can even trigger a build and see the connected agents pick it up and run it:
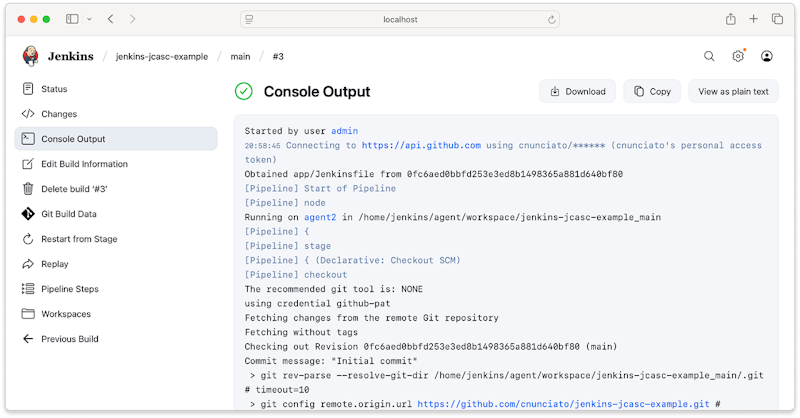
A Jenkins build
Defining controller and agent services
In docker-compose.yml, you'll see three container definitions: jenkins, agent1, and agent2. There's a bunch of other YAML in there, but it's mostly environment variables and defaults, so I'll assume you know your way around that stuff and just focus on the relevant lines:
services:

  # The controller.
  jenkins:
    build:
      context: .
      dockerfile: Dockerfile.controller
    ports:
      - "8080:8080"

  # An agent.
  agent1:
    build:
      context: .
      dockerfile: Dockerfile.agent
    depends_on:
      - jenkins

  # Another agent.
  agent2:
    build:
      context: .
      dockerfile: Dockerfile.agent
    depends_on:
      - jenkins
In the jenkins service's referenced Dockerfile, you'll see that it pulls in jenkins.yaml and plugins.txt, then runs the jenkins-plugin-cli (which is included in the Jenkins container image) to install all plugins, baking them into the container image:
FROM jenkins/jenkins:jdk21

# Copy in jenkins.yaml and plugins.txt.
COPY jenkins.yaml /usr/share/jenkins/ref/jenkins.yaml
COPY plugins.txt /usr/share/jenkins/ref/plugins.txt

# Install all plugins with jenkins-plugin-cli.
RUN jenkins-plugin-cli --plugin-file /usr/share/jenkins/ref/plugins.txt

# Disable the setup wizard and tell JCasC where the config file is located.
ENV JAVA_OPTS="-Djenkins.install.runSetupWizard=false"
ENV CASC_JENKINS_CONFIG="/usr/share/jenkins/ref/jenkins.yaml"
The last two environment variable settings are the key to making this work:
JAVA_OPTStells Jenkins to skip running the setup wizard (you no longer need it — you're rolling with JCasC now)CASC_JENKINS_CONFIGtells the JCasC plugin where to findjenkins.yaml
From there, Docker runs the default entrypoint to start the Jenkins service.
What happens when I stop Docker Compose? Won't I lose all my data?
Ordinarily, yes, because containers — but in this case, since we're using jenkins/jenkins as a base image, and it uses a Docker VOLUME for the Jenkins home directory, all of your data (pipelines, jobs, logs, etc.) will persist across restarts.
In a non-Docker-based environment, it's conceptually the same, just slightly different in that you'll need to fetch the Jenkins package and the Jenkins Plugin Manager individually. On Ubuntu, that'd look something like this:
#!/bin/bash
set -euo pipefail

export DEBIAN_FRONTEND=noninteractive

# Install Jenkins dependencies.
apt-get update
apt-get install -y wget gnupg curl openjdk-21-jdk

# Install Jenkins.
curl -fsSL https://pkg.jenkins.io/debian-stable/jenkins.io-2023.key | tee /usr/share/keyrings/jenkins-keyring.asc > /dev/null
echo "deb [signed-by=/usr/share/keyrings/jenkins-keyring.asc] https://pkg.jenkins.io/debian-stable binary/" | tee /etc/apt/sources.list.d/jenkins.list > /dev/null
apt-get update
apt-get install -y jenkins

# Make sure jenkins.yaml and plugins.txt and exist.
ls -al /usr/share/jenkins/ref/jenkins.yaml
ls -al /usr/share/jenkins/ref/plugins.txt

# Download the Jenkins Plugin Installation Manager.
wget -O /tmp/jenkins-plugin-manager.jar https://github.com/jenkinsci/plugin-installation-manager-tool/releases/download/2.12.13/jenkins-plugin-manager-2.12.13.jar

# Run the plugin manager to install the plugins listed in plugins.txt.
java -jar /tmp/jenkins-plugin-manager.jar \
  --war /usr/share/java/jenkins.war \
  --plugin-file /usr/share/jenkins/ref/plugins.txt \
  --plugin-download-directory /var/lib/jenkins/plugins

# Set required environment variables.
export JENKINS_HOME=/var/lib/jenkins
export JAVA_OPTS="-Djenkins.install.runSetupWizard=false"
export CASC_JENKINS_CONFIG="/usr/share/jenkins/ref/jenkins.yaml"

# Start Jenkins.
# systemctl start jenkins # Or just `jenkins`, to start.
Either way, that's all there is to it: a jenkins.yaml file, a plugins.txt file, a CLI command to load your plugins, and two environment variables, and your Jenkins controller is fully configured — no need to sign into the Jenkins UI to configure a thing.
Now let's have a last look at how the agent setup and self-registration work.
Configuring agent self-registration
If you open the agents' Dockerfile, you'll see that it's built from jenkins/inbound-agent, but it's using a shell script, agent.sh, as the entrypoint, rather than the default:
FROM jenkins/inbound-agent:jdk21

USER root
RUN apt-get update && apt-get install -y curl

USER jenkins
COPY agent.sh /agent.sh
ENTRYPOINT ["/agent.sh"]
That's because in order to connect to the Jenkins controller, an agent needs to supply a secret — and those secrets are generated dynamically (and uniquely for each agent) by the controller. You can view them in the Jenkins UI, and you can copy from the UI into the terminal when you fire up an agent — but who wants to do that? The whole point of JCasC, after all, is to avoid having to click around in the Jenkins UI and paste things into a terminal.
Fortunately, there's a way to retrieve the generated secret directly from the controller, which is exactly what agent.sh does. The script calls the jenkins-agent.jnlp endpoint (using the credentials we specified for the agent account earlier) and parses the response with sed to pull out the secret value before setting it as the JENKINS_SECRET environment variable (along with a few others):
#!/bin/bash

set -e

echo "Waiting for Jenkins to start..."
sleep 15

echo "Registering '${JENKINS_AGENT_NAME}' with the controller..."

# Retrieve the agent secret from its metadata endpoint.
AGENT_ENDPOINT="${JENKINS_URL}/computer/${JENKINS_AGENT_NAME}/jenkins-agent.jnlp"
AGENT_METADATA="$(curl -s -X GET -u "${JENKINS_AGENT_USERNAME}:${JENKINS_AGENT_PASSWORD}" $AGENT_ENDPOINT)"
AGENT_SECRET="$(echo $AGENT_METADATA | sed "s/.*<application-desc><argument>\([a-z0-9]*\).*/\1\n/")"

echo "Starting '${JENKINS_AGENT_NAME}'..."
export JENKINS_SECRET="$AGENT_SECRET"
export JENKINS_AGENT_NAME="$JENKINS_AGENT_NAME"
export JENKINS_URL="$JENKINS_URL"
exec jenkins-agent
And with that, you're good to go: You now have a fully functioning example of configuring Jenkins completely from scratch, including plugins, self-registering agents, and a Docker-based setup to make development and testing a little less painful.
Wrapping up
We've covered a lot, and hopefully we've given you a solid understanding of how JCasC works and how to use it. There's much more to learn — we've just scratched the surface — but what's here should give you a decent foundation to build onto.
To keep the learning going, you might want to check out:
- The Jenkins Configuration as Code sub-project
- The Configuration as Code page of the Jenkins Handbook
- The jenkinsci/configuration-as-code repository on GitHub — especially the demos folder
And of course, keep on tinkering! You'll find our example on GitHub at cnunciato/jenkins-jcasc-example.
Scaling beyond Jenkins with Buildkite
While JCasC makes it easy to deploy a virtually endless supply of Jenkins controllers, you'll still need to keep all of those controllers (and all of their supporting infrastructure) up and running as you scale. And over time, the cost of maintaining all that Jenkins can definitely add up.
Buildkite's hybrid architecture is different: it gives you full control over the deployment and orchestration of your build agents, but without having to manage (or even think about) the control plane at all — even at massive scale. Many of our customers have made the leap from Jenkins to Buildkite and shared their stories of what life is like on the other side:
- How Elastic improved its CI run times by 70% with Buildkite
- How Faire cut PR build times in half and scaled horizontally with Buildkite
- How the Bazel team at Google rebuilt its CI system on Buildkite
Monorepos at scale: Building CI for 1,000 daily commits at Uber
Register to watch the webinar
- Recorded on
- June 26, 2024
- Length
- 40 minutes