Migrate from Jenkins
If you are familiar with Jenkins and want to migrate to Buildkite, this guide is for you. Buildkite is a modern and flexible continuous integration and deployment (CI/CD) platform that provides a powerful and scalable build infrastructure for your applications.
While Jenkins and Buildkite have similar goals as CI/CD platforms, their approach differs. Buildkite uses a hybrid model consisting of the following:
- A software-as-a-service (SaaS) platform for visualization and management of CI/CD pipelines.
- Agents for executing jobs—hosted by you, either on-premises or in the cloud.
Buildkite addresses the pain points of Jenkins' users, namely its security issues (both in its base code and plugins), time-consuming setup, and speed. This approach makes Buildkite more secure, scalable, and flexible.
Follow the steps in this guide for a smooth migration from Jenkins to Buildkite.
Understand the differences
Most of the concepts will likely be familiar, but there are some differences to understand about the approaches.
System architecture
While Jenkins is a general automation engine with plugins to add additional features, Buildkite Pipelines is a product specifically aimed at CI/CD. You can think of Buildkite Pipelines like Jenkins with the Pipeline suite of plugins. To simplify it, we'll refer to Jenkins Pipeline as just Jenkins and Buildkite Pipelines as Buildkite.
At a high level, Buildkite follows a similar architecture to Jenkins:
- A central control panel that coordinates work and displays results.
- Jenkins: A controller shown in the web UI.
- Buildkite: The Buildkite dashboard.
- A program that executes the work it receives from the control panel.
- Jenkins: A combination of nodes, executors, and agents.
- Buildkite: Agents.
However, while you're responsible for scaling and operating both components in Jenkins, Buildkite manages the control panel as a SaaS offering (the Buildkite dashboard). This reduces the operational burden on your team, as Buildkite takes care of platform maintenance, updates, and availability. The Buildkite dashboard also handles monitoring tools like logs, user access, and notifications.
The program that executes work is called an agent in Buildkite. An agent is a small, reliable, and cross-platform build runner that connects your infrastructure to Buildkite. It polls Buildkite for work, runs jobs, and reports results. You can install agents on local machines, cloud servers, or other remote machines. The agent code is open-source, and you can view it on GitHub.
The following diagram shows the split in Buildkite between the SaaS platform and the agents running on your infrastructure.
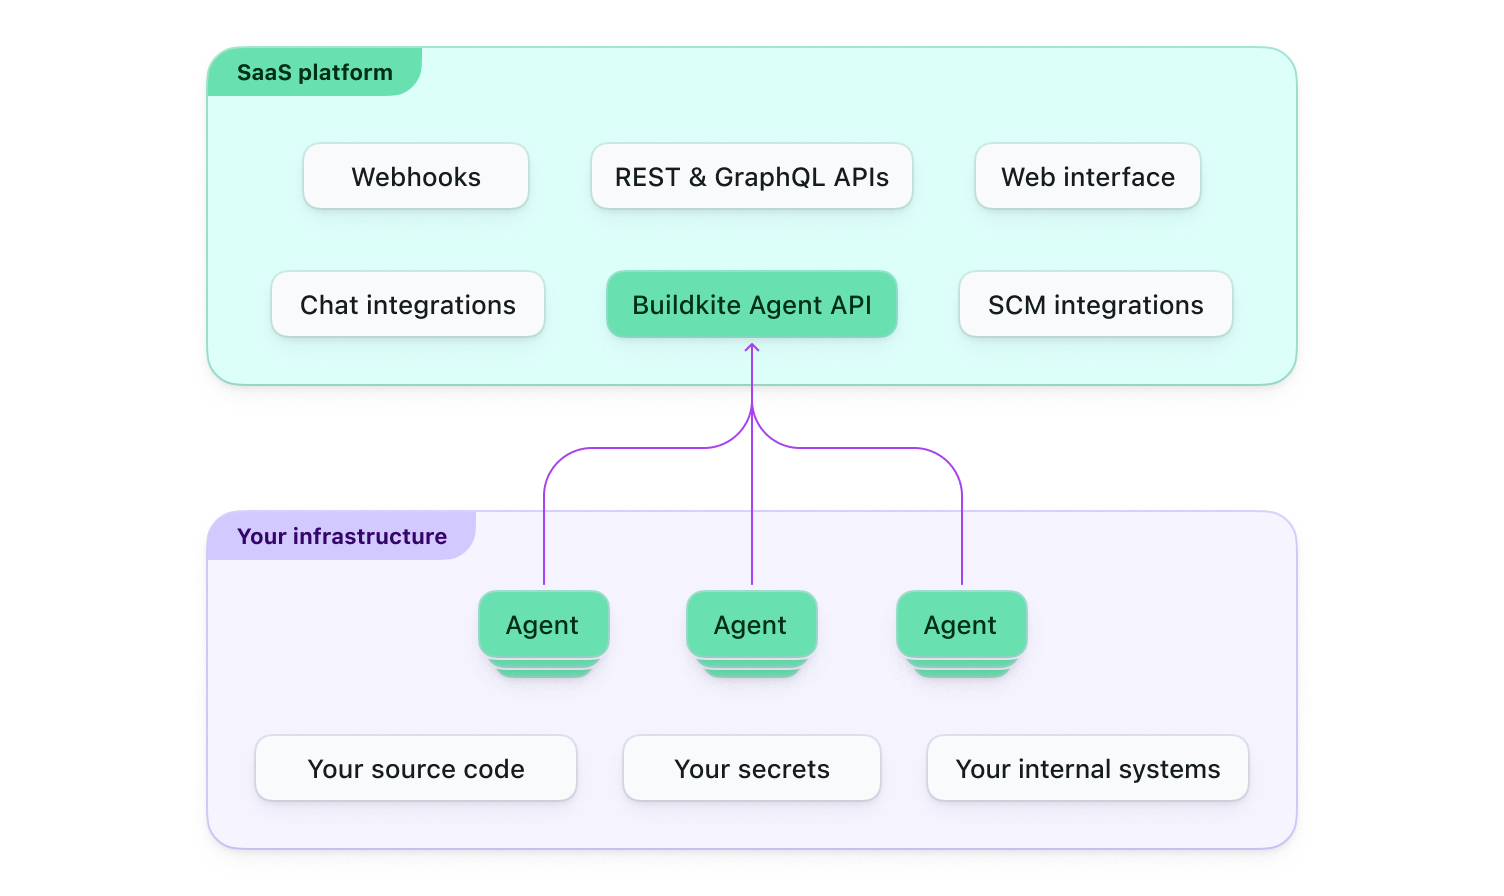
The diagram shows that Buildkite provides a web interface, handles integrations with third-party tools, and offers APIs and webhooks. By design, sensitive data, such as source code and secrets, remain within your environment and are not seen by Buildkite. This decoupling provides flexibility, as you can scale the build agents independently while Buildkite manages the coordination, scheduling, and web interface.
In Jenkins, you manage concurrency by having multiple executors within a single node. In Buildkite, you run multiple agents on a single machine or across multiple machines.
Security
Security is crucial in CI/CD, protecting sensitive information, system integrity, and compliance with industry standards. Jenkins and Buildkite have different approaches to security, which will impact how you manage your CI/CD pipeline's security aspects.
Securing a Jenkins instance requires:
- Careful configuration.
- Plugin management.
- Regular updates to address security vulnerabilities.
You must consider vulnerabilities in both the base code and plugins. Additionally, since Jenkins is a self-hosted solution, you are responsible for securing the underlying infrastructure, network, and storage. Some updates require you to take Jenkins offline to perform them, leaving your team without access to CI/CD during that period.
Buildkite's hybrid architecture, which combines a centralized SaaS platform with self-hosted build agents, provides a unique approach to security. Buildkite takes care of the security of the SaaS platform, including user authentication, pipeline management, and the web interface. Build agents, which run on your infrastructure, allow you to maintain control over the environment, security, and resources. This separation reduces the operational burden and allows you to focus on securing the environments where your code is built and tested.
Buildkite does not have or need access to your source code. Only the agents you host on your infrastructure need access to clone your repositories. This gives you all the benefits of a SaaS platform without many of the common security concerns.
Buildkite also doesn't store your secrets. Instead, Buildkite integrates with best-in-class tools like AWS Secrets Manager and Hashicorp Vault to use in your pipelines.
Both Jenkins and Buildkite support multiple authentication providers and offer granular access control. However, Buildkite's SaaS platform provides a more centralized and streamlined approach to user management, making it easier to enforce security policies and manage user access across your organization.
Pipeline configuration
When migrating your CI/CD pipelines from Jenkins to Buildkite, it's important to understand the differences in pipeline configuration.
Like Jenkins, Buildkite lets you create pipeline definitions in the web interface or a file checked into the repository. Most people use the latter to include their pipeline definitions next to the code, managed in source control. The equivalent of a Jenkinsfile is a pipeline.yml.
Rather than the Groovy-based syntax in Jenkins, Buildkite uses a YAML-based syntax. The YAML definitions are simpler, more human-readable, and easier to understand. And you can even generate pipeline definitions at runtime with the power and flexibility of dynamic pipelines.
In Jenkins, the core description of work is a job. Jobs contain stages with steps and can trigger other jobs. You use a job to upload a Jenkinsfile from a repository. Installing the Pipeline plugin lets you describe a workflow of jobs as a pipeline. Buildkite uses similar terms in different ways. Pipelines are the core description of work. Pipelines contain different types of steps for different tasks:
- Command step: Runs one or more shell commands on one or more agents.
- Wait step: Pauses a build until all previous jobs have completed.
- Block step: Pauses a build until unblocked.
- Input step: Collects information from a user.
- Trigger step: Creates a build on another pipeline.
- Group step: Displays a group of sub-steps as one parent step.
Triggering a pipeline creates a build, and any command steps are dispatched as jobs to run on agents. A common practice is to define a pipeline with a single step that uploads the pipeline.yml file in the code repository. The pipeline.yml contains the full pipeline definition and can be generated dynamically.
Plugin system
Plugins are an essential part of both Jenkins and Buildkite. They help you extend the products to further customize your CI/CD workflows.
Rather than a web-based plugin management system like Jenkins, you manage Buildkite plugins directly in pipeline definitions. That means teams can manage plugins on a pipeline level rather than a monolith approach.
Jenkins plugins are typically developed in Java and are closely integrated with the Jenkins core, which may lead to compatibility issues when updating Jenkins or its plugins. Buildkite plugins are written in Bash and loosely coupled with Buildkite, making them more maintainable and less prone to compatibility issues.
Try out Buildkite
With a basic understanding of the differences between Buildkite and Jenkins, the next step is to try creating and running a pipeline.
We recommend following the Getting started guide to:
- Sign up for a 30-day free trial account.
- Set up an agent to execute the pipeline steps.
- Create a pipeline using an example repository.
- Run a build and view the output in the Buildkite dashboard.
Provision agent infrastructure
The agents are where your builds, tests, and deployments run. They run on your infrastructure, providing flexibility and control over the environment and resources. Operating agents is similar in approach to hosting nodes in Jenkins.
You'll need to consider the following:
- Infrastructure type: Agents can run on various infrastructure types, including on-premises, cloud (AWS, GCP, Azure), or container platforms (Docker, Kubernetes). Based on your analysis of the existing Jenkins nodes, choose the infrastructure type that best suits your organization's needs and constraints.
- Resource usage: Agent infrastructure is similar to the requirements for nodes in Jenkins, without operating the controller. Evaluate your Jenkins nodes' resource usage (CPU, memory, and disk space) to determine the requirements for your Buildkite agent infrastructure.
- Platform dependencies: To run your pipelines, you'll need to ensure the agents have the necessary dependencies, such as programming languages, build tools, and libraries. Take note of the operating systems, libraries, tools, and dependencies installed on your Jenkins nodes. This information will help you configure your Buildkite agents.
- Network configurations: Review the network configurations of your Jenkins nodes, including firewalls, proxy settings, and network access to external resources. These configurations will guide you in setting up the network environment for your Buildkite agents. The Buildkite agent works by polling Buildkite's agent API over HTTPS. There is no need to forward ports or provide incoming firewall access.
- Agent scaling: Evaluate the number of concurrent builds and the build queue length in your Jenkins nodes to estimate the number of Buildkite agents needed. Keep in mind that you can scale Buildkite agents independently, allowing you to optimize resource usage and reduce build times.
- Build isolation and security: Consider using separate agents for different projects or environments to ensure build isolation and security. You can use agent tags and clusters to target specific agents for specific pipeline steps, allowing for fine-grained control over agent allocation.
You'll continue to adjust the agent configuration as you monitor performance to optimize build times and resource usage for your needs.
See the Installation guides when you're ready to install an agent and follow the instructions for your infrastructure type.
Translate pipeline definitions
A pipeline is a container for modeling and defining workflows. While that's true for both Buildkite and Jenkins, they look quite different. Both can read a configuration file checked into a repository to define the workflow. In Jenkins, the Jenkinsfile. In Buildkite, the pipeline.yml. Where the Jenkinsfile uses a Groovy-based syntax and strong hierarchy, pipelines.yml uses YAML and a flat structure for better readability.
Audit your pipelines
Before you start moving pipelines, we recommend taking inventory of your existing pipelines, plugins, and integrations. Determine which parts of your Jenkins setup are essential and which can be replaced or removed. This will help you decide what needs to be migrated to Buildkite.
Translate a pipeline
Since the configuration files are quite different, creating an automated tool to translate between them is difficult. Instead, we recommend assessing the goal of a pipeline and investing the time to see how to achieve the same thing the Buildkite way. This results in clearer pipelines with better performance.
Some Buildkite features you might want to use include dynamic pipelines, lifecycle hooks, conditionals, artifacts, build matrices, and annotations.
A simple pipeline in Buildkite might look like the following:
steps:
- label: "Build"
  command: "build.sh"
  key: "build"

- label: "Test"
  command: "test.sh"
  key: "test"
  depends_on: "build"

- label: "Deploy"
  command: "deploy.sh"
  depends_on: "test"
To translate a pipeline:
- Identify the goal of the pipeline.
- Look for an example pipeline closest to that goal.
- Follow Defining steps and surrounding documentation to learn how to customize the pipeline definition to meet your needs, including:
- Targeting a specific agent or queue.
- Replacing any Jenkins plugins and integrations with Buildkite features, existing Buildkite plugins, custom plugins, or custom scripts.
- Migrate any environment variables, secrets, or credentials used in the pipeline. Buildkite allows you to manage environment variables and secrets on different levels, such as organization, pipeline, and step levels. Securely store your sensitive data on your preferred secret management tool and integrate them into your agents and pipelines. See Managing pipeline secrets to learn more.
- Run the pipeline to verify it works as expected.
- If it does, nice work! On to the next one.
- If it doesn't, check the logs to resolve the issues. If you're having trouble, reach out to support at support@buildkite.com.
Many teams continue running pipelines on their existing infrastructure to verify the results match before removing the pipeline from Jenkins.
Integrate your tools
Integrating workflow tools and notifications with your CI/CD pipelines helps streamline processes and keeps your team informed about build and deployment status. Buildkite supports various integrations with tools like chat applications, artifact managers, and monitoring systems.
To set up your integrations:
- List existing tools: Identify the workflow tools and notification systems you use or need to integrate with your CI/CD pipelines.
- Define notification requirements: Determine the types of notifications your team needs, such as build status, deployment updates, test results, and alerts for critical issues. This information will help you configure the appropriate integrations and notification settings.
-
Choose the integration approach:
- Plugins: Buildkite provides plugins to integrate with popular workflow tools and notification systems. Check the Plugins directory to see if there's a plugin available for your desired tool. If a plugin is available, include it in your pipeline configuration and follow the plugin's documentation for configuration instructions. If it's not, learn about writing plugins.
- Third-party services: Some third-party services provide direct integrations with Buildkite. Check your tools to see if they can help you achieve the desired integrations without writing custom scripts.
- Webhooks and APIs: If you need a custom integration, consider using webhooks or APIs. Buildkite supports outgoing webhooks for various pipeline events, and many workflow tools provide APIs to interact with their services. Use custom scripts or tools in your pipeline steps to send notifications and interact with your workflow tools.
- Set up notification channels: Create dedicated notification channels in your chat applications to receive CI/CD updates. This approach helps keep your team informed without cluttering general communication channels.
- Configure notification triggers: Configure your integrations to send notifications based on specific pipeline events, such as build failures, deployments, or critical alerts. Avoid excessive notifications by focusing on essential events that require your team's attention. See Triggering notifications for more information.
- Customize notification content: Tailor the content of your notifications to include relevant information, such as build status, commit details, and links to artifacts or logs. Customize your notifications to be as informative and actionable as possible, so your team can quickly identify and address issues.
Continue adjusting the settings as you gather feedback from your team on the effectiveness and usefulness of your integrations and notifications.
Keep your integrations up to date by monitoring the release notes and updates for Buildkite plugins and the workflow tools you use. Updating your integrations ensures compatibility, fixes bugs, and introduces new features.
Next steps
That's it! 🎉
Migrating from Jenkins to Buildkite provides a more flexible, scalable, and secure build infrastructure for your applications.
Remember that it may take some time to adapt to the new platform, and be prepared to address any issues or challenges that arise during the migration process. We recommend you gather feedback from your team members on their experiences with Buildkite, so you can continually optimize your setup.
If you need further assistance or have any questions, please don't hesitate to reach out to support at support@buildkite.com. We're here to help you use Buildkite to build your dream CI/CD workflows.
After configuring Buildkite Pipelines for your team, you could get actionable insights from the tests running in pipelines using Test Engine.