Running Buildkite Agent on Google Cloud Platform
The Buildkite Agent can be run on Google Cloud Platform (GCP). For fine control over long–lived agents, you might like to run the agent using individual VM instances on Google Compute Engine. Or run Docker–based builds using a scalable cluster of agents on the Google Kubernetes Engine using Kubernetes.
Using the Buildkite Agent Stack for Kubernetes on the Google Cloud Platform
The Buildkite Agent's jobs can be run within a Kubernetes cluster on GCP.
Once your Kubernetes cluster is running on GCP, follow the Buildkite Agent Stack for Kubernetes instructions to set up the Buildkite Agent stack to run in Kubernetes.
Running the agent on Google Compute Engine
To run the agent on your own Google Compute Engine instance use whichever installer matches your instance type. For example:
Launch an instance using the latest Ubuntu LTS image through the console:

Connect using SSH:
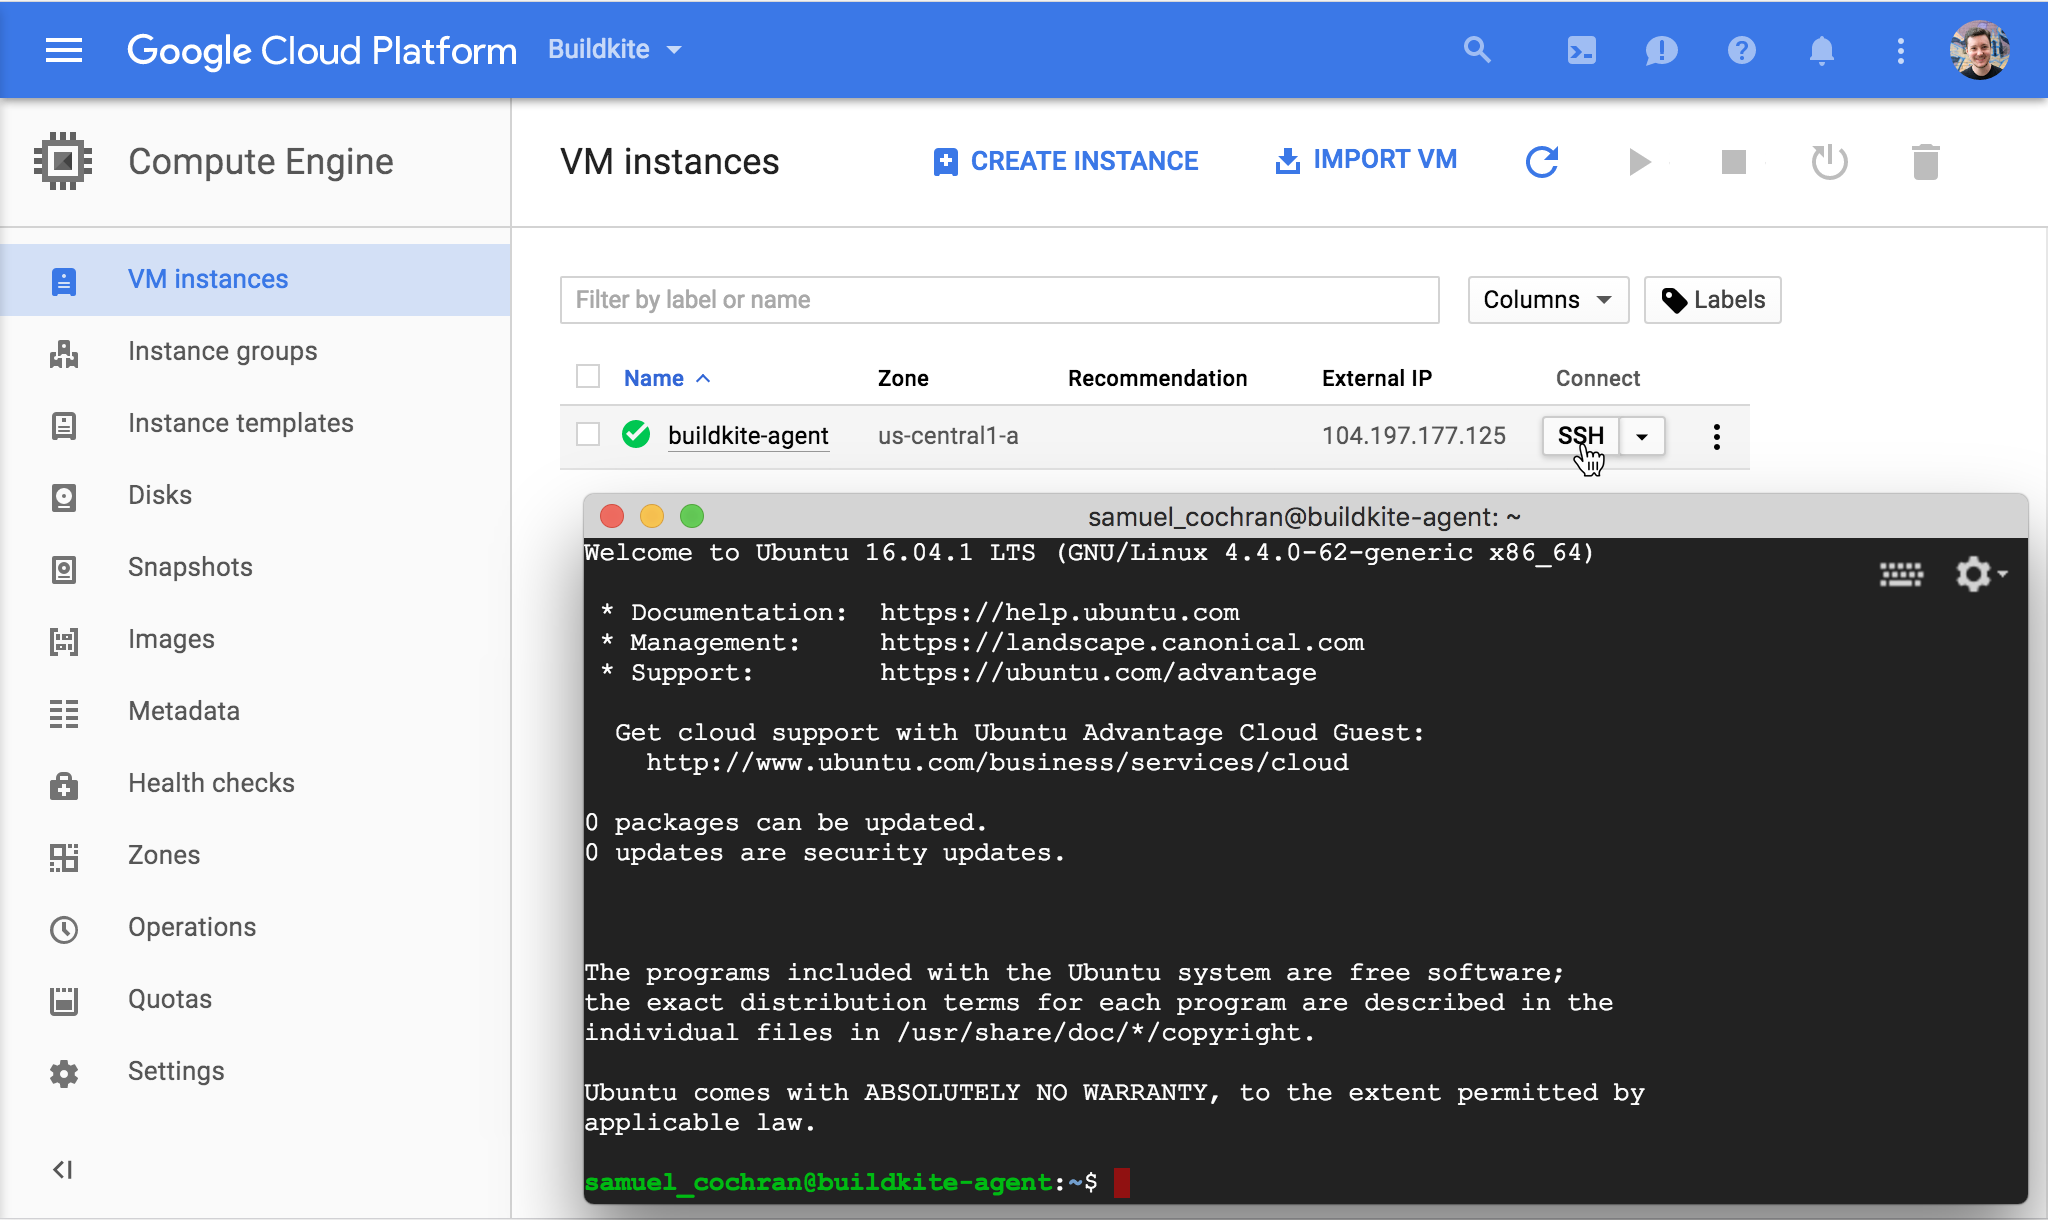
Follow the setup instructions for Ubuntu.
Running the agent on Google Kubernetes Engine
Google Kubernetes Engine can run the agent as a Docker container using Kubernetes. To run Docker–based builds, ensure the container is started with a privileged security context and mount the Docker socket as a volume.
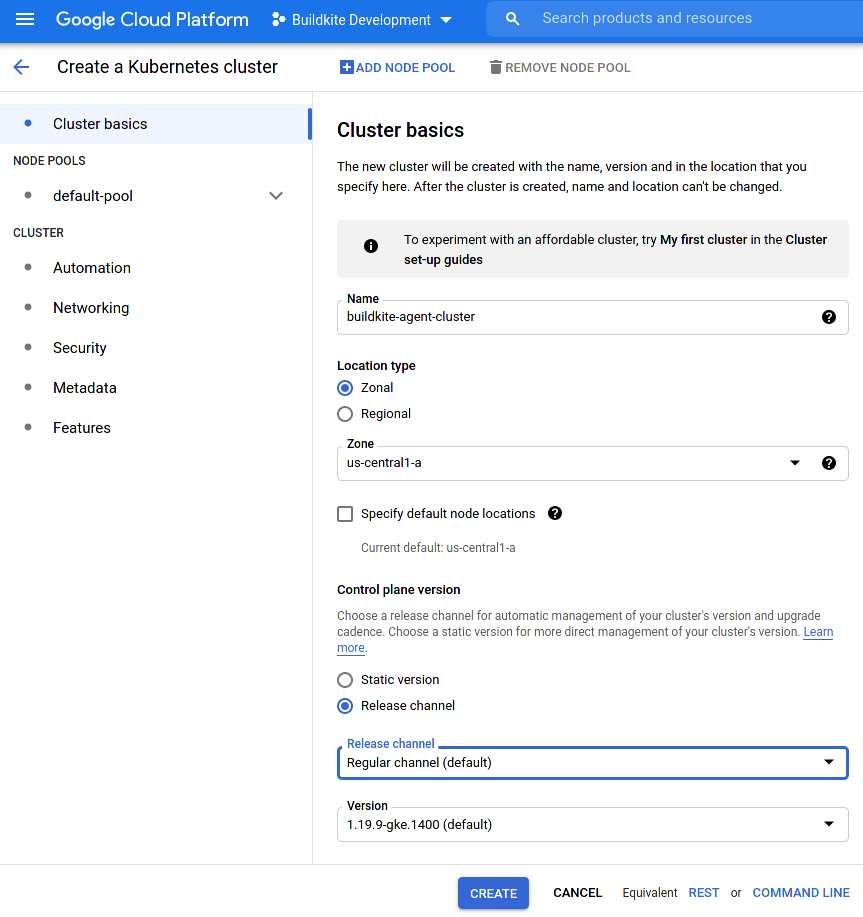
In the Google Cloud Console, create a Standard Google Kubernetes Engine cluster:
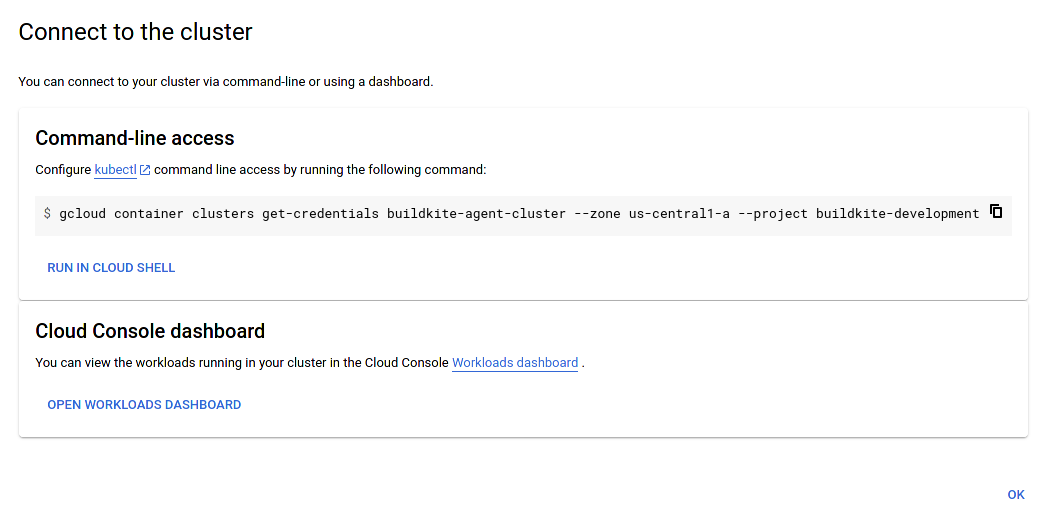
Open Google Cloud Shell, or your own console with gcloud installed and authenticated.j
Then, after a minute, configure kubectl to talk to your new cluster. The console includes a Connect button which shows the exact command to run:
Running it should look like this, with your details in the right places:
$ gcloud container clusters get-credentials INSERT-YOUR-CLUSTER-NAME \
    --zone INSERT-YOUR-ZONE --project INSERT-YOUR-PROJECT
Fetching cluster endpoint and auth data.
kubeconfig entry generated for YOUR-CLUSTER-NAME
Double check that it's running by taking a look at the cluster info:
$ kubectl cluster-info
Kubernetes control plane is running at https://34.71.166.83
GLBCDefaultBackend is running at https://34.71.166.83/api/v1/namespaces/kube-system/services/default-http-backend:http/proxy
KubeDNS is running at https://34.71.166.83/api/v1/namespaces/kube-system/services/kube-dns:dns/proxy
Metrics-server is running at https://34.71.166.83/api/v1/namespaces/kube-system/services/https:metrics-server:/proxy

To further debug and diagnose cluster problems, use 'kubectl cluster-info dump'.
Create a secret with your agent registration token:
$ kubectl create secret generic buildkite-agent --from-literal=token=INSERT-YOUR-AGENT-TOKEN-HERE
secret "buildkite-agent" created
Create a Kubernetes deployment to start an agent:
$ cat | kubectl apply -f -
apiVersion: apps/v1
kind: Deployment
metadata:
  name: buildkite-agent
spec:
  replicas: 1
  selector:
    matchLabels:
      app: buildkite-agent
  template:
    metadata:
      labels:
        app: buildkite-agent
    spec:
      containers:
        - name: buildkite
          image: "buildkite/agent:3.29.0"
          env:
            - name: DOCKER_HOST
              value: tcp://localhost:2375
            - name: BUILDKITE_AGENT_TOKEN
              valueFrom: {secretKeyRef: {name: buildkite-agent, key: token}}
          volumeMounts:
            - name: buildkite-builds
              mountPath: /buildkite/builds
        - name: dind-daemon
          image: docker:20.10.6-dind
          command: ["dockerd", "--host=unix:///var/run/docker.sock", "--host=tcp://0.0.0.0:2375"]
          securityContext:
              privileged: true
          volumeMounts:
            - name: buildkite-builds
              mountPath: /buildkite/builds
            - name: docker-graph-storage
              mountPath: /var/lib/docker
      terminationGracePeriodSeconds: 900
      volumes:
        - name: docker-graph-storage
          emptyDir: {}
        - name: buildkite-builds
          emptyDir: {}

# (press Control-D)

deployment "buildkite-agent" created
After waiting another minute, verify that your agent pod is running:
$ kubectl get pods
NAME                               READY   STATUS    RESTARTS   AGE
buildkite-agent-67d54b9b88-jnzxg   2/2     Running   0          22s
And that the Buildkite agent has registered successfully:
$ kubectl logs buildkite-agent-67d54b9b88-jnzxg buildkite

   _           _ _     _ _    _ _                                _
  | |         (_) |   | | |  (_) |                              | |
  | |__  _   _ _| | __| | | ___| |_ ___    __ _  __ _  ___ _ __ | |_
  | '_ \| | | | | |/ _` | |/ / | __/ _ \  / _` |/ _` |/ _ \ '_ \| __|
  | |_) | |_| | | | (_| |   <| | ||  __/ | (_| | (_| |  __/ | | | |_
  |_.__/ \__,_|_|_|\__,_|_|\_\_|\__\___|  \__,_|\__, |\___|_| |_|\__|
                                                 __/ |
 https://buildkite.com/agent                    |___/

2021-05-26 12:55:27 NOTICE Starting buildkite-agent v3.29.0 with PID: 7
2021-05-26 12:55:27 NOTICE The agent source code can be found here: https://github.com/buildkite/agent
2021-05-26 12:55:27 NOTICE For questions and support, email us at: hello@buildkite.com
2021-05-26 12:55:27 INFO   Configuration loaded path=/buildkite/buildkite-agent.cfg
2021-05-26 12:55:27 INFO   Registering agent with Buildkite...
2021-05-26 12:55:27 WARN   Failed to find unique machine-id: machineid: machineid: open /etc/machine-id: no such file or directory
2021-05-26 12:55:27 INFO   Successfully registered agent "buildkite-agent-67d54b9b88-jnzxg-1" with tags []
2021-05-26 12:55:27 INFO   Starting 1 Agent(s)
2021-05-26 12:55:27 INFO   You can press Ctrl-C to stop the agents
2021-05-26 12:55:27 INFO   buildkite-agent-67d54b9b88-jnzxg-1 Connecting to Buildkite...
2021-05-26 12:55:27 INFO   buildkite-agent-67d54b9b88-jnzxg-1 Waiting for work...
You're successfully running a Buildkite agent!
Running more than one agent
To run more than one agent you can increase replicas:
$ kubectl scale --replicas=5 deployment buildkite-agent
deployment "buildkite-agent" scaled
Confirm after a few seconds:
$ kubectl get pods
NAME                               READY   STATUS    RESTARTS   AGE
buildkite-agent-67d54b9b88-6pl9k   2/2     Running   0          69s
buildkite-agent-67d54b9b88-7gzcr   2/2     Running   0          69s
buildkite-agent-67d54b9b88-cqdt6   2/2     Running   0          69s
buildkite-agent-67d54b9b88-jnzxg   2/2     Running   0          8m23s
buildkite-agent-67d54b9b88-qwfc5   2/2     Running   0          69s
Authenticating to private repositories
To run builds from private repositories you can store an SSH key for the agent in a secret and map it into the containers:
# Use an existing key pair, or generate a new one with something like:
$ ssh-keygen -t rsa -b 2048 -N "" -C buildkite-agent -f id_rsa
Generating public/private rsa key pair.
Your identification has been saved in id_rsa.
Your public key has been saved in id_rsa.pub.
...

# Create a secret containing the ssh keys:
$ kubectl create secret generic buildkite-agent-ssh \
    --from-file id_rsa=id_rsa \
    --from-file id_rsa.pub=id_rsa.pub
secret "buildkite-agent-ssh" created

# Change the spec to include new volumes to map the ssh key into place (because
# this is Docker the git and ssh processes are running as root):
$ kubectl edit deployment buildkite-agent
...
spec:
  containers:
  - ...
    volumeMounts:
    - name: ssh-keys
      mountPath: /root/.ssh/id_rsa
      subPath: id_rsa
    - name: ssh-keys
      mountPath: /root/.ssh/id_rsa.pub
      subPath: id_rsa.pub
    ...
  volumes:
  - name: ssh-keys
    secret:
      secretName: buildkite-agent-ssh
      defaultMode: 0400
  ...
If you git clone over https (for example using a GitHub API token) you could mount a git-credentials file instead:
spec:
containers:
- ...
  volumeMounts:
  - name: git-credentials
    mountPath: /root/.git-credentials
    subPath: .git-credentials
  ...
volumes:
- name: git-credentials
  secret:
    secretName: buildkite-agent-git-credentials
    defaultMode: 0400
...
You'll need to add an environment hook to set the git credential.helper to actually use your newly added git-credentials file. See the Docker instructions for authenticating private git repositories for an example.
Further configuration
To configure the agent further you can create a config map and volume mount it over the default agent configuration file in /buildkite/buildkite-agent.cfg.
To add agent hooks add another config map and volume mount them into /buildkite/hooks/.
To add container startup scripts, add another config map with files and volume mount them into /docker-entrypoint.d/. Note: scripts in this directory must not have any periods (.) or any file extensions since they are run by the run-parts util.
See our Docker setup instructions for more details on configuring and customizing the Buildkite Agent running in Docker.
Uploading artifacts to Google Cloud Storage
You can upload the artifacts created by your builds to your own Google Cloud Storage bucket. Configure the agent to target your bucket by exporting the following environment variables using an environment agent hook (this can not be set using the Buildkite web interface, API, or during pipeline upload):
export BUILDKITE_ARTIFACT_UPLOAD_DESTINATION="gs://my-bucket/$BUILDKITE_PIPELINE_ID/$BUILDKITE_BUILD_ID/$BUILDKITE_JOB_ID"
Make sure the agent has permission to create new objects. If the agent is running on Google Compute Engine or Google Kubernetes Engine you can grant Storage Write permission to the instance or cluster, or restrict access more specifically using a service account.
You can also set the application credentials with the environment variable BUILDKITE_GS_APPLICATION_CREDENTIALS. From Agent v3.15.2 and above you can also use raw JSON with the BUILDKITE_GS_APPLICATION_CREDENTIALS_JSON variable. See the Managing Pipeline Secrets documentation for how to securely set up environment variables.
If you are using any of the non-public predefined Access Control Lists (ACLs) to control permissions on your bucket, you won't have automatic access to your artifacts through the links in the Buildkite web interface. Artifacts will inherit the permissions of the bucket into which they're uploaded. You can set a specific ACL on an artifact:
export BUILDKITE_GS_ACL="publicRead"
If you need to be authenticated to view the objects in your bucket, you can use Google Cloud Storage's cookie-based authentication:
export BUILDKITE_GCS_ACCESS_HOST="storage.cloud.google.com"
To use your own authenticating proxy for access control, set your proxy's domain as the access host:
export BUILDKITE_GCS_ACCESS_HOST="myproxyhost.com"
If your proxy does not follow default GCS artifact path conventions, for example, not including the bucket name in the URL, you can override the artifact path.
To override the default path, export the environment variable BUILDKITE_GCS_PATH_PREFIX:
export BUILDKITE_GCS_PATH_PREFIX="custom-folder-structure/"
The above variable export will cause the artifact path to use your custom prefix instead of the GCS_BUCKET_NAME:
# default path
${BUILDKITE_GCS_ACCESS_HOST}/${GCS_BUCKET_NAME}/${ARTIFACT_PATH}

# using the BUILDKITE_GCS_PATH_PREFIX environment variable
${BUILDKITE_GCS_ACCESS_HOST}/custom-folder-structure/${ARTIFACT_PATH}